How To Draw A Rose: Simple Steps For A Stunning Flower Sketch
Learning how to draw a rose can feel a bit scary for folks just starting out, you know, like it's a really complex thing to do. Many people look at a rose, with all its delicate petals and curves, and think it’s too difficult to put on paper. But honestly, it does not have to be that way at all. This guide is here to show you that creating a lovely rose drawing is actually quite achievable, even if you are just picking up a pencil for the first time. We are going to walk through each part together, making sure you feel good about every line you make.
Roses, in a way, are often thought of as a sign of deep affection and passion, which is that, just one reason why they are so popular. They are truly beautiful and quite breathtaking to observe, whether in a garden or as a gift. If you happen to not have a green thumb for growing real flowers, you can still create a truly amazing rose right there on your paper, which is pretty cool, actually. This tutorial will help you bring that beauty to life, giving you a sense of accomplishment with your art.
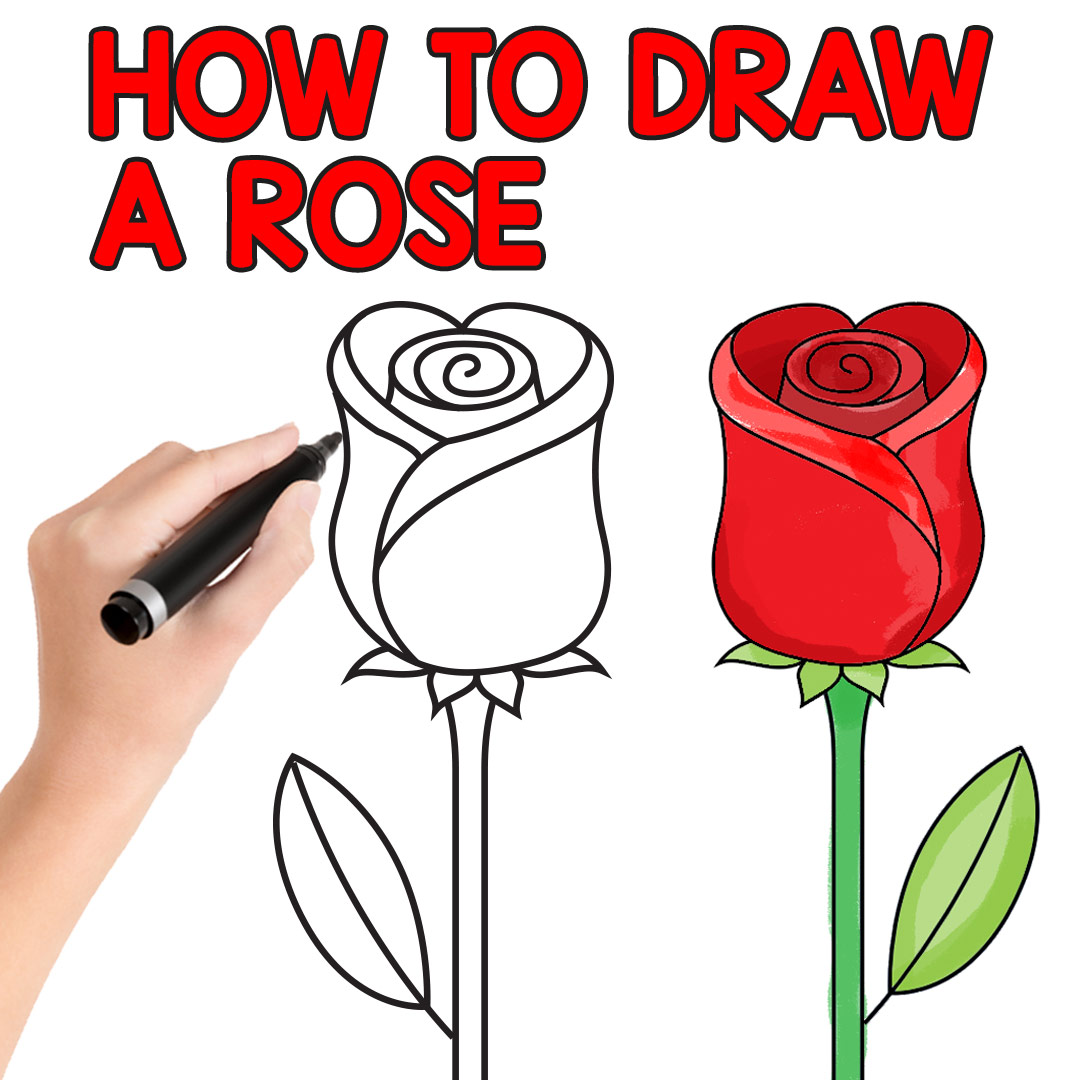
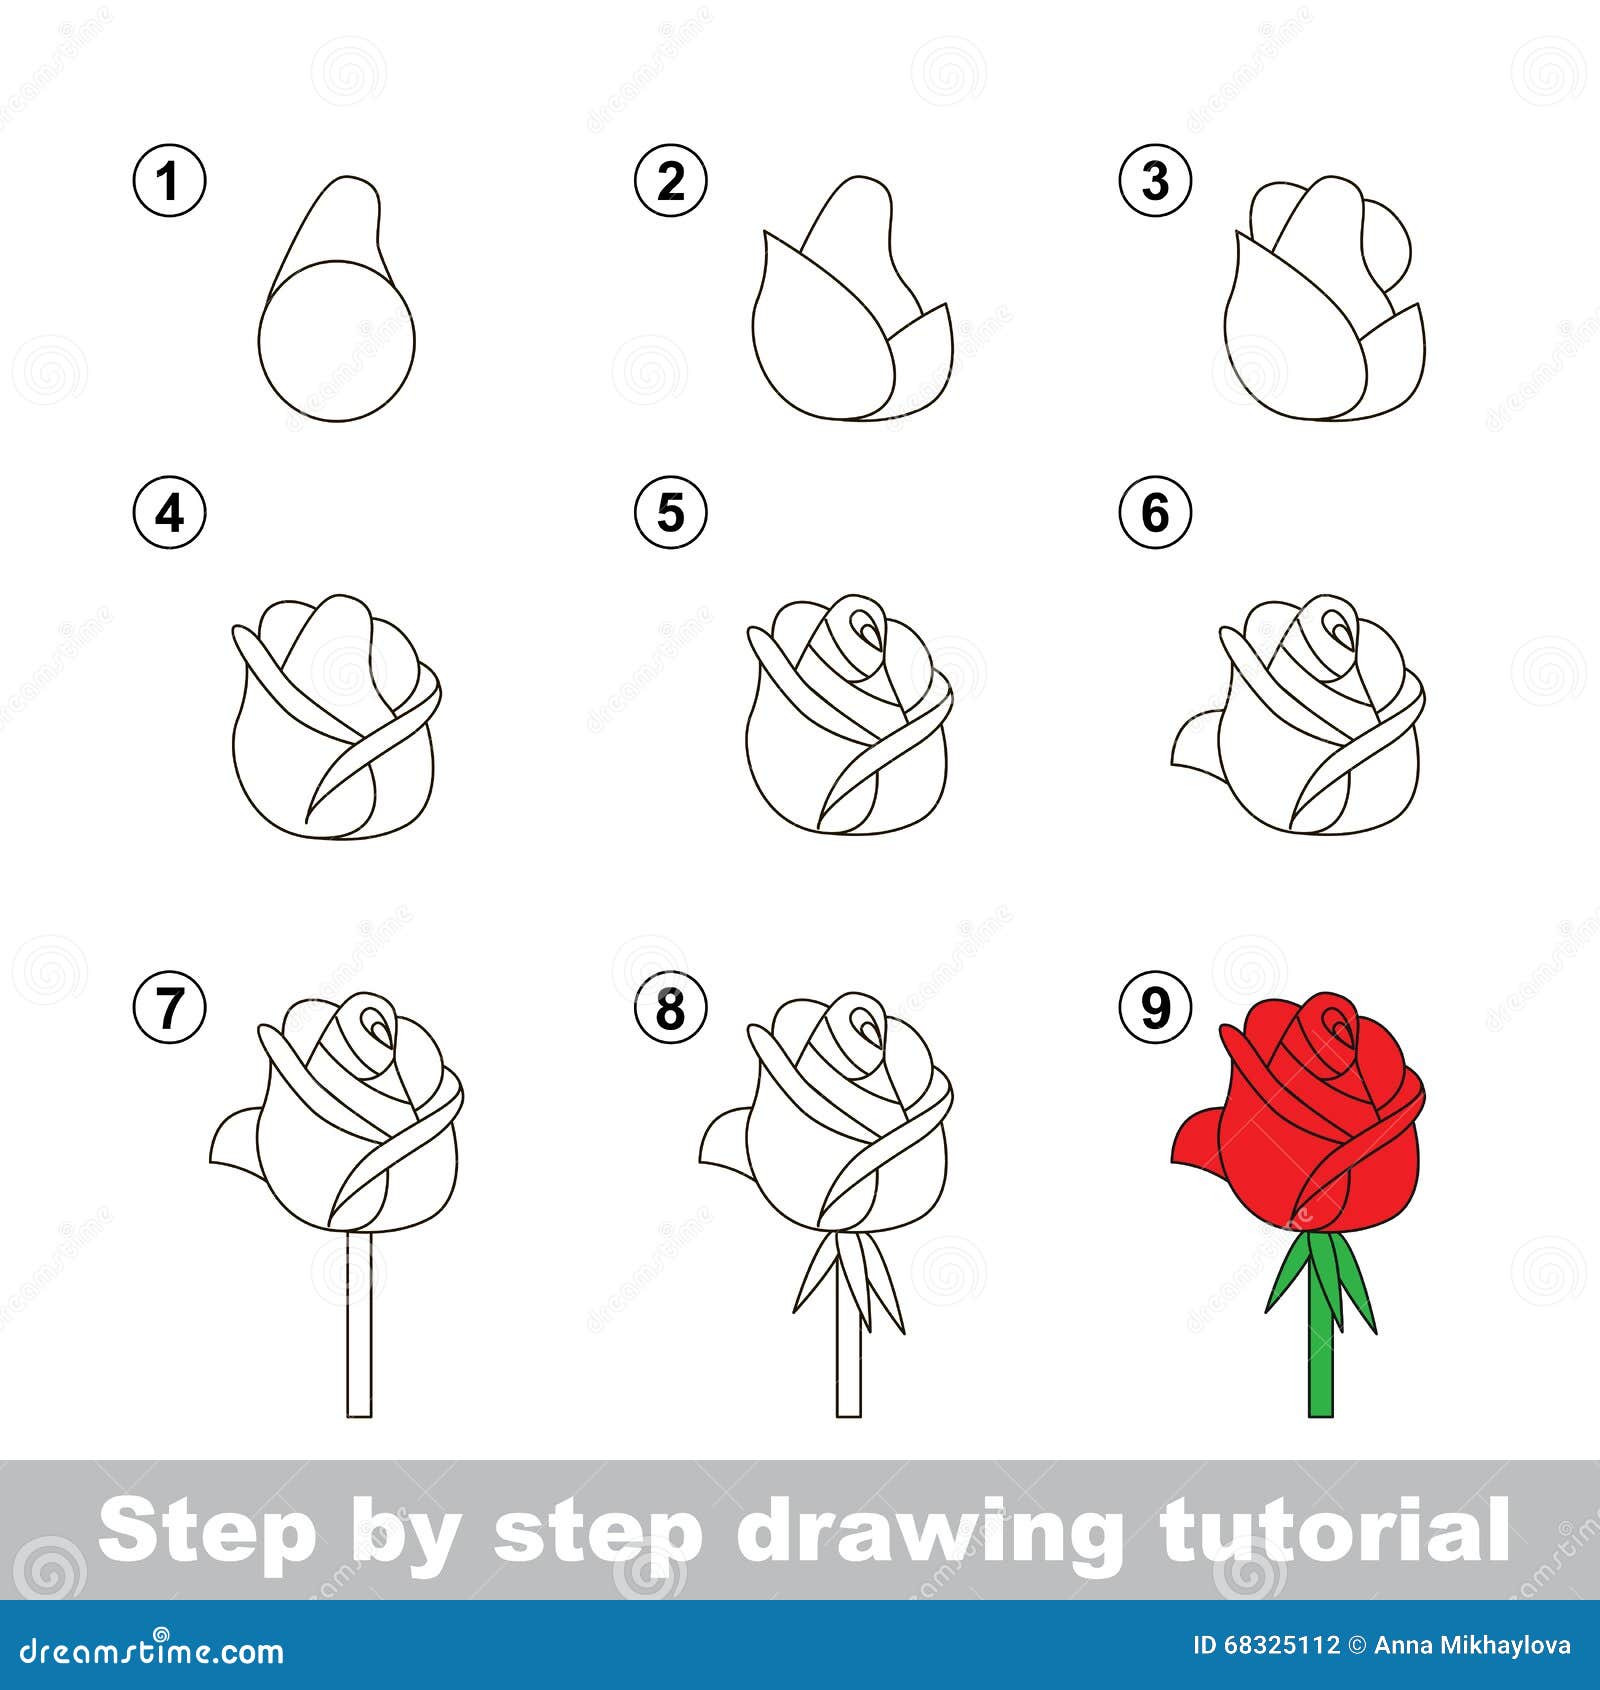
This easy to follow rose tutorial makes drawing this beautiful flower super easy, making it perfect for beginners as well as kids, so you see, anyone can try it. We will explain how to draw a realistic rose step by steps with detailed pencil illustrations as examples for each step, which really helps. With just a few simple shapes and some guidance, you will be drawing beautiful roses very quickly. You will be ready to draw roses that impress, using these simple drawing guides that move from easy designs to a more complex, realistic look, which is perfect for artists at any level, honestly.
- Henry Günther Ademola Dashtu Samuel
- Cách Tạo Tài Khoản Flow
- Kanye West And Bianca Censori
- Translate The Correct Sentences From Exercise 2 Into Your Language
- Sophie Rain Spiderman Video Tutorial
Table of Contents
- Getting Ready to Draw Your Rose
- Gathering Your Art Supplies
- Starting Your Rose Sketch: The Basic Shape
- Building the Rose's Heart: The Center Petals
- Expanding the Bloom: Adding More Petals
- Giving Your Rose Structure: The Stem and Leaves
- Adding Depth and Life: Shading Your Rose
- Making Your Rose Unique: Personal Touches
- Tips for a More Beautiful Rose Drawing
- Common Questions About Drawing Roses (FAQ)
Getting Ready to Draw Your Rose
Before you even pick up a pencil, it is a good idea to get your mind in the right place, you know. Drawing should be a fun and rewarding process, not something that makes you feel stressed. This easy rose drawing tutorial shows the steps to create a realistic flower sketch, and it is all about enjoying the journey. Whether you are a beginner using traditional tools like pencil and paper, or you prefer working with digital art tools, the basic steps are quite similar, which is helpful. So, just take a deep breath and prepare to create something lovely.
Gathering Your Art Supplies
You do not need a lot of fancy equipment to learn how to draw a rose, which is pretty great. Basic supplies you have around the house will often do the trick. For a pencil drawing, you will typically want a few things. First, a good pencil, maybe a regular HB for outlines and a softer one like a 2B or 4B for shading, that is if you have them. Then, some paper, any kind will work for practice, but smoother paper helps with finer details. You will also want an eraser, a kneaded eraser is really good for lifting graphite gently, but a regular one works too. And sometimes, a blending stump or just your finger can help smooth out shadows, so, just keep that in mind.
Starting Your Rose Sketch: The Basic Shape
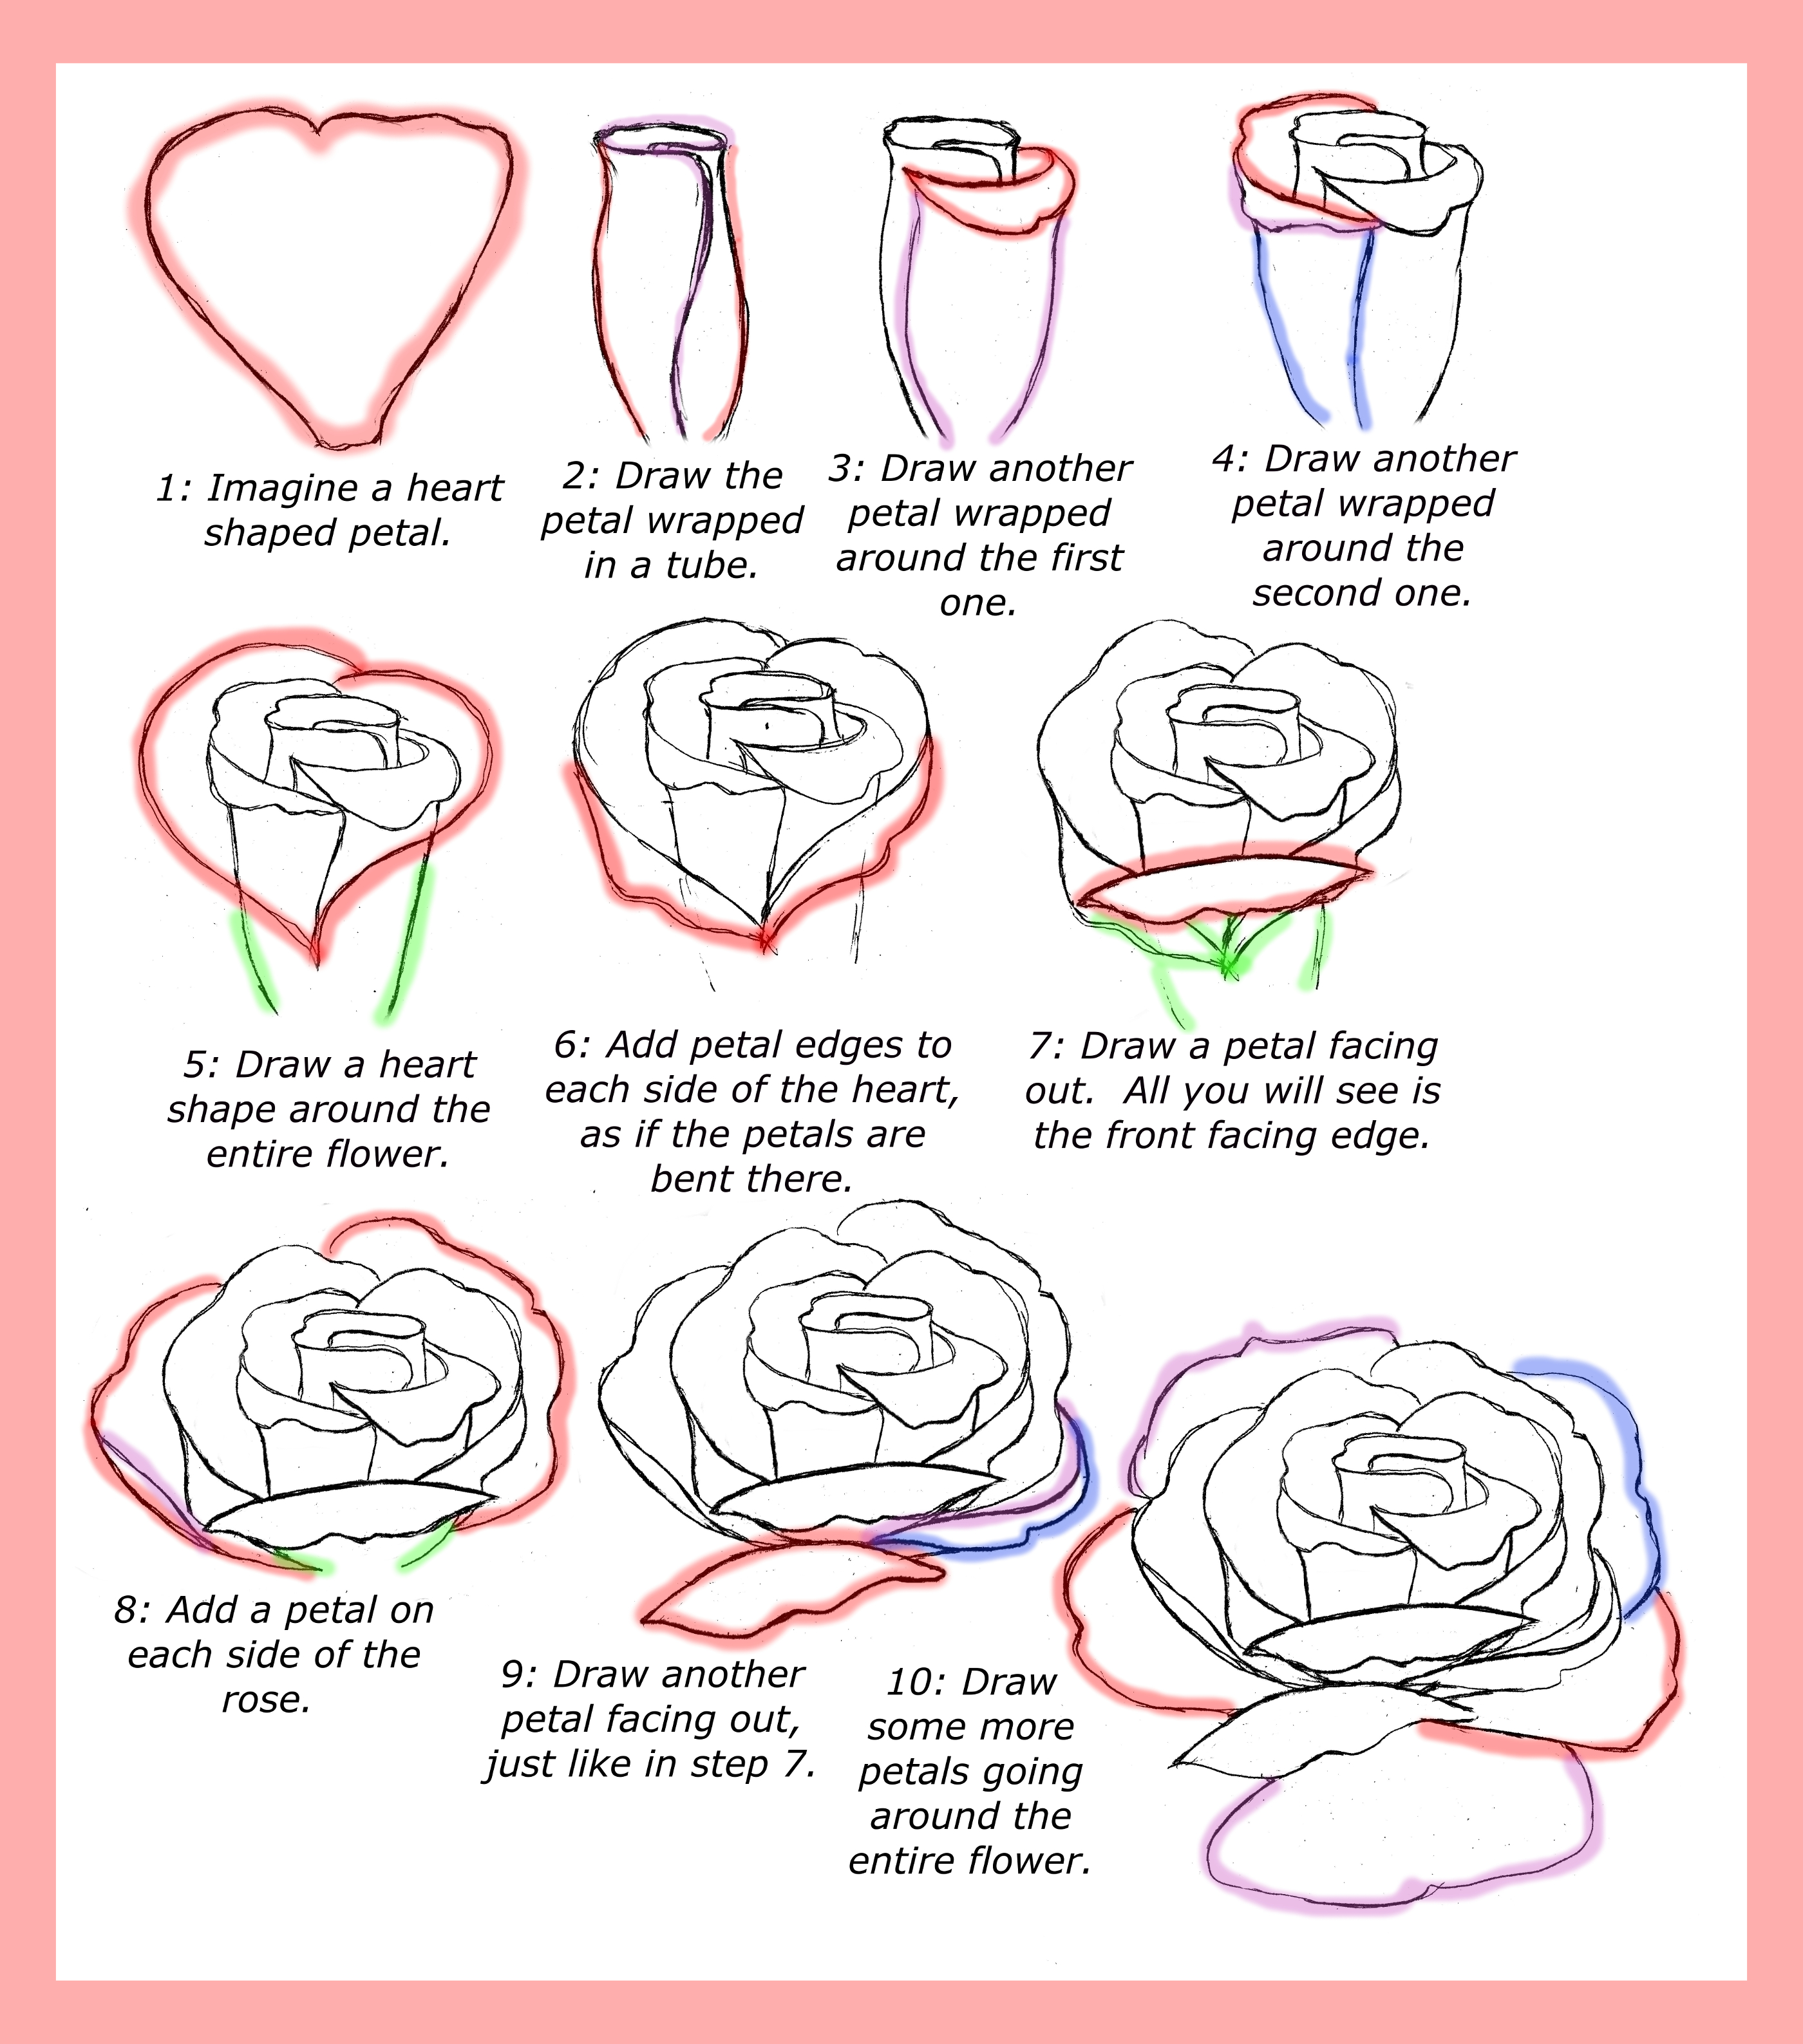
Every beautiful rose begins with some very simple shapes, honestly. We are going to start by sketching out the main form of your rose. Think of it like building a foundation for a house. You will want to draw a light oval or a somewhat rounded shape for the top part of the flower, which will be the full bloom. Then, below that, draw a slightly curved line for the stem. These initial marks should be very light, almost barely visible, because you will be erasing them later. This step is just about getting the general placement and size right, which is actually quite important.
- Fruit Of The Loom Cornucopia
- Taco Bell Steakhouse Burrito
- Is Michael Jackson Still Alive
- What Happened To Rachael Ray
- John Tee Artist
For instance, you might make the oval a little wider if you want a more open rose, or a bit narrower for a tighter bud. The stem can be short or long, depending on what you imagine for your flower. Do not press too hard with your pencil here, as a matter of fact. It is all about gentle guidance, getting a feel for the space on your paper. This simple starting point makes drawing this beautiful flower super easy, which is a real bonus for beginners, you know.
Building the Rose's Heart: The Center Petals
Now, let us get to the very core of the rose, the tightly wound center. This part is often like a small, swirling cup. You will draw a small, somewhat irregular spiral or a series of overlapping, curved lines right in the middle of your initial oval shape. Think of it as a tiny, rolled-up scroll. These lines should not be perfect, because, well, natural petals are not perfect either. This is where the rose truly starts to take its shape, and it is pretty exciting, actually.
You might want to make these inner lines a little darker than your initial outline, so they stand out a bit more. Remember, we are building this rose layer by layer. This central part gives the rose its characteristic depth and structure. With just a few strokes you will be drawing beautiful roses, and this is where those strokes really begin to count. It is like the secret to making your rose look alive, in a way.
Expanding the Bloom: Adding More Petals
Once you have that center, you can start adding the surrounding petals, making the rose flower in full bloom. These petals will curve around the central part, overlapping each other. Imagine layers of fabric gently folding. Each petal will be a soft, curved shape, almost like a heart or a teardrop, but with very soft edges. You will draw them coming out from the center, getting larger as they move outwards. This is where your rose really starts to open up, you see.
Try to vary the size and direction of these petals a bit. Some might overlap a lot, while others might show more of their individual shape. This variation adds a lot of realism to your drawing, you know. Keep your lines light at first, so you can easily adjust them. This step-by-step approach makes drawing this beautiful flower super easy, making it perfect for beginners as well as kids, which is really what we are going for here.
You will continue to add these petal shapes, working your way around the central form. Think about how a real rose looks; its petals are not all the same, and they have a natural flow to them. Some petals might curl at the edges, or perhaps show a little bit of their underside. This layering is key to creating that lush, full-bloom look. Honestly, it is quite satisfying to see the flower grow on your paper.
As you add more layers, you can start to define the outer edge of your rose. These outer petals are often larger and more open, sometimes even slightly flattened. They help give the rose its overall roundness and volume. You might find yourself drawing lines that suggest the curve of a petal, even if you do not draw the whole thing. This kind of implied detail is really powerful, you know, in making your drawing look complete. Learn how to draw a rose in 8 steps using these easy step by step instructions, and this part covers several of those steps, actually.
Giving Your Rose Structure: The Stem and Leaves
A rose is not just its petals; it also has a stem and some lovely leaves, as a matter of fact. Go back to that initial curved line you drew for the stem and make it a little more defined. You can make it slightly thicker, giving it some presence. Then, you can add some small, pointed shapes along the stem for thorns. These do not have to be too detailed, just little triangles or sharp bumps will do the trick, in a way.
For the leaves, think of them as having a somewhat oval shape with serrated, or jagged, edges. Roses typically have compound leaves, meaning several leaflets grow from one stem, so you might draw a group of three or five small leaves together. Make sure to add a central vein and some smaller veins branching out on each leaf. This adds a lot of life to your drawing, you know. These details really help ground your rose and make it feel like a real plant, which is pretty neat.
You can place the leaves strategically to balance your composition. Maybe one leaf peeks out from behind the flower, and another is lower down the stem. This kind of placement makes the drawing feel more natural and less stiff. With just a few simple shapes and some thought, you can create a complete and beautiful rose. It is all part of the process of learning how to draw a rose with pencil, which is really rewarding.
Adding Depth and Life: Shading Your Rose
Shading is what truly brings your rose to life, giving it a three-dimensional look. Without shading, your drawing might look a bit flat. The idea is to show where light hits the petals and where shadows fall. Think about a light source; is it coming from the top, the side, or somewhere else? The areas furthest from the light, or where petals overlap, will be darker. The areas facing the light will be lighter, or even have highlights, you know.
Use your pencil to apply lighter pressure for soft shadows and more pressure for deeper, darker areas. The inner parts of the rose, where the petals are tightly packed, will generally be darker. As the petals open up and catch more light, they will become lighter. You can use a blending tool or your finger to gently smooth out the graphite, creating soft transitions between light and shadow. This easy rose drawing tutorial shows the steps to create a realistic flower sketch, and shading is a big part of that realism, frankly.
Pay attention to the curves of the petals. Shading helps define these curves, making some parts appear to recede and others to come forward. For instance, the underside of a curled petal will likely be darker than the top surface. Do not be afraid to build up your layers of shading gradually. It is better to start light and add more darkness slowly than to go too dark too quickly, which is a common thing, actually. This detailed pencil illustration as examples for each step of shading can really make a difference, you know.
Even the stem and leaves can benefit from a little shading. A bit of shadow on one side of the stem, and some darker areas under the leaves, will make them pop. This step is about adding texture and volume, making your rose look like it could almost be picked from a garden. It is a fun and rewarding process, seeing your drawing gain so much life. Learning how to draw a rose with these step by step instructions really helps you get to this level of detail.
Making Your Rose Unique: Personal Touches
While following steps is great for learning, making your rose drawing your own is also a wonderful part of the process, you know. Once you get comfortable with the basic structure, you can start to experiment. Maybe you want to draw a rosebud instead of a full bloom, or perhaps a rose with dew drops on its petals. You could even try adding a small insect, like a ladybug, resting on a leaf. These personal touches make your artwork truly yours, which is pretty cool.
You might also experiment with different drawing tools. While pencil is a great starting point, you could try colored pencils, charcoal, or even digital brushes once you feel ready. Each medium brings its own unique qualities to the drawing. The final drawing will be a rose in full bloom, but it will be *your* rose, reflecting your style and choices. This easy to follow rose tutorial makes it perfect for, well, anyone who wants to add their own flair, you see.
Think about the background, too. A simple, blurred background can make your rose stand out even more. Or, you could place your rose in a vase, or as part of a larger floral arrangement. The possibilities are quite vast, actually. This kind of creative freedom is what makes drawing so enjoyable and gives you a chance to express yourself. Ready to draw roses that impress? These guides progress from easy designs to complex realism, which is perfect for artists at any level, honestly.
Tips for a More Beautiful Rose Drawing
- Start Light, Build Up Dark: Always begin your sketches with very light lines. It is much easier to erase and correct light lines than dark, heavy ones. You can always add more pressure later to darken your drawing, you know.
- Observe Real Roses: If you have access to a real rose, take some time to look at it closely. Notice how the petals curl, how they overlap, and where the shadows naturally fall. This observation is a powerful learning tool, as a matter of fact.
- Practice Different Petal Shapes: Not all petals are the same. Practice drawing various curves and folds to give your rose a more natural and organic look. This variation adds a lot of character, you see.
- Do Not Aim for Perfection: Nature is not perfect, and neither should your drawing be. Embrace the slight irregularities; they often make your rose look more authentic and charming, which is pretty true.
- Use a Variety of Pencils: If you have them, using a range of pencils (like HB for light lines, 2B for mid-tones, and 4B or 6B for dark shadows) can greatly improve your shading. This helps create depth, in a way.
- Take Breaks: Sometimes stepping away from your drawing for a few minutes and then coming back with fresh eyes can help you spot areas for improvement. It is a good practice, honestly.
- Learn more about drawing techniques on our site.
Common Questions About Drawing Roses (FAQ)
People often have questions when they are learning something new, especially something like drawing a rose. Here are a few common ones, which is pretty helpful, actually.
Is it hard to draw a rose?
Learning how to draw a rose can be intimidating for beginners, but it is not hard once you know the steps. This tutorial explains how to draw a realistic rose step by steps with detailed pencil illustrations as examples for each step, making it much easier. With the right guidance and a bit of practice, anyone can create a lovely rose drawing, which is the honest truth.
What is the easiest way to draw a rose?
The easiest way to draw a rose is by breaking it down into simple shapes and building it up layer by layer. Starting with a basic oval and then adding the central spiral, followed by overlapping petals, makes the process much more manageable. This how to draw a rose step by step tutorial makes drawing this beautiful flower super easy, making it perfect for beginners as well as kids, you know.
How do you draw a rose for kids?
For kids, focus on the very basic shapes and keep the details minimal. Start with a simple spiral for the center, then add a few large, curved petals around it. A simple stem and a couple of leaves are enough. The goal is to make it fun and accessible, so they feel good about their drawing. This easy to follow rose tutorial makes it perfect for, well, anyone, including younger artists, as a matter of fact.
So, there you have it, a clear path to creating your own beautiful rose drawing. Remember, drawing a rose might seem tricky, but with the right steps, it’s a fun and rewarding process. You do not need a green thumb to create a rose on paper; just a pencil and some willingness to try. Keep practicing, and you will see your skills grow with every flower you draw. You can always find more inspiration and tips, perhaps by looking at art from other creators, like the fantastic work found on ArtStation, which is a great place to see what other artists are doing. And if you are looking for more drawing guides, you can always find more tips on our drawing tips page, too, which is pretty useful.
- Kelsey Chow Movies And Tv Shows
- Dairy Queen Grill Chill
- Descargar Video De Instagram
- Bhad Bhabie Leaked
- Lia Engel Leaks
How To Draw A Rose Step By Flower Drawing Tutorial | Best Flower Site
Drawing Tutorial. How To Draw A Rose Stock Vector - Image: 68325112
How To Draw Roses - Happy Family Art
