Safely Remove Gel Nail Polish At Home: Your Expert Guide For Healthy Nails
Are you finding yourself with a beautiful gel manicure that has, you know, overstayed its welcome, but you just don't have the time to go to the salon for a removal? It's a pretty common situation, honestly. Many people wonder how to safely remove gel nail polish at home without causing any damage to their natural nails.
Well, good news! You can absolutely take off your gel polish right at home, and it doesn't have to be a big, scary ordeal. This post will teach you how to remove gel polish at home to save you time and money, which is, like, a huge bonus for busy schedules. Our simple gel nail removal guide will give you a fresh start while keeping your nails healthy, too.
You might be wondering how to remove gel nail polish at home without destroying your nails, and that's a very valid concern. We asked three nail experts to break down the six steps and products you need to get the job done right. This expert advice will minimize the damage and keep your nails healthy, which is, you know, the main goal.
- Eso Si Que Es
- Jennifer Hudson And Common
- South Carolina Gamecocks Womens Basketball
- Bengali Viral Mms
- 1 0 6 And Park
Table of Contents
- Why Learn How to Remove Gel Nail Polish at Home?
- The Right Tools Make All the Difference
- Step-by-Step Guide: How to Remove Gel Nail Polish Safely
- Expert Tips for a Damage-Free Removal
- Common Mistakes to Avoid When Removing Gel Polish
- Frequently Asked Questions About Gel Nail Removal
Why Learn How to Remove Gel Nail Polish at Home?
There are, you know, quite a few reasons why taking off your gel manicure at home makes a lot of sense. For one thing, it definitely saves you a trip to the salon, which can be a real time-saver when your schedule is, well, packed. That's a pretty big deal for many people these days.
Another major benefit is the money you'll keep in your pocket. Salon removals, you know, they do add up over time. Learning this skill at home means fewer expenses, which is, honestly, a smart financial move if you get gel manicures often. It's a pretty practical approach, really.
Perhaps most importantly, learning how to remove gel nail polish at home safely helps protect your natural nails. Peeling off your gel manicure might be tempting, but there are safer ways to go about it, as a matter of fact. This guide ensures you don't turn your fingertips into a crime scene, which is, like, a relief for everyone.
- Los Cerritos Mall Cerritos
- Remoteiot Vpc Ssh Windows 10 Without
- Bhad Bhabie Net Worth
- Lee Lucas From Baton Rouge
- Thank You In Spanish
The Right Tools Make All the Difference
To remove your gel polish quickly, thoroughly, and, above all, safely, you need the right tools. It's not that difficult, but having the proper items on hand makes the whole process much smoother. Here’s what you'll need, you know, to get started.
- Coarse Nail File or Buffer: This is for gently filing off the top layer of your gel polish. You want something that will effectively, you know, break the seal.
- 100% Acetone: This is the key ingredient for dissolving gel polish. Make sure it's pure acetone, not just regular nail polish remover, which is, you know, weaker.
- Cotton Balls or Pads: These will hold the acetone against your nails. You'll need enough for each finger, actually.
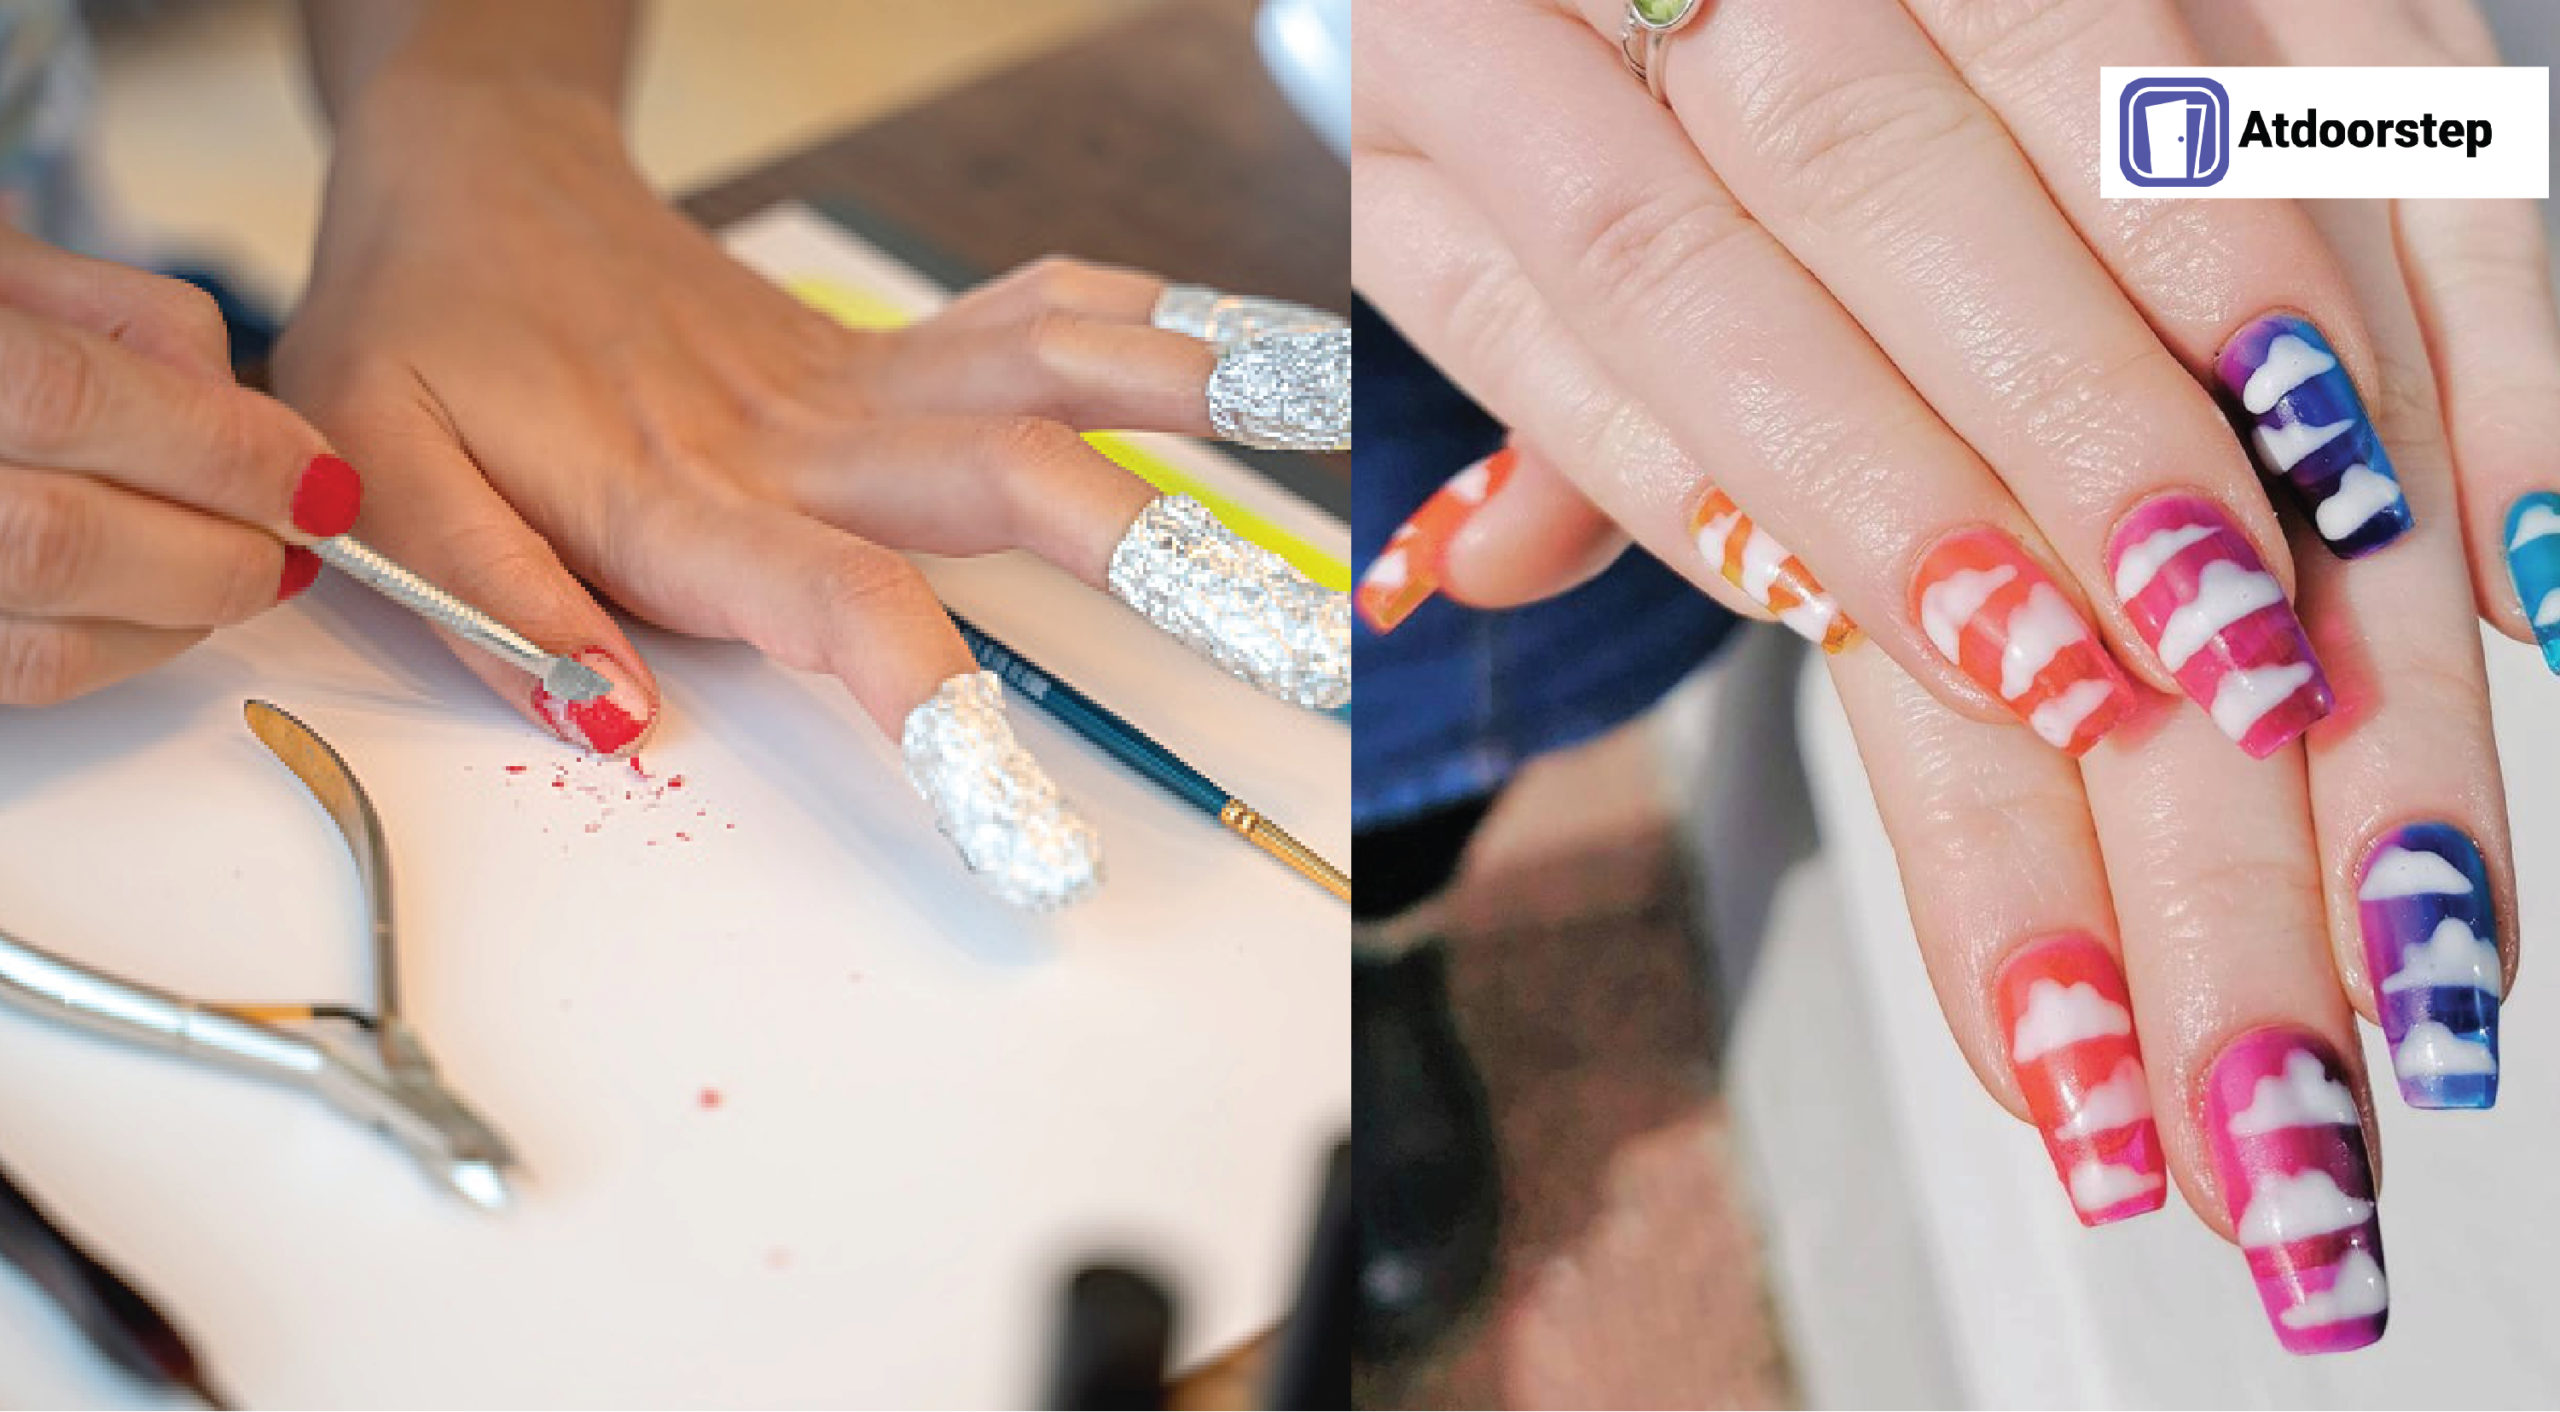
- Aluminum Foil: Cut into small squares, these will wrap around your fingers to keep the cotton in place and, you know, seal in the acetone.
- Orange Wood Stick or Cuticle Pusher: This is for gently pushing off the softened gel polish. You really don't want to use anything sharp or metal that could scratch your nail bed.
- Nail Buffer (Fine Grit): For smoothing out your nails after removal, so, you know, they look nice.
- Cuticle Oil: Essential for rehydrating your nails and surrounding skin after the acetone exposure. This is, like, super important.
- Hand Cream or Lotion: For overall skin hydration, because, you know, acetone can be drying.
Having all these items ready before you start will, honestly, make the removal process much less stressful. It's a pretty good idea to lay everything out, actually, so you're not scrambling mid-way through. This preparation really helps, you know, ensure a smooth experience.
Step-by-Step Guide: How to Remove Gel Nail Polish Safely
Ready to give it a shot? Dermatologist Shari Lipner, MD, FAAD, shares her secret for removing gel nail polish at home, and other nail experts agree on these steps. Here’s how you can do it safely without damaging your nails, you know, for real.
Step 1: Gently Break the Seal
First things first, you need to gently file the top coat of your gel manicure. Use a coarse nail file or a buffer to lightly buff the surface of each nail. The goal here is just to remove the shine, not to file down to your natural nail, which is, you know, a common mistake.
This step creates tiny openings in the gel polish, allowing the acetone to penetrate and do its job more effectively. It's a pretty important initial action, actually, for the whole process. Just a little buffing is all you need, so, you know, don't overdo it.
If you skip this step, the acetone will have a much harder time getting through the top layer, and your soaking time will be, well, significantly longer. So, it's worth taking a moment to do this part right, you know. It really helps the next steps work better.
Step 2: Protect Your Skin
Acetone, while effective for removing gel, can be quite drying to your skin. Before you apply the acetone, put a generous amount of cuticle oil or even petroleum jelly around your cuticles and the skin surrounding your nails. This creates a protective barrier, which is, you know, pretty smart.
This barrier helps shield your skin from the harsh effects of the acetone, minimizing dryness and irritation. It's a small step that makes a pretty big difference in how your hands feel afterward, honestly. Your skin will thank you, basically.
You want to make sure you get good coverage around the entire nail area. A little extra protection here goes a long way, so, you know, don't be shy with the oil. It’s a pretty simple way to keep things comfortable.
Step 3: Soak It Off
Now, take a cotton ball or pad and saturate it completely with 100% acetone. Place the soaked cotton directly onto your buffed nail, making sure it covers the entire surface of the gel polish. This is, you know, where the real work begins.
Once the cotton is in place, wrap a small square of aluminum foil tightly around your fingertip, securing the cotton ball firmly against your nail. The foil helps to, you know, keep the acetone from evaporating too quickly and holds the heat in, which aids in the removal process. Do this for all ten fingers.
You can also use specialized gel removal clips if you have them, which are, like, reusable and often a bit more comfortable than foil. Either way, the goal is to keep that acetone in close contact with the gel for a good amount of time, you know. It's all about consistent contact.
Step 4: Time for Patience
This is, honestly, the most crucial part: waiting. Allow your nails to soak for at least 10 to 15 minutes. For some stubborn gel polishes, you might need to wait a little longer, perhaps up to 20 minutes, you know, depending on the brand and thickness.
Resist the urge to peek or remove the foil too early. The acetone needs ample time to break down the gel polish properly. If you rush this step, you'll end up having to re-soak, which, you know, just prolongs the whole process. Patience really is a virtue here.
During this waiting period, you might feel a slight tingling sensation, which is pretty normal. If you experience any intense burning or discomfort, however, remove the foil and cotton immediately and rinse your hands, as a matter of fact. Safety first, always.
Step 5: Softly Scrape Away
After the soaking time is up, remove one foil wrap and cotton ball at a time. You should see the gel polish looking, you know, bubbly, lifted, or even flaky. This is a good sign; it means the acetone has done its job. It's pretty satisfying to see, actually.
Using an orange wood stick or a cuticle pusher, very gently push the softened gel polish away from your nail plate. Start from the cuticle area and work your way towards the tip. The gel should come off fairly easily, without much force, you know. If it doesn't, that's a sign.
If you encounter any stubborn spots that don't budge easily, do not force it. Re-soak that particular nail for another 5 to 10 minutes with fresh acetone and cotton. Forcing the gel off can damage your natural nail, which is, you know, what we are trying to avoid. Take your time with each nail, basically.
Step 6: Nourish and Hydrate
Once all the gel polish is removed from your nails, you'll want to gently buff away any remaining residue with a fine-grit buffer. This will smooth out your nail surface, so, you know, it feels nice and even. Be very light-handed here, really.
After buffing, wash your hands thoroughly to remove any acetone residue. Then, it's time to reintroduce moisture. Apply a generous amount of cuticle oil to each nail and massage it into your cuticles and nail beds. This helps to replenish the oils lost during the acetone exposure, which is, like, super important for nail health.
Follow up with a rich hand cream or lotion to hydrate your entire hands. Your nails and skin will likely feel a bit dry after this process, so giving them some much-needed moisture is, you know, pretty crucial. Consider giving your nails a break before applying another manicure, too, to let them breathe and recover.
Expert Tips for a Damage-Free Removal
To ensure your nails stay healthy, there are a few extra bits of advice from the pros. Dermatologist Shari Lipner, MD, FAAD, emphasizes the importance of patience, which is, you know, a recurring theme. She stresses that rushing the process is often where damage occurs, as a matter of fact.
Many nail experts agree that the biggest mistake people make is peeling or prying off the gel. This action strips away layers of your natural nail along with the gel, leading to thin, brittle, and damaged nails. It's really not worth the temporary satisfaction, you know.
Another key tip is to always use 100% pure acetone. Regular nail polish removers often contain less acetone or other ingredients that aren't strong enough to break down gel polish effectively. This means you'll end up soaking for much longer, which, you know, exposes your nails to more chemicals than necessary.
Keeping your nails hydrated before, during, and after gel manicures is also, like, a big deal. Consistent use of cuticle oil helps to maintain the health and flexibility of your nails, making them less prone to breakage, which is pretty good. You can learn more about general nail care from trusted sources, too, if you're interested.
Finally, if your nails feel particularly weak or damaged after removal, give them a break from polish altogether. Let them breathe and recover for a week or two, using plenty of cuticle oil and a good nail strengthener. This recovery period is, honestly, very beneficial for long-term nail health.
Common Mistakes to Avoid When Removing Gel Polish
Knowing what not to do is just as important as knowing what to do when you're taking off gel polish at home. Avoiding these common pitfalls will help keep your nails strong and healthy, which is, you know, the main goal here. It's pretty straightforward, really.
One of the biggest no-nos is trying to peel or pick off your gel manicure. As mentioned, this rips off layers of your natural nail, causing serious thinning and weakening. It’s, like, the quickest way to ruin your nail health, honestly. Just don't do it, basically.
Another mistake is using tools that are too harsh or sharp, like metal files or scrapers, to remove the softened gel. These can easily scratch and damage your nail plate, creating ridges or even infections. Stick to orange wood sticks or plastic cuticle pushers, which are, you know, much gentler.
Skipping the hydration step is also a pretty common oversight. Acetone is very drying, and if you don't follow up with cuticle oil and hand cream, your nails and skin will become brittle and prone to cracking. This is, you know, easily preventable with a little care.
Not soaking long enough is another frequent error. If the gel isn't bubbling or lifting easily, it means it needs more time in the acetone. Forcing it off when it's still hard will, you know, only lead to damage. Patience, as we've said, is truly key here.
Using regular nail polish remover instead of 100% acetone is also a mistake. These removers aren't formulated to break down gel polish, so they'll be ineffective and just prolong the process, exposing your nails to chemicals for longer periods. Always check the label for pure acetone, you know.
Finally, forgetting to protect your surrounding skin with oil or petroleum jelly can lead to dryness and irritation. This little step makes a huge difference in how comfortable your hands feel during and after the removal process, so, you know, don't skip it.
Frequently Asked Questions About Gel Nail Removal
People often have questions about how to remove gel nail polish, especially when doing it at home. Here are some answers to common queries that, you know, pop up a lot.
How long does it take to remove gel polish at home?
Typically, the entire process takes about 30 to 45 minutes, maybe a little more if you have very stubborn gel or, you know, thick layers. The actual soaking time is usually 10-20 minutes per hand, plus the prep and finishing steps. It's not a super quick thing, but it's faster than, you know, traveling to a salon.
Can I remove gel polish with just nail polish remover?
No, not really effectively. You need 100% pure acetone to properly break down gel nail polish. Regular nail polish removers, even those labeled "gel polish remover," often contain other ingredients and less acetone, making them much less effective. They might soften it a little, but, you know, won't remove it completely without a lot of extra effort and time.
What if my gel polish isn't coming off easily?
If the gel polish isn't coming off easily after the initial soak, that's a clear sign it needs more time. Do not try to force it or scrape it aggressively. Instead, re-saturate a fresh cotton ball with acetone, re-wrap the nail in foil, and soak for another 5 to 10 minutes. This extra time will, you know, usually do the trick. Patience is, honestly, your best friend here.
Learning how to remove gel nail polish at home is a skill that, you know, genuinely empowers you. It gives you the freedom to manage your manicures on your own schedule and save some cash, too. By following these expert tips and using the right tools, you can keep your nails looking and feeling healthy, which is, like, a pretty great outcome.
Whether you're in between salon visits, trying to save money, or just prefer the DIY approach, you can totally achieve a fresh start for your nails without any damage. For more helpful information on keeping your nails in tip-top shape, you can Learn more about nail care on our site. Also, check out our other beauty guides for more home beauty tips. Remember, healthy nails are, you know, always in style!
- Anti Social Social Club
- How Did Coach Wall Die
- Jw Marriott Desert Ridge
- Dairy Queen Grill Chill
- Passion Fruit In Spanish
Gel nail Polish removal guide | ATDOORSTEP Blogs

How to Remove Gel Nail Polish (with Pictures) - wikiHow

How to Remove Gel Nail Polish at Home Quickly
