How To Fold A Fitted Sheet: The Simple Way To Tidy Linens
Do you ever look at your linen closet and feel a little overwhelmed by a pile of what seems like shapeless fabric? You are certainly not alone, you know. For many people, figuring out how to fold a fitted sheet can feel like trying to solve a puzzle with too many pieces. That elastic edge, while great for keeping your sheet on the bed, makes traditional folding methods seem, well, rather impossible.
It's time to face your folding fears, honestly. What makes fitted sheets difficult to fold is the fact that they aren’t flat, which is that main reason for the struggle. But what if I told you there's a straightforward method, a trick really, that turns this frustrating chore into a quick, satisfying task? We're going to walk through it together, and you'll have it mastered in no time.
Here, experts share how to fold a fitted sheet, making that messy linen cupboard a thing of the past. We'll show you how to fold a fitted sheet with step-by-step instructions, and you'll be a folding pro in no time, honestly. All you'll need is your fitted sheet and a flat surface, like a table, or even your bed, to get started. It's really that simple, in a way.
- Black People With Blue Eyes
- Who Do You Think You Are I Am
- Hannah Einbinder Partner
- Nicki Minaj Net Worth
- What Does The Fox Say
Table of Contents
- The Mystery of the Fitted Sheet: Why It Feels So Hard
- Getting Ready: Your Folding Station
- Step-by-Step: How to Fold a Fitted Sheet the Easy Way
- Beyond the Fold: Making a Tidy Sheet Set
- Quick Tips for Folding Success
- Frequently Asked Questions About Folding Fitted Sheets
The Mystery of the Fitted Sheet: Why It Feels So Hard
For many, the very thought of folding a fitted sheet brings a slight sigh. It's almost as if they resist being tamed, isn't it? The main problem, as we mentioned, is that fitted sheets aren’t flat. Unlike a simple flat sheet or a pillowcase, they have those elastic edges all around, which are meant to hug your mattress. This design, while practical for sleeping, certainly complicates things when you're trying to create a neat stack in your cupboard. Chances are no one ever taught you how to fold fitted sheets, which is a big part of the challenge, too.
The elastic makes it difficult to find a straight line or a crisp edge, which are usually what we rely on when folding clothes or other linens. You might try to fold it like a regular sheet, only to end up with a crumpled ball, or perhaps a rather lumpy rectangle that just won't stay put. This often leads to frustration and, quite honestly, just shoving them into the cupboard. But there is a better way, a much better way, actually.
Learning the fastest, easiest ways to fold a fitted sheet can truly change your linen closet game. It's about understanding how to work with that elastic, rather than against it. Once you get the hang of it, you'll wonder why you ever struggled. It’s a skill that, honestly, brings a surprising amount of satisfaction to your home organization efforts. This simple method means no more messy sheets in the linen cupboard, which is really quite a relief.
- Bhad Bhabie Leaked
- Ripple Ceo Brad Garlinghouse Xrp Tattoo
- Riley Green Wife
- Why Are People Boycotting Target
- Bhad Bhabie Net Worth
Getting Ready: Your Folding Station
Before we jump into the steps, let's get our workspace ready. You don't need much, just your fitted sheet and a flat surface. This could be a kitchen table, a bed that’s already made, or even a clean spot on the floor. A flat surface gives you the space to spread out the sheet and really see what you’re doing, which is pretty important. It just makes the whole process so much smoother, you know.
Make sure your sheet is clean and dry, of course. Any dampness can make folding harder and can lead to mildew if stored away. Take a moment to shake out any wrinkles, too, that might have formed in the dryer. A relatively smooth sheet is easier to manage, in some respects, and will give you a neater final result. That's really all the preparation you need for this simple task, honestly.
Having a clear area helps you focus on the movements and allows you to practice without feeling cramped. It’s like setting the stage for a little bit of magic, transforming that unruly fabric into a perfectly folded item. This small step, getting prepared, can make a big difference in how quickly you master the technique, you know, and how much you enjoy the process, too.
Step-by-Step: How to Fold a Fitted Sheet the Easy Way
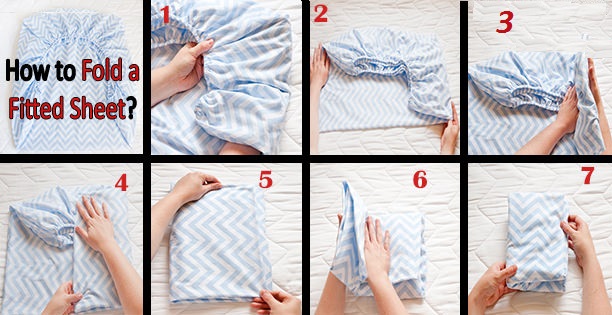
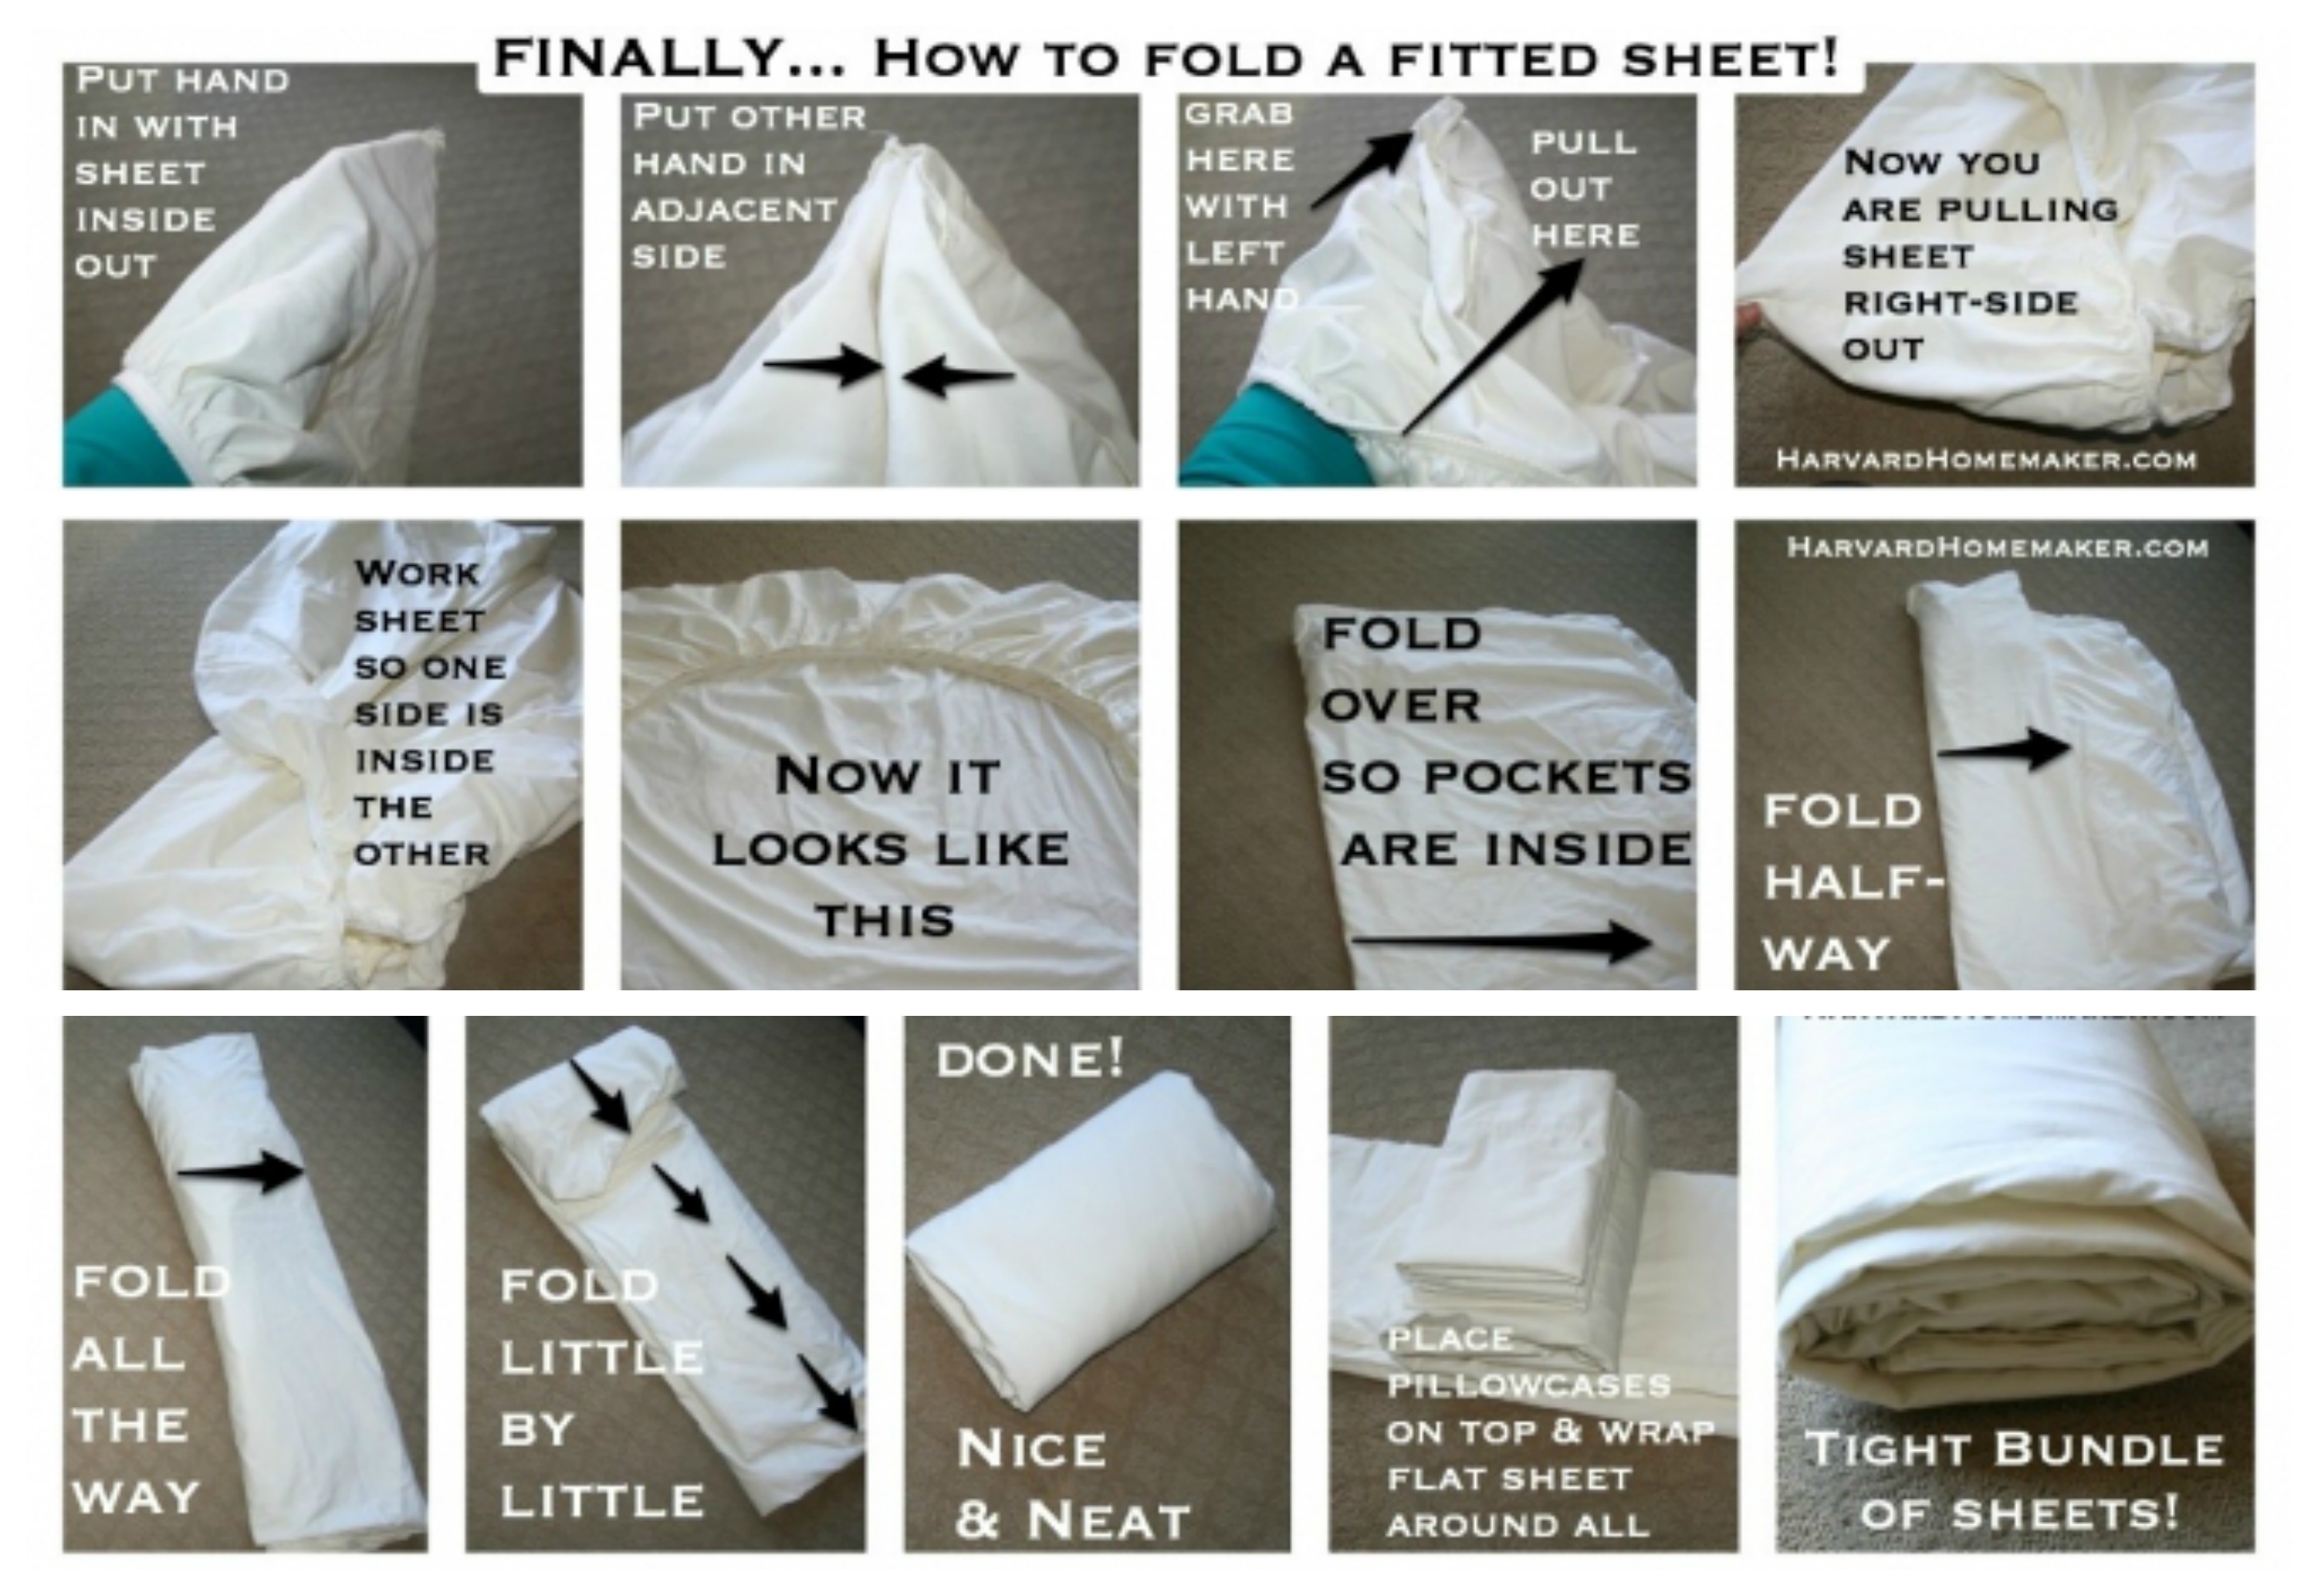
Here we share our five simple steps to neatly fold a fitted sheet with elastic all around in under 60 seconds. The trick to fold a fitted sheet neatly is start by laying it flat with the elastic corners facing up. If you have trouble following along, give the steps a try, and you'll soon see how straightforward it truly is. I'll show you how to fold a fitted sheet with step by step instructions, and you'll have it mastered in no time!
Step 1: Finding Your Corners
Begin by taking your fitted sheet straight from the dryer or laundry basket. Hold it lengthwise, with the two shorter sides at the top and bottom. Now, reach inside the sheet and find one of the top corners. It’s usually easiest to start with the top-right corner, for instance. Put your hand inside that corner, so your fingers are right at the seam where the elastic begins. This is your starting point, more or less.
With your hand still in that first corner, find the other top corner. You'll want to grab this one with your other hand. So, you're holding the sheet by two adjacent corners at the top. This gives you a good sense of the sheet's width and helps you get it oriented correctly. It might feel a little awkward at first, but it sets you up for the next crucial move, you know.
The goal here is to get a good grip on those elasticized corners. Don't worry too much about the rest of the sheet right now; just focus on those two points. This initial setup is key to making the subsequent folds smooth and simple. It's really about getting the sheet ready to be manipulated into a neat shape, actually, so take your time with this part.
Step 2: The Corner Tuck
Now comes the clever part, the real trick, so to speak. With your hands still holding those two top corners, you're going to bring one corner over and tuck it inside the other. Imagine you’re putting one corner on top of the other, but instead of just layering them, you’re actually slipping one right into the pocket of the other. It's almost like putting on a glove, but with sheet corners.
For example, if you're holding the top-right corner in your right hand and the top-left corner in your left, bring your right hand over to your left. Then, slip the top-right corner over and into the top-left corner. The elastic edges should line up pretty well, creating a single, combined corner. This makes the sheet start to form a more manageable shape, which is pretty neat.
You now have two layers of elasticized fabric neatly nested together at one corner. This is what helps eliminate that unruly, shapeless quality of the fitted sheet. This step is arguably the most important, as it transforms the sheet from a floppy mess into something with a more defined edge. It’s a very satisfying moment when those corners click into place, honestly.
Step 3: Creating a Straight Edge
With your two top corners now tucked together, you should have what looks like a single corner. Now, still holding that combined corner, find the corresponding bottom corner on the same side of the sheet. Bring this bottom corner up and tuck it into the combined top corner as well. You're essentially stacking all four corners of one side of the sheet into one neat bundle.
Once all four corners are nested together, you should have a long, somewhat rectangular shape. Lay the sheet flat on your chosen surface. Smooth it out with your hands, making sure those tucked corners stay together. You'll notice that the elastic edge now forms a relatively straight line along one side, which is a big improvement from before. This is where the magic really starts to happen, you know.
Take a moment to really smooth out any bumps or wrinkles. The flatter you get it at this stage, the neater your final fold will be. This step essentially turns the fitted sheet into a more traditional, flat piece of fabric, making it much easier to handle. It's like you're giving the sheet a new, more organized personality, in a way.
Step 4: The Long Fold
Now that you have a long, somewhat rectangular shape with one side featuring that neat, combined elastic edge, it's time to fold it lengthwise. Take one of the long sides and fold it over towards the middle of the sheet. Then, take the other long side and fold it over so that it meets or slightly overlaps the first fold. You're aiming for a long, narrow strip of fabric.
This fold helps to further contain the elastic and create a more uniform shape. Make sure to smooth out the fabric as you go, keeping the edges as straight as possible. You'll notice that the elastic is now mostly hidden within these folds, which is really quite clever. This long, narrow shape is much more manageable than the original, sprawling sheet, isn't it?
You can adjust the width of this long fold based on how you prefer to store your sheets. Some people like a very narrow strip, while others prefer something a bit wider. The key is to keep it consistent and tidy. This step is pretty straightforward, and it really brings you closer to that perfectly folded result, honestly.
Step 5: The Final Folds
With your sheet now a long, narrow rectangle, you're ready for the final touches. You'll typically fold this long strip into thirds or quarters, depending on the size of your sheet and how compact you want it to be for storage. For most sheets, folding it into thirds works really well.
Start by taking one end of the long strip and folding it about a third of the way down. Then, take the other end and fold it over the top of the first fold. This should give you a neat, compact rectangle or square. Again, smooth out the fabric with your hands after each fold to keep it crisp and tidy. You'll be surprised at how professional it looks, you know.
And just like that, you have a perfectly folded fitted sheet! It's a rather satisfying sight, isn't it? This method means your fitted sheets will stack beautifully in your linen cupboard, taking up less space and looking much more organized. You'll be a folding pro in no time, and your linen closet will thank you for it, honestly. Learn more about home organization on our site, and link to this page for more laundry tips.
Beyond the Fold: Making a Tidy Sheet Set
Once you've mastered the art of folding the fitted sheet, you can take your linen organization a step further by creating a tidy sheet set. This means folding the flat sheet and pillowcases in a way that keeps them together with the fitted sheet. It’s a very neat trick that makes finding a complete set so much easier, you know, and really streamlines your laundry day.
After folding your fitted sheet into that neat rectangle, fold your flat sheet to a similar size. You can then place the folded fitted sheet on top of the folded flat sheet. For the pillowcases, fold them in half or thirds, so they also form a compact rectangle. Then, you can either place them on top of the stacked sheets or, for an even tidier look, tuck the entire set inside one of the pillowcases. It’s a rather clever way to keep everything together, actually.
This method of creating a sheet set not only keeps your linen cupboard looking incredibly organized but also saves you time when you're making the bed. You grab one pillowcase, and the whole set is right there, ready to go. It’s a small change that makes a big difference in the overall tidiness and functionality of your bedroom linens, honestly. You'll feel so much more organized, too.
Quick Tips for Folding Success
Practice makes perfect, they say, and that's certainly true for folding fitted sheets. Don't get discouraged if your first few attempts aren't absolutely perfect. Keep trying, and you'll develop a rhythm that works for you. It's really about muscle memory, you know, and getting a feel for the fabric. You'll get there, honestly.
For larger sheets, like king-size, you might find it easier to do the initial corner tucks while the sheet is still partially draped over a surface, rather than trying to hold it all up in the air. This gives you more control over the fabric. Also, if your sheet is particularly thin or slippery, taking a little extra time to smooth it out at each step will make a big difference in the final result, too. Sometimes, a slightly thicker sheet is easier to handle, actually.
Consider the material of your sheets as well. Cotton sheets tend to hold their folds better than very silky or stretchy fabrics. If you have trouble following along, just slow down and focus on each individual movement. You might even find it helpful to watch a quick video demonstration online, just to see the motions in action. A visual guide can sometimes clarify things really well. For more tips on fabric care, you might want to check out this resource: Good Housekeeping's Folding Tips.
Frequently Asked Questions About Folding Fitted Sheets
Why is it so hard to fold a fitted sheet?
It feels so hard to fold a fitted sheet primarily because of its elastic edges, you know. Unlike flat linens, the elastic makes it impossible to lay the sheet completely flat or find perfectly straight, crisp edges to guide your folds. This lack of a traditional rectangular shape often leads to a crumpled or lumpy result, which is why many people find it rather frustrating. It's a design meant for hugging a mattress, not for easy folding, honestly.
Is there an easy way to fold a fitted sheet?
Yes, absolutely! There is a very easy and effective way to fold a fitted sheet, and it involves a specific technique for tucking the elastic corners together. This method, which we've outlined, transforms the sheet from an unruly shape into a more manageable rectangle. Once you master the corner tuck, the rest of the folding process becomes quite similar to folding a regular flat sheet, making it much simpler, honestly. It's really a game-changer.
How do you make a fitted sheet look neat when folded?
To make a fitted sheet look neat when folded, the key is to correctly combine its elastic corners first. By tucking all four elastic corners into one another, you create a relatively straight edge along one side of the sheet. From there, smoothing out the fabric on a flat surface and making consistent, even folds, usually into thirds, will result in a tidy, compact rectangle. This method ensures the elastic is hidden, giving your folded sheet a very clean and organized appearance, which is pretty satisfying, you know.
- Kevin Bacon New Show
- Thank You In Spanish
- What Does Oc Mean
- Stroke It In Spanish
- Daisy Edgar Jones Movies And Tv Shows
How to Fold a Fitted Sheet?

How to fold a fitted sheet the easiest way : coolguides | Folding
HOW TO FOLD A FITTED SHEET - Merkel Armedo
