How To Draw Lips: Your Simple Guide To Great Looking Art
Ever wished you could sketch a captivating smile or a thoughtful pout with ease? Learning how to draw lips really makes a big difference in portrait art, giving faces so much more character and life. It is, you know, a common wish for many artists, whether they are just starting out or have been drawing for a little while. Lips, in a way, often tell a story all their own.
Drawing lips might seem a bit tricky at first glance, because, well, the forms can appear complex. Yet, with some simple guidance, you can absolutely gain confidence for the next time you need to draw them. This guide aims to make that whole process much clearer for you, offering a really straightforward approach to getting those shapes just right, and stuff.
In this easy guide, we’ll show you the different ways you can draw your lips and give you advice on shading too, so you can create truly wonderful art. We will explore how to draw lips from various perspectives, helping you achieve that naturalistic style you are probably looking for, more or less. Get ready to put pencil to paper and see your skills grow!
- Nicki Minaj Net Worth
- I Just Lost My Dawg Lyrics
- Minecraft Cherry Blossom House
- How To Bake A Sweet Potato
- David Bromstad Married
Table of Contents
- Why Learning How to Draw Lips Matters
- Getting Started: The Basics of Drawing Lips
- Step-by-Step Process: Building Your Lips
- Different Styles and Angles for Lips
- Adding Realism with Shading
- Common Questions About Drawing Lips
- Making Your Lips Look Natural
- Practice and Confidence in Drawing Lips
- Final Thoughts on Lip Art
Why Learning How to Draw Lips Matters
Learning how to draw lips is, quite frankly, a really important step if you want to master drawing the face. Lips give so much character and expression to any portrait or figure. Without well-drawn lips, a face can look flat or just not quite right, you know. They convey emotions, from a gentle smile to a serious frown, and capture a person's personality rather well.
Many people find drawing lips a bit intimidating because, as mentioned, the forms are complex. However, getting good at it really opens up new possibilities for your art. It allows you to create great looking lips that feel alive on the page. This skill is pretty much essential for anyone hoping to create compelling character art or realistic portraits, to be honest.
Think about all the famous paintings or drawings you admire; the lips often stand out, don't they? They are a focal point, drawing the viewer's eye and telling part of the story. So, investing time in understanding how to draw lips is, like, a really valuable artistic endeavor, which helps your overall facial drawing abilities, too it's almost.
- Who Do You Think You Are I Am
- The Big Comfy Couch
- Aime Leon Dore Hat
- American Actor Ray Liotta
- Cronología De Inter Milan Contra Fc Barcelona
Getting Started: The Basics of Drawing Lips
Drawing lips is easier than you think when you break it down into basic shapes and lines. You do not need to feel stressed about it, as a matter of fact. We are going to start with some simple shapes that serve as a foundation. This approach helps simplify what can appear to be a very intricate subject, allowing you to build up detail gradually.
To begin, you will want to sketch a horizontal line for the mouth's general width. Then, perhaps, add a subtle curve above and below this line to suggest the top and bottom lips. These initial lines are just guides, so don't press too hard, you know. They are meant to be light and easily erasable, just a little.
You can think of the top lip as two small hills meeting in the middle, creating that little dip called the Cupid's bow. The bottom lip is often seen as a single, fuller curve. These basic forms help you get the overall structure down before you worry about any finer details. It is, basically, a simple way to start, anyway.
Materials You Might Need
You don't need a lot of fancy stuff to learn how to draw lips. A simple pencil, an eraser, and some paper are really all you need to begin. Different pencil hardnesses (like 2B for lighter lines and 4B or 6B for darker tones) can be helpful later for shading, but not essential at the very start. So, you know, just grab what you have.
Some artists also find blending stumps or cotton swabs useful for smoothing out graphite, which helps create a softer look for the lips. If you are working digitally, any drawing program with basic brush tools will do the trick. The important thing is to just start drawing, you know, without waiting for the "perfect" tools, actually.
Remember, the goal here is to learn the process, not to have the most expensive art supplies. Your skill and practice matter far more than your tools, honestly. You can always get more specialized items as you get better and decide what you really like to use, in a way.
Step-by-Step Process: Building Your Lips
This video shows you how to draw lips easily step by step, which is a great way to learn. Following a clear sequence of actions can make drawing less overwhelming and more manageable. We will walk through the process, just like in a video tutorial, breaking it down into small, easy-to-follow actions, you know. This method aims to give you a solid foundation.
Step 1: The Initial Guide Lines
Start with a horizontal line. This line will represent the overall width of the mouth. Then, draw a vertical line right through the middle of that horizontal line. This helps you keep things symmetrical, which is pretty important for lips, as a matter of fact. These are your very first guides, so keep them light, anyway.
Next, add two more horizontal lines, one above your main line and one below it. These will mark the top and bottom boundaries of the lips. Think of them as the outer edges where the lips stop. So, you know, you now have a simple box-like structure to work within, which helps a lot, actually.
Step 2: Defining the Basic Shapes
Now, within those guide lines, start to sketch the general shape of the lips. For the top lip, you can lightly draw a curve that dips down in the middle (the Cupid's bow) and then curves up towards the corners. The bottom lip is usually a fuller, more rounded shape, so, you know, draw a gentle curve that fills the space, more or less.
I did a few versions to show different ways to do it, and this part really allows for some personal touch. Some lips are thinner, others are fuller, and some have a more pronounced Cupid's bow. This is where you can start to observe and capture those differences. Just try to get the overall flow right, pretty much.
Step 3: Refining the Outlines
Once you have the basic shapes, begin to refine the outlines. Make your lines a bit darker and smoother, paying attention to the natural curves and subtle bumps of the lips. The line where the top and bottom lips meet is often the darkest and most defined line, so, you know, give that one a little more attention, actually.
Remember that lips are not just flat shapes; they have volume. As you refine the outlines, try to think about how the skin stretches over the muscle and bone underneath. This mental image helps you create lines that suggest that three-dimensional quality, which is very helpful, you know.
Step 4: Adding Details and Volume
This is where the lips really start to come alive. You can add some subtle lines that radiate from the center of the lips outwards, especially on the top lip. These lines represent the small wrinkles and textures of the lips. Don't overdo it, though; just a few lines can suggest texture without making the lips look too aged, basically.
Also, consider the corners of the mouth. They often have a small, soft crease or shadow, which helps ground the lips on the face. These little details, you know, really contribute to a more realistic and naturalistic style. It's about observing those tiny things that make lips look real, anyway.
Different Styles and Angles for Lips
There are tons of ways to draw lips, whether you want to use a really stylized approach or something very realistic. In this tutorial, I want to show you how to draw lips well, from any angle, and be confident about the next time you need to draw lips. Understanding different styles and angles really broadens your artistic abilities, you know.
Front View Lips
The front view is what we have mostly covered so far. It is, basically, the most common starting point for many artists. When drawing lips head-on, focus on symmetry and the balance between the top and bottom lip. The Cupid's bow and the philtrum (the groove above the top lip) are very visible here, so, you know, pay attention to those features, actually.
Remember that even in a front view, lips are not perfectly flat. They curve around the teeth and jaw, so think about that subtle roundness. This perspective is a good place to practice getting the basic proportions right before moving on to more challenging angles, you know, more or less.
Side Profile Lips
Drawing lips from a side profile presents a different kind of challenge. Here, you are really focusing on the projection of the lips from the face. The top lip usually protrudes slightly more than the bottom lip, or they can be aligned, depending on the person. This view really shows the curve of the mouth as it comes forward from the face, you know.
The line where the lips meet will curve back towards the face, creating a distinct profile. Pay attention to the angle of the jaw and chin, as these will affect how the lips sit on the face. It is, basically, a very different way of seeing and drawing the same feature, anyway.
Three-Quarter View Lips
The three-quarter view is often considered the most dynamic and expressive angle for faces, and that holds true for lips too. One side of the mouth will appear shorter and more foreshortened than the other, as it turns away from the viewer. This view requires a good grasp of perspective, so, you know, it can be a bit harder, actually.
You will need to adjust the curves and lengths of the lips to show that turning motion. The Cupid's bow will also appear asymmetrical, with one side being more visible than the other. It is, like, a really rewarding angle to master, though, because it adds so much life to your portraits, pretty much.
Adding Realism with Shading
In this easy guide, we’ll show you the different ways you can draw your lips and give you advice on shading too. Shading is what truly brings your lips to life, giving them depth and making them look realistic. Without proper shading, even perfectly drawn outlines can appear flat. So, you know, it's a very important step, actually.
Understanding Light and Shadow
Before you start shading, think about where your light source is coming from. Is it from above, below, or to the side? This will determine where the highlights (brightest areas) and shadows (darkest areas) fall on the lips. Lips are often shiny, so they tend to have distinct highlights, you know.
The top lip often casts a slight shadow over the bottom lip, especially if the light is coming from above. The bottom lip, being fuller, often catches more light and can have a brighter highlight. These subtle differences really help to create a sense of volume and form, more or less.
Techniques for Shading Lips
In this tutorial, I demonstrate how to draw lips step by step, in a realistic and naturalistic style, and shading is a huge part of that. You can use cross-hatching, blending, or stippling to create different textures and tones. For a smooth, soft look, blending with a blending stump or even your finger works well, basically.
Start with lighter pressure and gradually build up your darker tones. The creases and corners of the mouth will generally be darker. Leave some areas untouched or very lightly shaded for the highlights. This contrast between light and dark is what makes the lips look three-dimensional, you know, and really pop off the page, anyway.
You can also add a subtle shadow just beneath the bottom lip. This helps to lift the lip off the face and gives it more projection. Similarly, a very light highlight on the philtrum above the top lip can also enhance the realism. These little touches, you know, really make a big difference, actually.
Common Questions About Drawing Lips
Here are some questions people often ask when they are learning how to draw lips, because, well, it's a topic with lots of little details.
How do you draw lips for beginners?
For beginners, the best way to start is by using basic shapes and lines, as we covered. Begin with a horizontal line, then add a vertical line for symmetry. Sketch simple curves for the top and bottom lips, focusing on the overall form before adding any small details. It's really about building up from the simplest elements, you know, and not getting overwhelmed, actually.
What are the basic shapes to draw lips?
The most basic shapes to draw lips are a horizontal line (for width), a vertical line (for symmetry), and then simple curved lines that suggest the top and bottom lips. You can think of the top lip as two soft triangles or hills meeting in the middle, and the bottom lip as a single, wider oval shape. These shapes act as your scaffolding, so, you know, they are very helpful, anyway.
How do you make lips look realistic?
To make lips look realistic, you need to pay attention to several things. First, get the proportions right and understand the underlying structure. Then, add subtle textures like the small vertical lines on the lips. Most importantly, use shading to create depth, showing where light hits and where shadows fall. Highlights, especially on the bottom lip and Cupid's bow, also really help to suggest moisture and realism, you know, pretty much.
Making Your Lips Look Natural
To draw lips well, from any angle, and make them look truly natural, you need to observe real people. Every person's lips are unique, so, you know, avoid drawing generic shapes every time. Look at how lips sit on the face, how they interact with the surrounding skin, and how they change with different expressions. This observation is, like, a really powerful tool for artists, actually.
Also, remember that lips are not just static objects. They are part of a moving, expressive face. Even when a person is not speaking, their lips have a subtle tension or relaxation that conveys a lot. Try to capture that slight variation in your drawings. It is, basically, about adding that little bit of life, anyway.
The edges of the lips are rarely a hard, sharp line. They often blend softly into the surrounding skin, especially towards the corners. Using softer lines and gentle blending at these edges can make your lips look much more integrated into the face, rather than just pasted on. So, you know, think about those soft transitions, pretty much.
Practice and Confidence in Drawing Lips
Learning how to draw lips with ease comes down to practice. The forms are complex, yes, but repeated effort really builds skill. Don't expect perfection on your first try, or even your tenth. Every drawing is a chance to learn something new, so, you know, just keep going, actually.
I hope that this guide helped you. The more you draw lips, the more confident you will become. Try drawing lips from photos, from life, and from different angles. Experiment with different styles and shading techniques. This kind of consistent practice is, basically, what makes an artist better over time, anyway.
Remember, this article, along with any video tutorial you might find, aims to give you simple tips to help you draw realistic lips without stress. It is about enjoying the process of learning and seeing your improvements. You can learn more about art techniques on our site, which offers many other resources, too it's almost.
Final Thoughts on Lip Art
By following the simple steps outlined here, you too can easily draw a perfect lips, or at least a really good one. Though a single tutorial can't possibly cover this subject thoroughly enough, I hope that it has given you a solid starting point and some helpful ideas. The journey of drawing is, like, a continuous one of learning and exploration, you know.
Remember to keep observing, keep practicing, and don't be afraid to experiment. There are tons of ways to approach drawing lips, and finding what works best for you is part of the fun. You can find more inspiration and tutorials on drawing faces, which will further your skills, you know, more or less.
Whether you are aiming for a realistic portrait or a more stylized character, understanding the structure and nuances of lips will greatly enhance your artwork. So, go ahead and give it a try! You might be surprised at what you can create, you know, when you really focus on these steps, actually. And remember to check out this page for more art tips whenever you feel like it, anyway.
- Stanley Hudson From The Office
- Cronología De Inter Milan Contra Fc Barcelona
- Hannah Einbinder Partner
- Is Michael Jackson Still Alive
- How To Bake A Sweet Potato
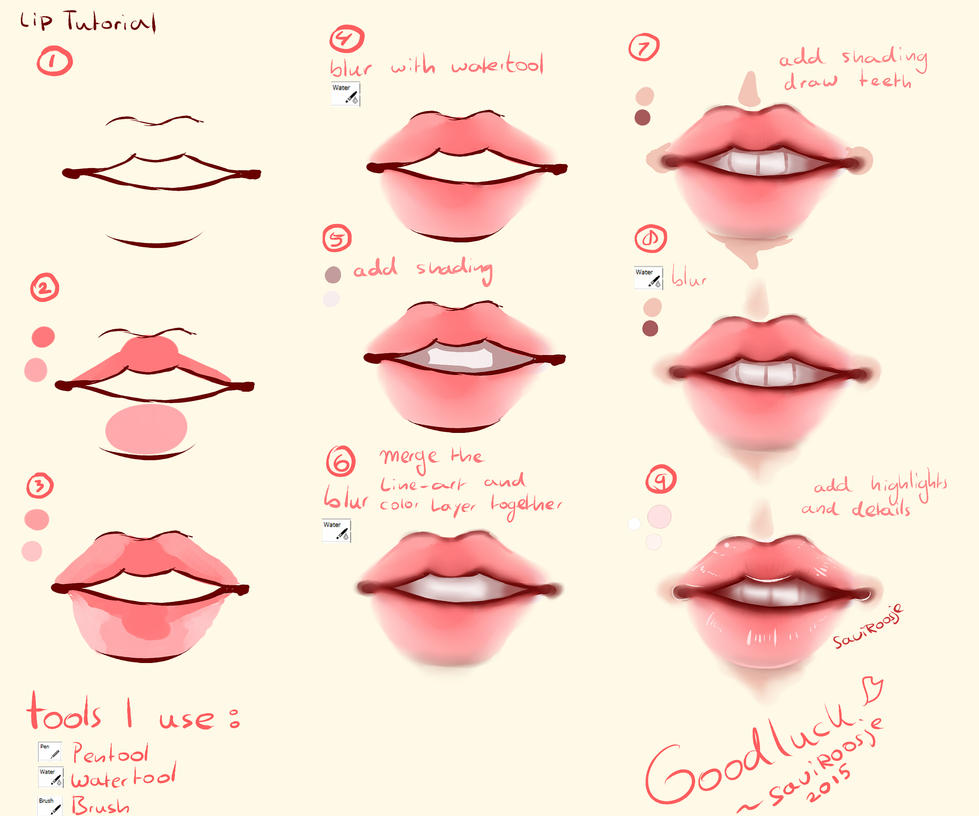
Step By Step - Lip Tutorial by Saviroosje on DeviantArt

how I draw lips by LeekAhBosu on DeviantArt

Step By Step - Lip Tutorial by Saviroosje on DeviantArt
