How To Make A Bow Out Of Ribbon: Your Easy Guide To Beautiful DIY Decorations Today
Learning how to make a bow out of ribbon can really change your gift-giving and decorating game. It's almost like adding a little bit of your heart to everything you create, giving presents that extra special touch or making your home feel more festive. Today, you know, on [Current Date], we're talking about this classic craft that, honestly, anyone can pick up.
Lots of folks think making a pretty bow is super tricky, like it takes some kind of secret talent or fancy tools. But that's just not the case, actually. You can whip up a stunning, simple bow from pretty much any ribbon you have lying around, and it only takes a few minutes, which is pretty neat.
This guide will walk you through exactly how to make a perfect bow every single time. Whether you need one for a present, a decoration, or maybe even a hair accessory, you'll learn the secrets to creating something beautiful in no time, which is really exciting.
- Anti Social Social Club
- Shu Jiao Fu Zhou
- What Is The Healthiest Energy Drink
- Thank You In Spanish
- Carly Jane Leaks
Table of Contents
- Why Make Your Own Ribbon Bows?
- Getting Started: What You'll Need
- The Classic "Bunny Ears" Bow Method (Step-by-Step)
- Other Easy Bow Making Techniques
- Tips for Perfecting Your Ribbon Bows
- Creative Ways to Use Your Handmade Bows
- Frequently Asked Questions About Ribbon Bows
Why Make Your Own Ribbon Bows?
Making your own ribbon bows, you know, has a lot going for it. It’s not just about saving a few pennies, though that’s a nice bonus. It’s really about putting a little bit of yourself into what you’re doing, which, honestly, makes a big difference.
Personal Touch
When you craft a bow yourself, it adds a unique flair that store-bought ones just can’t quite match, in a way. This personal touch shows you’ve put thought and effort into something, whether it’s a gift or a decoration, and people tend to notice that, obviously.
Cost-Effective
Buying pre-made bows can, actually, add up pretty quickly, especially if you need a lot of them. Ribbons, on the other hand, are often quite affordable, so you can make many bows for a fraction of the cost, which is pretty smart.
- Despacito Lyrics English Song
- Taco Bell Steakhouse Burrito
- 4 Charles Prime Rib
- How Tall Is Benson Boone
- Bengali Viral Mms
Versatility
You get to choose the exact color, texture, and size that you want, which is really cool. This means your bows will always perfectly match your project, giving you, you know, total creative freedom, and that’s a big deal.
Getting Started: What You'll Need
Before you jump into making your bow, it’s good to have a few basic items ready. You probably have most of these around your house already, so it's almost too easy to begin.
- **Ribbon:** Any type works! Grosgrain, satin, sheer, velvet – whatever you like. The width can vary, too.
- **Scissors:** A good, sharp pair will make clean cuts, which is important for a neat finish.
That’s really it! No special tools required, which, you know, makes this a super accessible craft for everyone, honestly.
The Classic "Bunny Ears" Bow Method (Step-by-Step)
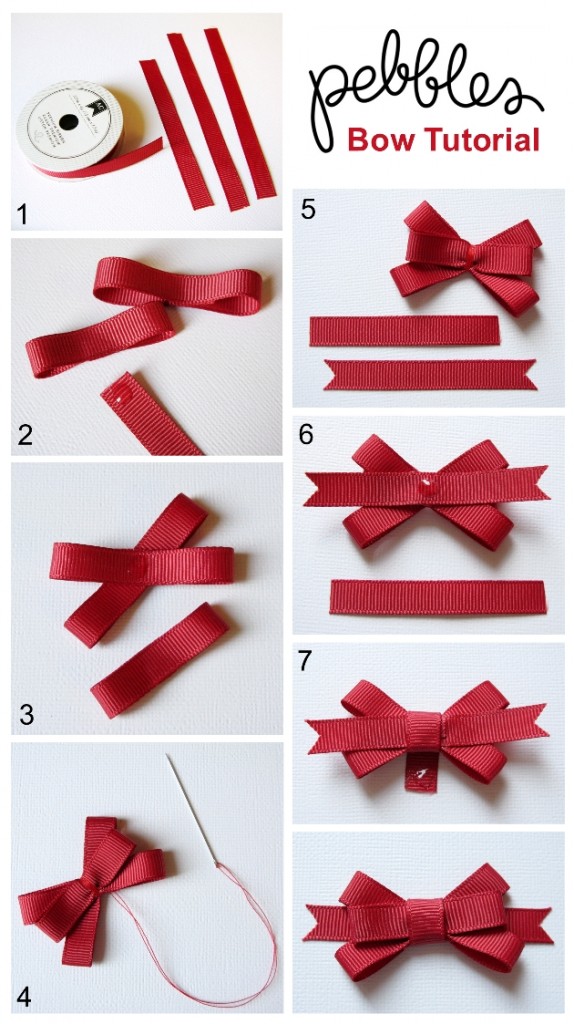
This is, arguably, one of the easiest and most popular ways to make a bow. It’s the method many of us learned when tying our shoes, so it might feel a little familiar, which is nice. This method is what our tutorial provides, giving you the secrets to creating a stunning yet simple bow.
Step 1: Prepare Your Ribbon
If you’re trying to make a bow out of ribbon, first cut a length of ribbon and lay it out flat. The length depends on how big you want your finished bow to be, so you might need to experiment a little, you know, to get it just right.
Step 2: Form the Loops
Next, make loops on both ends of the ribbon. Think of them like the "bunny ears" you create when you’re about to tie your shoelaces, that kind of thing. Make sure these loops are about the same size, which, you know, helps keep your bow looking balanced.
Step 3: Overlap and Tie
Now, overlap those two loops, just like you do when you tie your shoes the bunny ears way. You should have two loops and two tails hanging down, basically. Then, take one loop and pass it under and through the other, creating a knot, which is really the core of the bow.
Step 4: Tighten and Adjust
Gently pull on the loops to tighten the knot. Don’t pull too hard at first, though. You want to be able to adjust the loops until they look even and pretty, so, you know, take your time with this part. You can also gently tug on the tails to adjust the size of the loops, which is quite handy.
Step 5: Trim the Tails
Once you’re happy with how your bow looks, you can trim the tails. You might want to cut them at an angle or create a "V" shape for a nice finish, which, you know, adds a bit of polish. This step really helps make a perfect bow every time, honestly.
Other Easy Bow Making Techniques
While the bunny ears method is a great starting point, there are, you know, other ways to make lovely bows, too. These can give you different looks or work better for certain projects, so it's good to know a few options.
The Simple Loop Bow
This method involves making several loops and gathering them in the middle, then securing them with a smaller piece of ribbon or wire. It creates a fuller, fluffier bow, which is really nice for gifts. You can make as many loops as you like, making it, you know, very versatile.
The Fork Bow (for Smaller Bows)
For tiny, delicate bows, a kitchen fork can be your best friend. You simply wrap the ribbon around the tines of the fork, tie a knot in the middle, and then slide it off. This is, honestly, a clever trick for making small, uniform bows for things like cards or tiny gifts, and it's super easy.
Tips for Perfecting Your Ribbon Bows
Making a perfect bow can seem intimidating, but it’s actually so easy, you know, with a few pointers. These tips will help you create beautiful bows consistently, which is definitely what we want.
- **Choose the Right Ribbon:** Different ribbons behave differently. Stiffer ribbons like grosgrain hold their shape well, while softer ones like satin drape beautifully. Experiment to see what you like, basically.
- **Practice Makes Perfect:** The more you make bows, the better you’ll get at it, obviously. Don’t worry if your first few aren’t perfect; it’s all part of the learning process, you know.
- **Vary Your Sizes:** Try making bows of different sizes. A small bow can be sweet on a homemade card, while a big, fluffy one can really make a gift pop, which is pretty cool.
- **Secure Your Bow:** If your bow is for something that will be handled a lot, like a hair accessory, you might want to add a dab of hot glue or stitch it in place for extra security, which is a good idea.
- **Use Wire-Edged Ribbon:** For bows that need to hold a very specific shape, wire-edged ribbon is your friend. You can bend and mold it exactly how you want, which is incredibly helpful.
Creative Ways to Use Your Handmade Bows
Our tutorial provides the secrets to creating a stunning yet simple bow from any type of ribbon. You can use these handmade bows in so many different ways, from gift wrapping to holiday decor, which is really versatile.
- **Gift Wrapping:** This is, obviously, the most common use. A handmade bow makes any gift feel more thoughtful, especially as a festive bow on Christmas gifts, for example.
- **Hair Accessories:** Attach a small bow to a hair clip or headband for a sweet, personalized touch. It’s a great way to use up smaller ribbon scraps, you know.
- **Home Decor:** Use bows on wreaths, curtains, chair backs, or even as part of a centerpiece for holiday decor, perhaps on your front door. They add a touch of charm, basically.
- **Craft Projects:** Adorn scrapbooks, cards, or handmade ornaments with little bows. They can add a lovely finishing touch to almost any craft, which is pretty neat.
- **Party Decorations:** String bows together to make a garland, or use them to decorate party favors. They can really tie a theme together, you know, in a simple way.
- **Fashion Accents:** Sew a small bow onto a plain shirt, a bag, or even a pair of shoes for a quick style upgrade. It’s a simple way to personalize your items, really.
Making a bow out of ribbon is a fun and easy craft that anyone can learn. Whether you need a bow for a gift, decoration, or hair accessory, this guide has shown you exactly how to make a perfect bow every time, so, you know, give it a shot!
Frequently Asked Questions About Ribbon Bows
People often have questions when they start making bows, and that's totally normal. Here are a few common ones, you know, that might help you out, too.
Q: What kind of ribbon is best for making bows?
A: Honestly, it depends on the look you're going for. Stiffer ribbons like grosgrain or wired ribbon hold their shape really well, making them great for big, structured bows. Satin or sheer ribbons are softer and create a more elegant, flowing look, so, you know, choose what fits your project best.
Q: How much ribbon do I need for a standard gift bow?
A: For a typical medium-sized gift bow, you'll generally need about 2 to 3 feet of ribbon, more or less. If you want a bigger, fluffier bow or longer tails, you’ll need to cut a longer piece, obviously. It’s always better to have a little extra than not enough, to be honest.
Q: Can I make a bow without tying a knot?
A: Yes, actually! There are methods like the "stacked loop" bow or using a bow maker tool that don't rely on a traditional knot. These often involve gathering and securing loops with wire or glue, which can create a very full and elaborate bow, you know, if that's what you're after. Learn more about ribbon crafting ideas on our site, and for more specific techniques, you can link to this page here.
You can find more inspiration and ribbon types by checking out a craft supply store's website, like Jo-Ann Stores' ribbon section, for instance.
Making a bow from ribbon is a classic DIY project, perfect for gifts, decor, and crafts. You can create beautiful bows in no time, and it's really a skill that keeps on giving, so, you know, why not try it out today?
- Bianca Grammys Outfit No Blur
- Translate The Correct Sentences From Exercise 2 Into Your Language
- Haley Joel Osment Movies
- Who Do You Think You Are I Am
- Red Hair Big Boobs

How To Make A Bow Out Of Ribbon
How To Make a Bow Out of Ribbon: 34 Awesome DIY Bow Ideas

How to make simple easy bow ribbon glitter foam bow tutorial – Artofit
