How To Screenshot On HP Laptop: Your Quick & Easy Guide For Windows 11 And Beyond
It's almost a universal truth that we all need to grab a quick picture of our screen sometimes, isn't it? Whether you're sharing something funny, showing a tech issue to support, or saving an important piece of information for work, knowing how to screenshot on your HP laptop is just a very handy skill to have. Yet, for some folks, it feels a bit like trying to find a hidden treasure, especially with newer models or after a big Windows update, which is totally understandable.
You might be used to a certain way of doing things, perhaps with a trusty "Print Screen" button that just isn't there anymore, or maybe your old tricks simply stopped working. Like, you know, some people find that their usual method of dragging a rectangle to capture a shot no longer brings up the familiar box to post it, or it just doesn't save anywhere, which can be pretty frustrating when you need to quickly capture something important for your line of work, for example.
This article is here to clear up all that confusion. We'll walk through all the ways to take a screenshot on your HP laptop, covering everything from the classic methods to the slick new tricks in Windows 11. We'll also tackle some of those common head-scratchers, like when your screenshots seem to vanish into thin air, or when that "Print Screen" button just refuses to cooperate, even on a brand new machine like a Spectre x360 or an HP 1030 Elitebook, so you'll feel much more confident capturing exactly what you need.
- La Vie Est Belle
- La La Land Cafe
- American Actor Ray Liotta
- How Did Coach Wall Die
- How Tall Is Benson Boone
Table of Contents
- The Classic Ways to Capture Your Screen on HP
- Modern HP Laptops and Windows 11: New Tricks and Common Issues
- Advanced Tips and Alternative Methods
- Frequently Asked Questions
The Classic Ways to Capture Your Screen on HP
Even with all the newer features, some of the older, more traditional ways to take a screenshot on your HP laptop are still very much around and useful, you know. They've been helping people capture their screens for ages, and they're definitely worth knowing, especially if you're comfortable with keyboard shortcuts. So, let's look at these trusty methods first, which are usually pretty straightforward, actually.
Using the Print Screen Key (PrtSc)
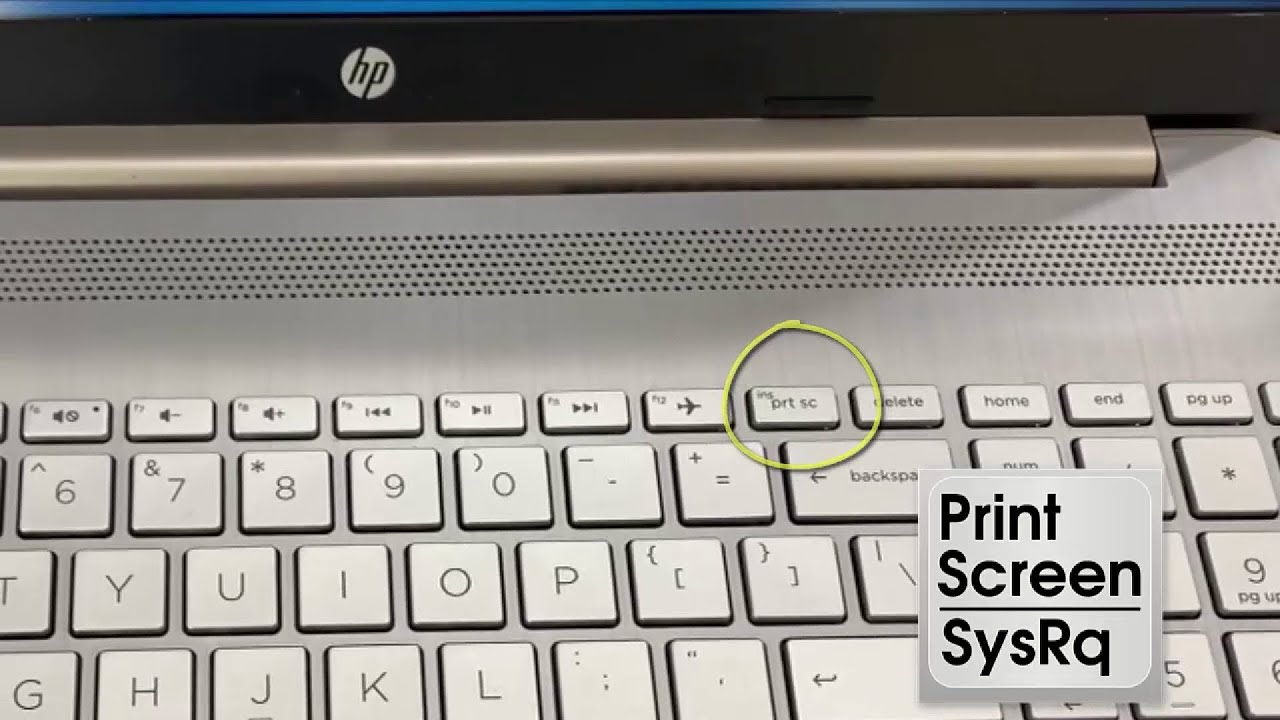
The "Print Screen" key, often labeled "PrtSc," "PrtScn," or something similar, is probably the most recognized way to grab a screenshot. This little button, typically found near the top right of your keyboard, has a few different functions depending on what other keys you press with it. It's a rather versatile tool, even if it sometimes feels a bit hidden or doesn't work as expected on some newer HP models.
First off, if you just press the `PrtSc` key by itself, what usually happens is that your entire screen gets copied to your clipboard. Think of the clipboard as a temporary storage space for things you've copied. You won't see any immediate sign that it's worked, like a flash or a notification, which can be a little confusing, you know. To actually see and save this image, you'll need to paste it into an image editing program, like Paint, Word, or even a chat application. This method is great if you just need to quickly paste an image somewhere without saving a file, which can be quite handy.
- Daisy Edgar Jones Movies And Tv Shows
- Despacito Lyrics English Song
- Salvage Hunters Drew Pritchard
- Red God Release Date
- Henry Günther Ademola Dashtu Samuel
Now, if you want to capture your whole screen and have it automatically save as a file, you'll want to use the `Windows Key + PrtSc` combination. This is a very popular method because it's so direct. When you press these two keys together, your screen might dim for a moment, or you might see a quick flash, which is the laptop's way of telling you it's taken the picture. The screenshot then gets saved as a PNG file in your "Screenshots" folder, which is usually found inside your "Pictures" folder. This is actually how many people expect their screenshots to work, so it's a good one to remember, for sure.
There's also a way to capture just the active window you're working on, which is quite useful if you have many things open. For this, you press `Alt + PrtSc`. This copies only the window that's currently in focus to your clipboard. Again, like with just pressing `PrtSc`, you'll need to paste this image into another program to view or save it. This is a pretty efficient way to get a clean shot of just one application without all the background clutter, you know, so it's worth trying if you need a focused capture.
The Snipping Tool (or Snip & Sketch)
The Snipping Tool, which has largely evolved into "Snip & Sketch" in more recent Windows versions, is a built-in utility that gives you a lot more control over what part of your screen you capture. For some, like those who find other methods a bit clunky or don't have a PrtSc button, this tool becomes their main way to get screenshots, even if it feels like an extra step. It's actually a pretty powerful tool once you get the hang of it, offering different ways to select your area.
To find the Snipping Tool, you can simply type "Snipping Tool" or "Snip & Sketch" into your Windows search bar, which is usually at the bottom of your screen. When you open it, you'll see options to create a "New" snip. You can choose different modes, like rectangular snip, free-form snip, window snip, or full-screen snip. Rectangular snip is probably the most common, letting you draw a box around the exact area you want to capture, which is really quite precise.
Now, while some users feel that using the Snipping Tool can be "quite clunky" because it involves opening an application, there's a much faster way to bring it up. This is where the `Windows Key + Shift + S` shortcut comes in, which we'll talk about more in a bit. This shortcut instantly activates the snipping functionality, letting you draw your rectangle right away without opening the app window first. This makes it a lot less cumbersome, you know, and helps you get your screenshot much faster, which is great for those quick grabs.
Once you've taken your snip, it automatically goes to your clipboard, and a small notification will pop up in the corner of your screen. Clicking on this notification will open the Snip & Sketch editor, where you can do some basic edits like highlighting or drawing on the image. From there, you can save it to any folder you like, or just copy it again to paste elsewhere. It's a very flexible tool, really, and once you master the shortcut, it's not clunky at all.
Modern HP Laptops and Windows 11: New Tricks and Common Issues
As laptops get sleeker and Windows evolves, especially with Windows 11, the ways we interact with our computers also change. This is particularly true for things like taking screenshots. You might have a brand new HP laptop, like a Spectre x360 or an HP Dragonfly G4, and find that the old methods just don't quite work the same, or maybe some buttons are missing entirely. It's a common experience, actually, and we'll look at these newer challenges and the best ways to handle them.
When the Print Screen Button is Missing or Not Working
It's a rather common complaint these days: "There is no print screen button on my new hp 1030 elitebook," or "I've tried the print screen button, win+print screen, ctrl+print screen and nothing will work." This can be incredibly frustrating, especially if you rely on screenshots for your daily tasks. Modern HP laptops, particularly the more compact or premium models, sometimes omit the dedicated PrtSc key to save space, or they integrate its function differently, which can be a bit of a puzzle.
If you can't find a standalone `PrtSc` key, or if pressing it does absolutely nothing, the first thing to check is if it's combined with another key. Many laptops, including some HP models, have the Print Screen function as a secondary action on one of the function keys (F1-F12). You might see "PrtSc" printed in a smaller font or a different color on a key like F10, F11, or F12. To use it, you'll typically need to hold down the `Fn` key (usually found near the bottom left of your keyboard) while pressing that function key. So, it's often `Fn + F11` (or whichever key has PrtSc) that will do the trick, which is a pretty important distinction, you know.
Another reason why your Print Screen key might not be working, even if it's there, could be a software glitch or a driver issue. Sometimes, a simple restart of your laptop can clear up these temporary hiccups. It's a bit of a classic troubleshooting step, but it often works wonders for various computer woes. So, if you're finding that `Win + PrtSc` or `Alt + PrtSc` just aren't showing any signs of taking a photo and no photos show up anywhere, a quick restart is definitely worth a try before you dig into more complex solutions, actually.
For those who really miss a dedicated PrtSc button and use it regularly, an external keyboard is always an option. Many external keyboards, even compact ones, will have a dedicated Print Screen key, giving you back that familiar functionality. It's not ideal for portability, perhaps, but for a desk setup, it solves the problem completely, which is something to consider if you're really struggling.
The Windows Key + Shift + S Shortcut: A Quick Grab
This particular shortcut, `Windows Key + Shift + S`, is truly a game-changer for many HP laptop users, especially those running Windows 10 or 11. It's actually the fastest and most efficient way to take a customized screenshot without opening any applications first. If you're someone who says, "But, I don't want the extra step of selecting what I want using that control bar," then this shortcut is practically made for you, as it streamlines the whole process considerably.
When you press `Windows Key + Shift + S`, your screen will dim slightly, and a small toolbar will appear at the top of your display. This toolbar gives you several options for capturing your screen: rectangular snip, free-form snip, window snip, and full-screen snip. You just click on the icon for the type of snip you want, and then you can immediately select the area. For example, with the rectangular snip, you just drag your mouse to draw a box around what you want to capture, and then release the mouse button, which is very intuitive, really.
Once you've made your selection, the screenshot is automatically copied to your clipboard. A small notification will pop up in the bottom right corner of your screen, letting you know the snip is ready. You can click on this notification to open the Snip & Sketch editor, where you can make quick annotations or save the image to a specific location. However, if you just need to paste it somewhere, like into an email or a document, you can do that right away without any extra steps, which is incredibly convenient for quick sharing, you know.
This method directly addresses the need for a "quick screen shot" without the "extra step of selecting what I want" through a clunky interface. It's integrated so smoothly into Windows 11 that it feels like a natural extension of your workflow. So, if you're looking for speed and precision, this is definitely the shortcut to master on your HP laptop, as it's almost universally available and very efficient, actually.
Troubleshooting Screenshot Saving Issues
One of the most frustrating things can be taking a screenshot, seeing the little flash, and then realizing it's nowhere to be found. "Well it doesn't show any signs that it's taken a photo and no photos show up anywhere," is a common sentiment. Even worse is when you know they're being taken, like "I can see the screenshot when i press windowskey+v and the clipboard history is on," but "my laptop does not hsow the folder screenshots where they are supposed to be saved under c:\users\name\pictures\screenshots the folder screenshots does not exist at all under pictures." This is a rather specific and annoying problem, isn't it?
First, let's confirm where screenshots *should* go. When you use `Windows Key + PrtSc`, your HP laptop typically saves the images to a folder named "Screenshots" inside your "Pictures" folder. The full path is usually `C:\Users\YourUsername\Pictures\Screenshots`. If this folder is missing, it can certainly feel like your screenshots are just disappearing. So, it's a good idea to check this path directly in File Explorer, just to be sure, you know.
If the "Screenshots" folder truly doesn't exist, you can actually create it yourself. Open File Explorer, go to your "Pictures" folder, right-click in an empty space, select "New," and then "Folder." Name this new folder "Screenshots" (make sure the spelling is exact, with a capital S). Sometimes, Windows just needs that folder to be there to know where to put things. After creating it, try taking a `Windows Key + PrtSc` screenshot again and see if it appears there. This often solves the problem quite neatly.
For those who use `Windows Key + Shift + S` or just `PrtSc`, remember that these methods primarily send the screenshot to your clipboard. This means it's not automatically saved as a file. If you can see your screenshots in the clipboard history (`Windows Key + V`), but they aren't saving to a folder, it's because you haven't explicitly saved them from the Snip & Sketch editor or pasted them into another program and then saved that program's file. So, if you want a file, you'll need that extra step of clicking the notification or pasting it somewhere, which is a pretty important distinction, really.
Another thing to consider is cloud synchronization. If you're using OneDrive or another cloud service, your "Pictures" folder might be syncing to the cloud. Sometimes, this can affect how quickly files appear locally or if they appear at all, especially if there are sync issues. You might find your screenshots in the cloud version of your Pictures folder before they show up on your local drive, which can be a bit confusing, you know. Checking your OneDrive settings might shed some light on this, actually.
Restarting Your Laptop: A Simple Fix
It sounds almost too simple, doesn't it? Yet, "Restart your laptop and try taking a screenshot again" is often some of the best advice you can get when something isn't working quite right. Computers, even powerful HP laptops, can sometimes get into a funny state where certain functions just stop responding as they should. This could be due to a temporary software bug, a service that's crashed in the background, or even a memory hiccup. So, it's a very common first step in troubleshooting, actually.
When you restart your laptop, it clears out temporary files, resets system processes, and reloads all the necessary drivers and services from scratch. This can often resolve minor software conflicts that might be preventing your screenshot functions from working correctly. If your `PrtSc` key isn't responding, or if your screenshots aren't saving properly, a fresh start can sometimes be all it takes to get everything back in order. It's like giving your computer a little refresh, you know.
So, before you spend a lot of time digging into settings or trying more complex solutions, just try a good old-fashioned restart. Save any open work, close all your programs, and then go to the Start Menu, click the Power icon, and choose "Restart." Once your HP laptop boots back up, give your preferred screenshot method another go. You might be surprised at how often this simple action fixes the problem, which is pretty convenient, really, as it saves a lot of hassle.
Advanced Tips and Alternative Methods
Beyond the standard methods, there are a few other ways to capture your screen on an HP laptop, some offering more features or catering to specific situations. These can be particularly useful if you're looking for something a bit different, or if the built-in tools just don't quite meet all your needs. So, let's explore some of these slightly more advanced options, which can be pretty powerful, actually.
Using the Xbox Game Bar for Screenshots
The Xbox Game Bar isn't just for gamers; it's a built-in Windows utility that also offers quick screenshot capabilities, among other things. If you're looking for a way to quickly capture an image or even record your screen, this tool can be quite handy. It's already there on your HP laptop, so there's no need to download anything extra, which is a definite plus, you know.
To bring up the Game Bar, just press `Windows Key + G`. A series of widgets will appear over your current application. Look for the "Capture" widget, which usually has an icon that looks like a camera. Clicking this camera icon will take a screenshot of your active window or game. The screenshot then gets saved to a "Captures" folder, which is typically found inside your "Videos" folder (`C:\Users\YourUsername\Videos\Captures`). It's a rather straightforward way to get a quick snap, especially if you're already in a game or an application where you want to avoid minimizing it.
While it's not always the first method people think of for general screenshots, it's a reliable alternative. It provides a visual confirmation when the screenshot is taken, and it manages its own saving location, which can be helpful if you want to keep your game-related captures separate from your general screenshots. So, if you're already familiar with the Game Bar, or if you just want another quick option, give `Windows Key + G` a try, as it's a pretty neat feature, actually.
Third-Party Screenshot Tools
Sometimes, the built-in Windows tools just don't offer all the bells and whistles you might need, especially if you take a lot of screenshots for work or creative projects. This is where third-party screenshot tools come into play. There are many options available, each with its own set of unique features, like advanced editing, cloud integration, or more flexible capture modes. So, if you're finding the native options a bit limiting, exploring these alternatives could be a good idea, you know.
Tools like ShareX, Lightshot, or Greenshot are very popular choices. They often provide more robust annotation features, allowing you to add arrows, text, or blur sensitive information directly on the screenshot before saving or sharing. Some even offer scrolling capture, which lets you take a screenshot of an entire webpage, even if it extends beyond your current screen view, which is a pretty powerful capability, actually. They might also have customizable hotkeys, letting you set up your own preferred shortcuts for different types of captures, which can really speed up your workflow.
While installing third-party software means a little extra setup, the added functionality can be well worth it for frequent users. Just be sure to download these tools from their official websites or reputable app stores to ensure you're getting safe and legitimate software. If
- Red Crab Juicy Seafood
- Jw Marriott Desert Ridge
- Translate The Correct Sentences From Exercise 2 Into Your Language
- How To Bake A Sweet Potato
- Bbq Chicken Urban Dictionary

How to Take Screenshots on HP Laptop Windows 7/8/10

HP Laptop Screenshot: Easy Guide (Windows 11 & 10)
How to take a screenshot on HP laptop Windows 10 - YouTube
