Learn How To Draw Fire: Easy Steps For Captivating Flames
Have you ever looked at a crackling campfire or a flickering candle and thought, "Wow, that looks so alive!" It's pretty amazing, you know, how fire dances and glows. Learning how to draw fire can seem a bit tough at first, can't it? Fire, with its dancing shapes and bright glow, looks so alive, and that makes it notoriously tricky to put down on paper.
Drawing fire can be both fun and a little bit challenging, as it involves capturing the dynamic shapes and vibrant colors of flames. Drawing flames can be tricky since they don't have one solid form or color, but there are some simple tricks you can use to make it easier, really. Many people find it intimidating, but honestly, it can be an enjoyable and rewarding experience once you get the hang of it.
Good news, though! This fantastic tutorial will help simplify exactly how to draw flames. We’ll walk you through each stage, from basic shapes to adding those vibrant colors, so you can learn to draw a fire. Kids and beginners alike can now draw a great looking fire, basically. So grab your drawing tools, and let's fan the flames of your creativity!
- Pete Davidson Tattoo Removal
- Itscarlyjane Leaks
- Brooke Monk Leaked Nudes
- The Big Comfy Couch
- Victoria Secret Credit Card
Table of Contents
- How to Draw Fire: Starting Your Fiery Art
- Getting Ready: What You'll Need
- Step 1: The Basic Shape of a Flame
- Step 2: Adding More Wavy Lines
- Step 3: Building the Inner Glow
- Step 4: Layering Colors for Depth
- Step 5: Refining Edges and Movement
- Step 6: Adding Smoke and Sparkle
- Digital Fire Drawing: Using Online Tools
- Tips for Making Your Fire Look Real
- Common Questions About Drawing Fire
- Your Next Steps in Drawing Flames
How to Draw Fire: Starting Your Fiery Art
Learning how to draw fire is a skill that really lets you bring a lot of energy to your art. Fires and their flames are dynamic, which can make drawing fire tricky, but this lesson will show you how to draw fire in six easy steps. It gives examples in a simplified, beginner-friendly style, you know. In this drawing lesson, you will learn how to draw fire easily enough, even for kids and everyone who draws for the first time.
We’re going to break down the process into manageable parts, so it won’t feel overwhelming. You'll find that with a little practice, you can capture that lively look of a flame. This approach helps you understand the different parts that make up a fire, making the whole thing less daunting, you know.
So, get ready to create some truly eye-catching art. We will guide you through each stage, from basic shapes to the final fiery details. You might be surprised at how quickly you pick it up, actually!
- We Were Liars Cast
- South Carolina Gamecocks Womens Basketball
- Is Michael Jackson Still Alive
- High Potential Season 2
- Remote Iot Platform Ssh Key Raspberry Pi
Getting Ready: What You'll Need
Before we jump into how to draw fire, let's gather a few simple things. You won't need anything fancy, just some basic art supplies. For traditional drawing, you'll want some paper, a pencil, and an eraser, obviously. Colored pencils, markers, or even paints will be great for adding color later, too.
If you prefer drawing digitally, you can use a tablet and a stylus, or even your computer with a mouse. There are many free online drawing applications available, which we'll talk about a bit later. So, just make sure you have your preferred tools ready, and we can get started, really.
Having your materials organized helps you focus on the drawing itself. A clean workspace can also make a big difference, you know. So, take a moment to set up, and then we'll move on to the fun part of learning how to draw fire.
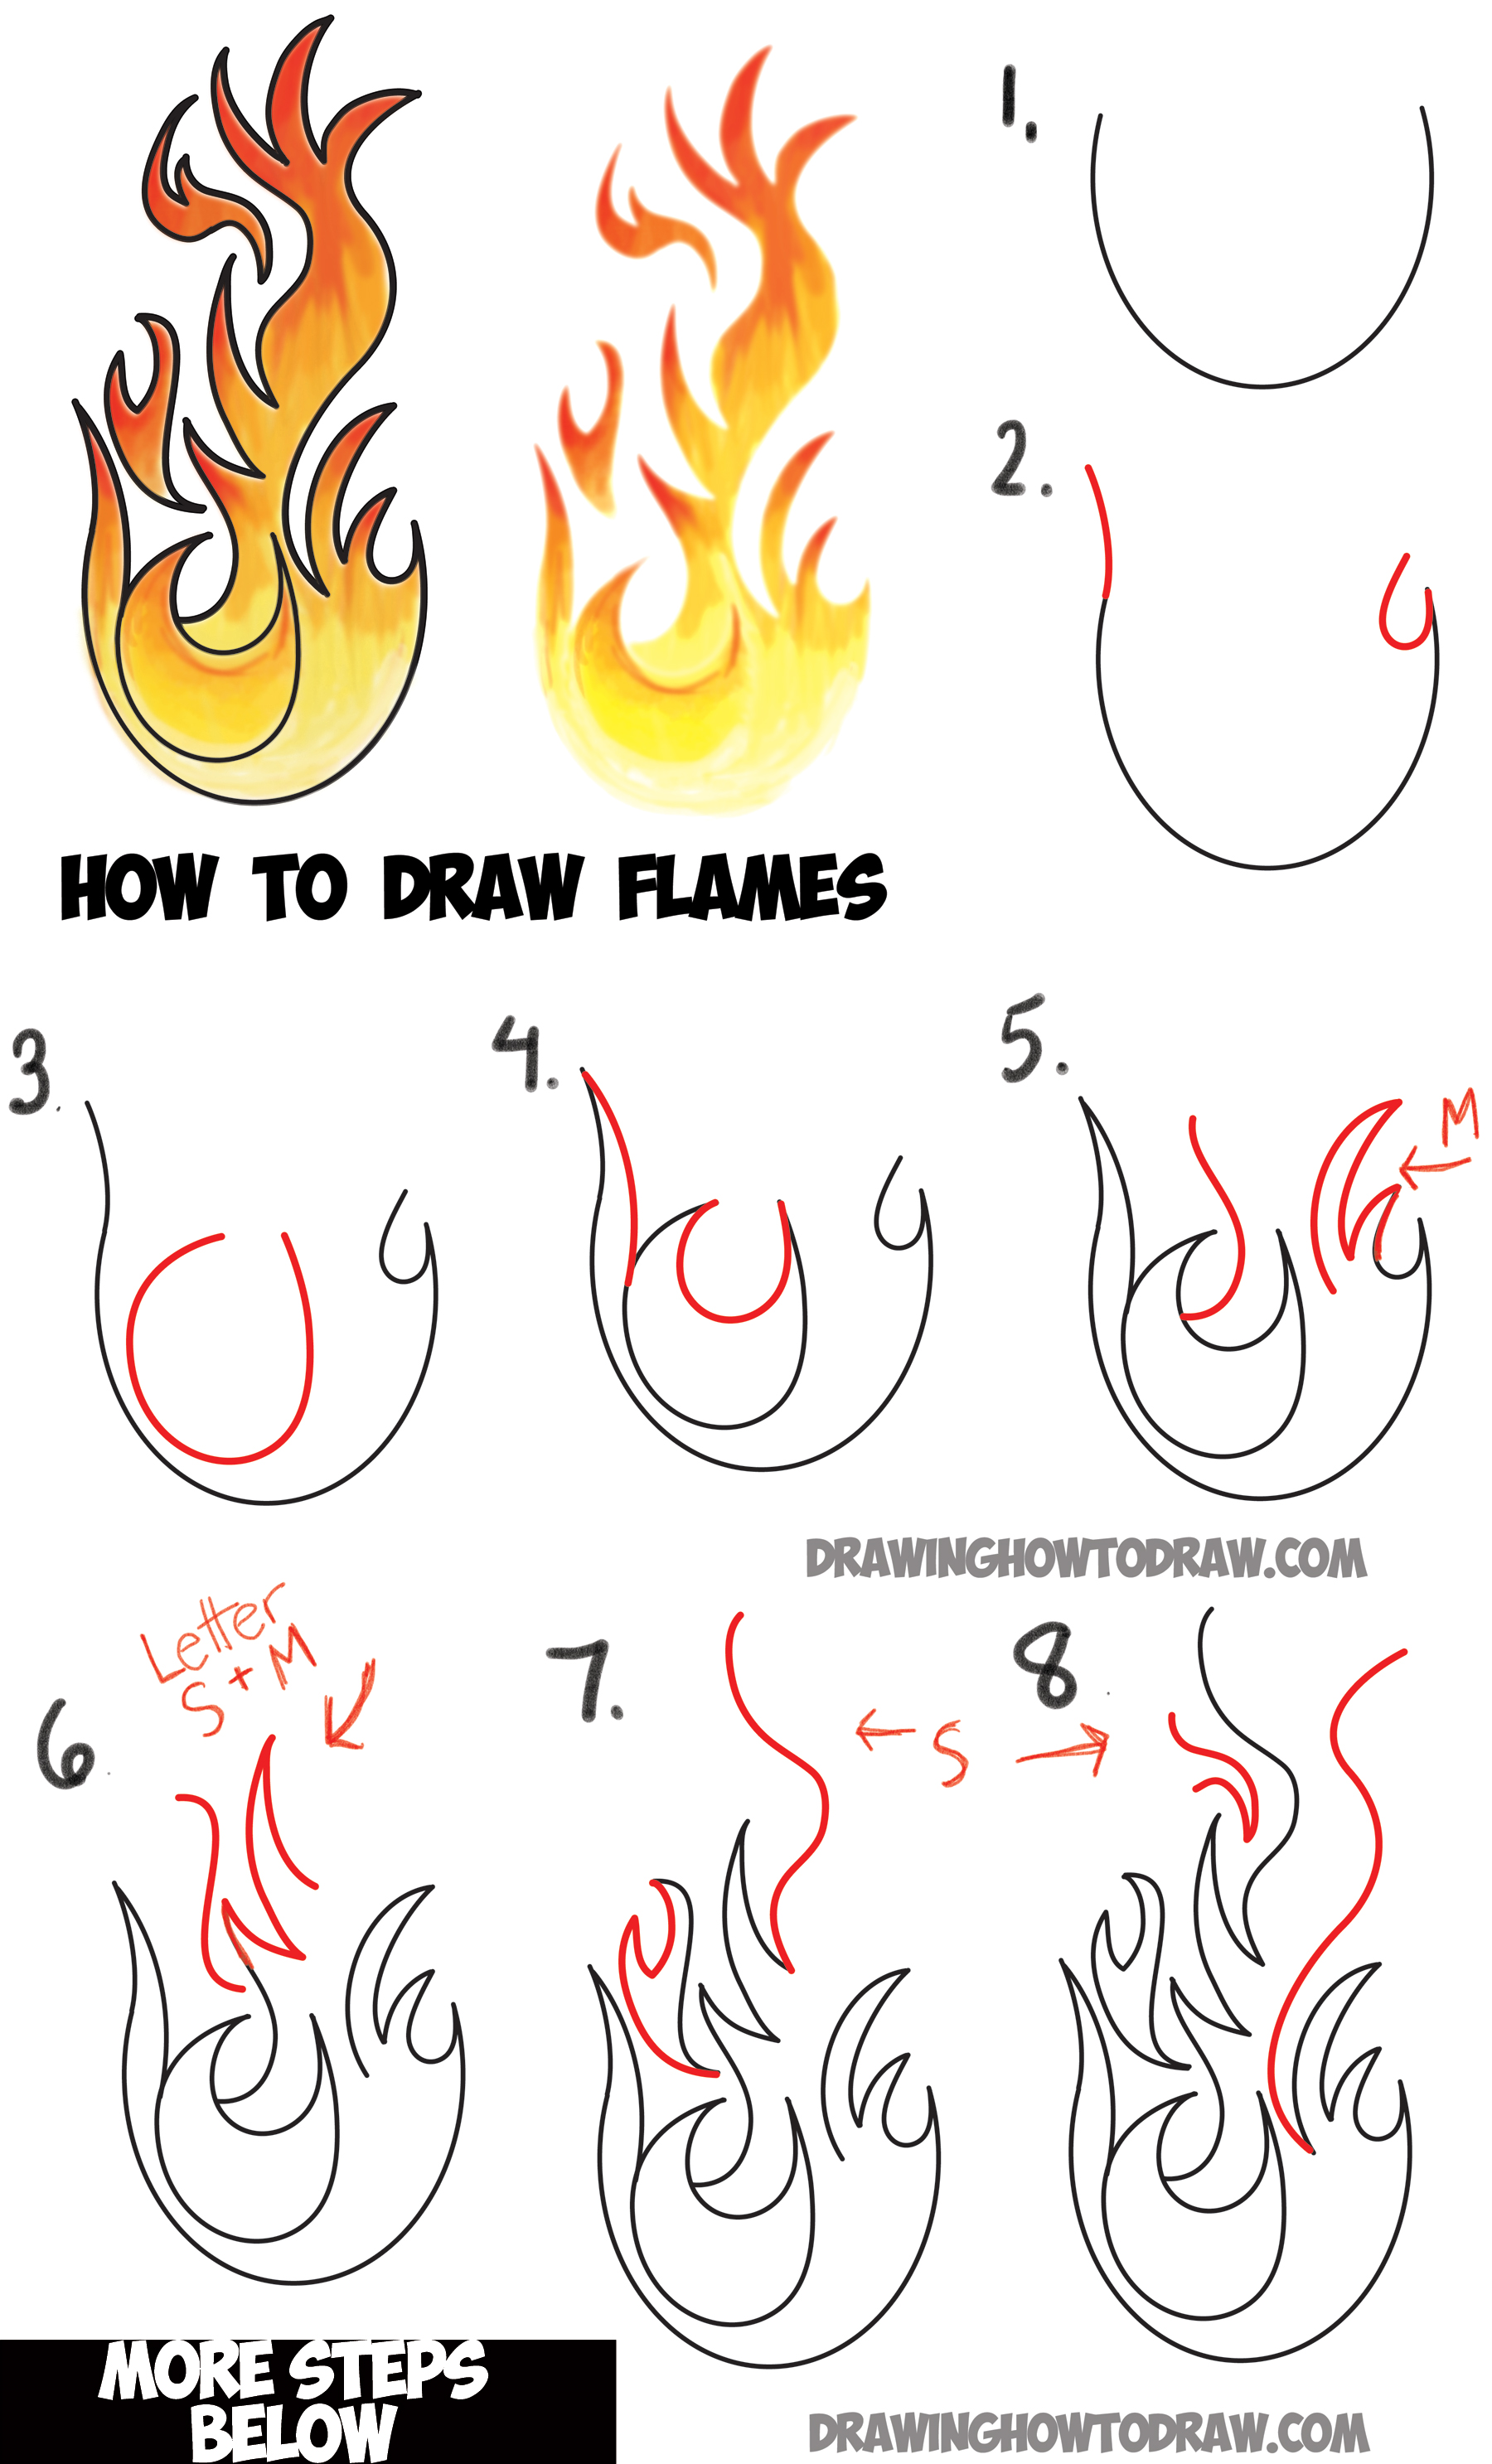
Step 1: The Basic Shape of a Flame
The first step in learning how to draw fire is to sketch out the main form. Think of a flame as a wobbly, somewhat tear-drop shape, or even a bit like a stretched-out letter 'S' that's standing up. It's not a perfect circle or square, you know, but something more organic.
Start by drawing a soft, curved line that goes up and then curves back down, forming a gentle peak. This is the main body of your flame. Try drawing a single flickering flame first, so you can get a feel for this initial shape. Don't press too hard with your pencil, as these are just guide lines, basically.
You can make it a little wider at the bottom and narrower at the top. This initial outline helps define where your fire will sit on the page, you know. It’s like creating the skeleton for your fiery masterpiece, actually.
Step 2: Adding More Wavy Lines
Once you have that first basic shape, it's time to add some more movement. Fire isn't just one solid shape; it has smaller, dancing parts. So, draw a few more wavy, curved lines inside your first outline, following the same general direction, you know.
These lines should be a bit smaller and rise up from the base, almost like smaller flames reaching upwards. Some can overlap, and some can stay separate. This really starts to give your fire that lively, flickering look. Think about how a real flame moves, and try to capture that feeling with your pencil, basically.
Don't worry about making them perfect; the beauty of fire is its unpredictable nature. These extra lines add depth and suggest different parts of the flame moving, which is pretty cool, you know. They are like the smaller, individual dances within the larger fire.
Step 3: Building the Inner Glow
Now, let's focus on the heart of the flame. Fire is brightest at its core, so we need to show that. Inside your wavy lines from Step 2, draw even smaller, more irregular shapes near the bottom of your flame, you know. These shapes will represent the hottest, most intense part.
These inner shapes can be a bit more jagged or spiky, showing that intense heat. They should be closer to the base where the fuel source would be. This step is really important for making your fire feel like it's glowing from within, actually. It's where the light feels like it's coming from.
You're basically creating layers of flame, with the smallest, brightest layers at the very center. This layering helps give your fire a three-dimensional quality, which is pretty neat. So, keep those inner shapes organic and bright-looking.
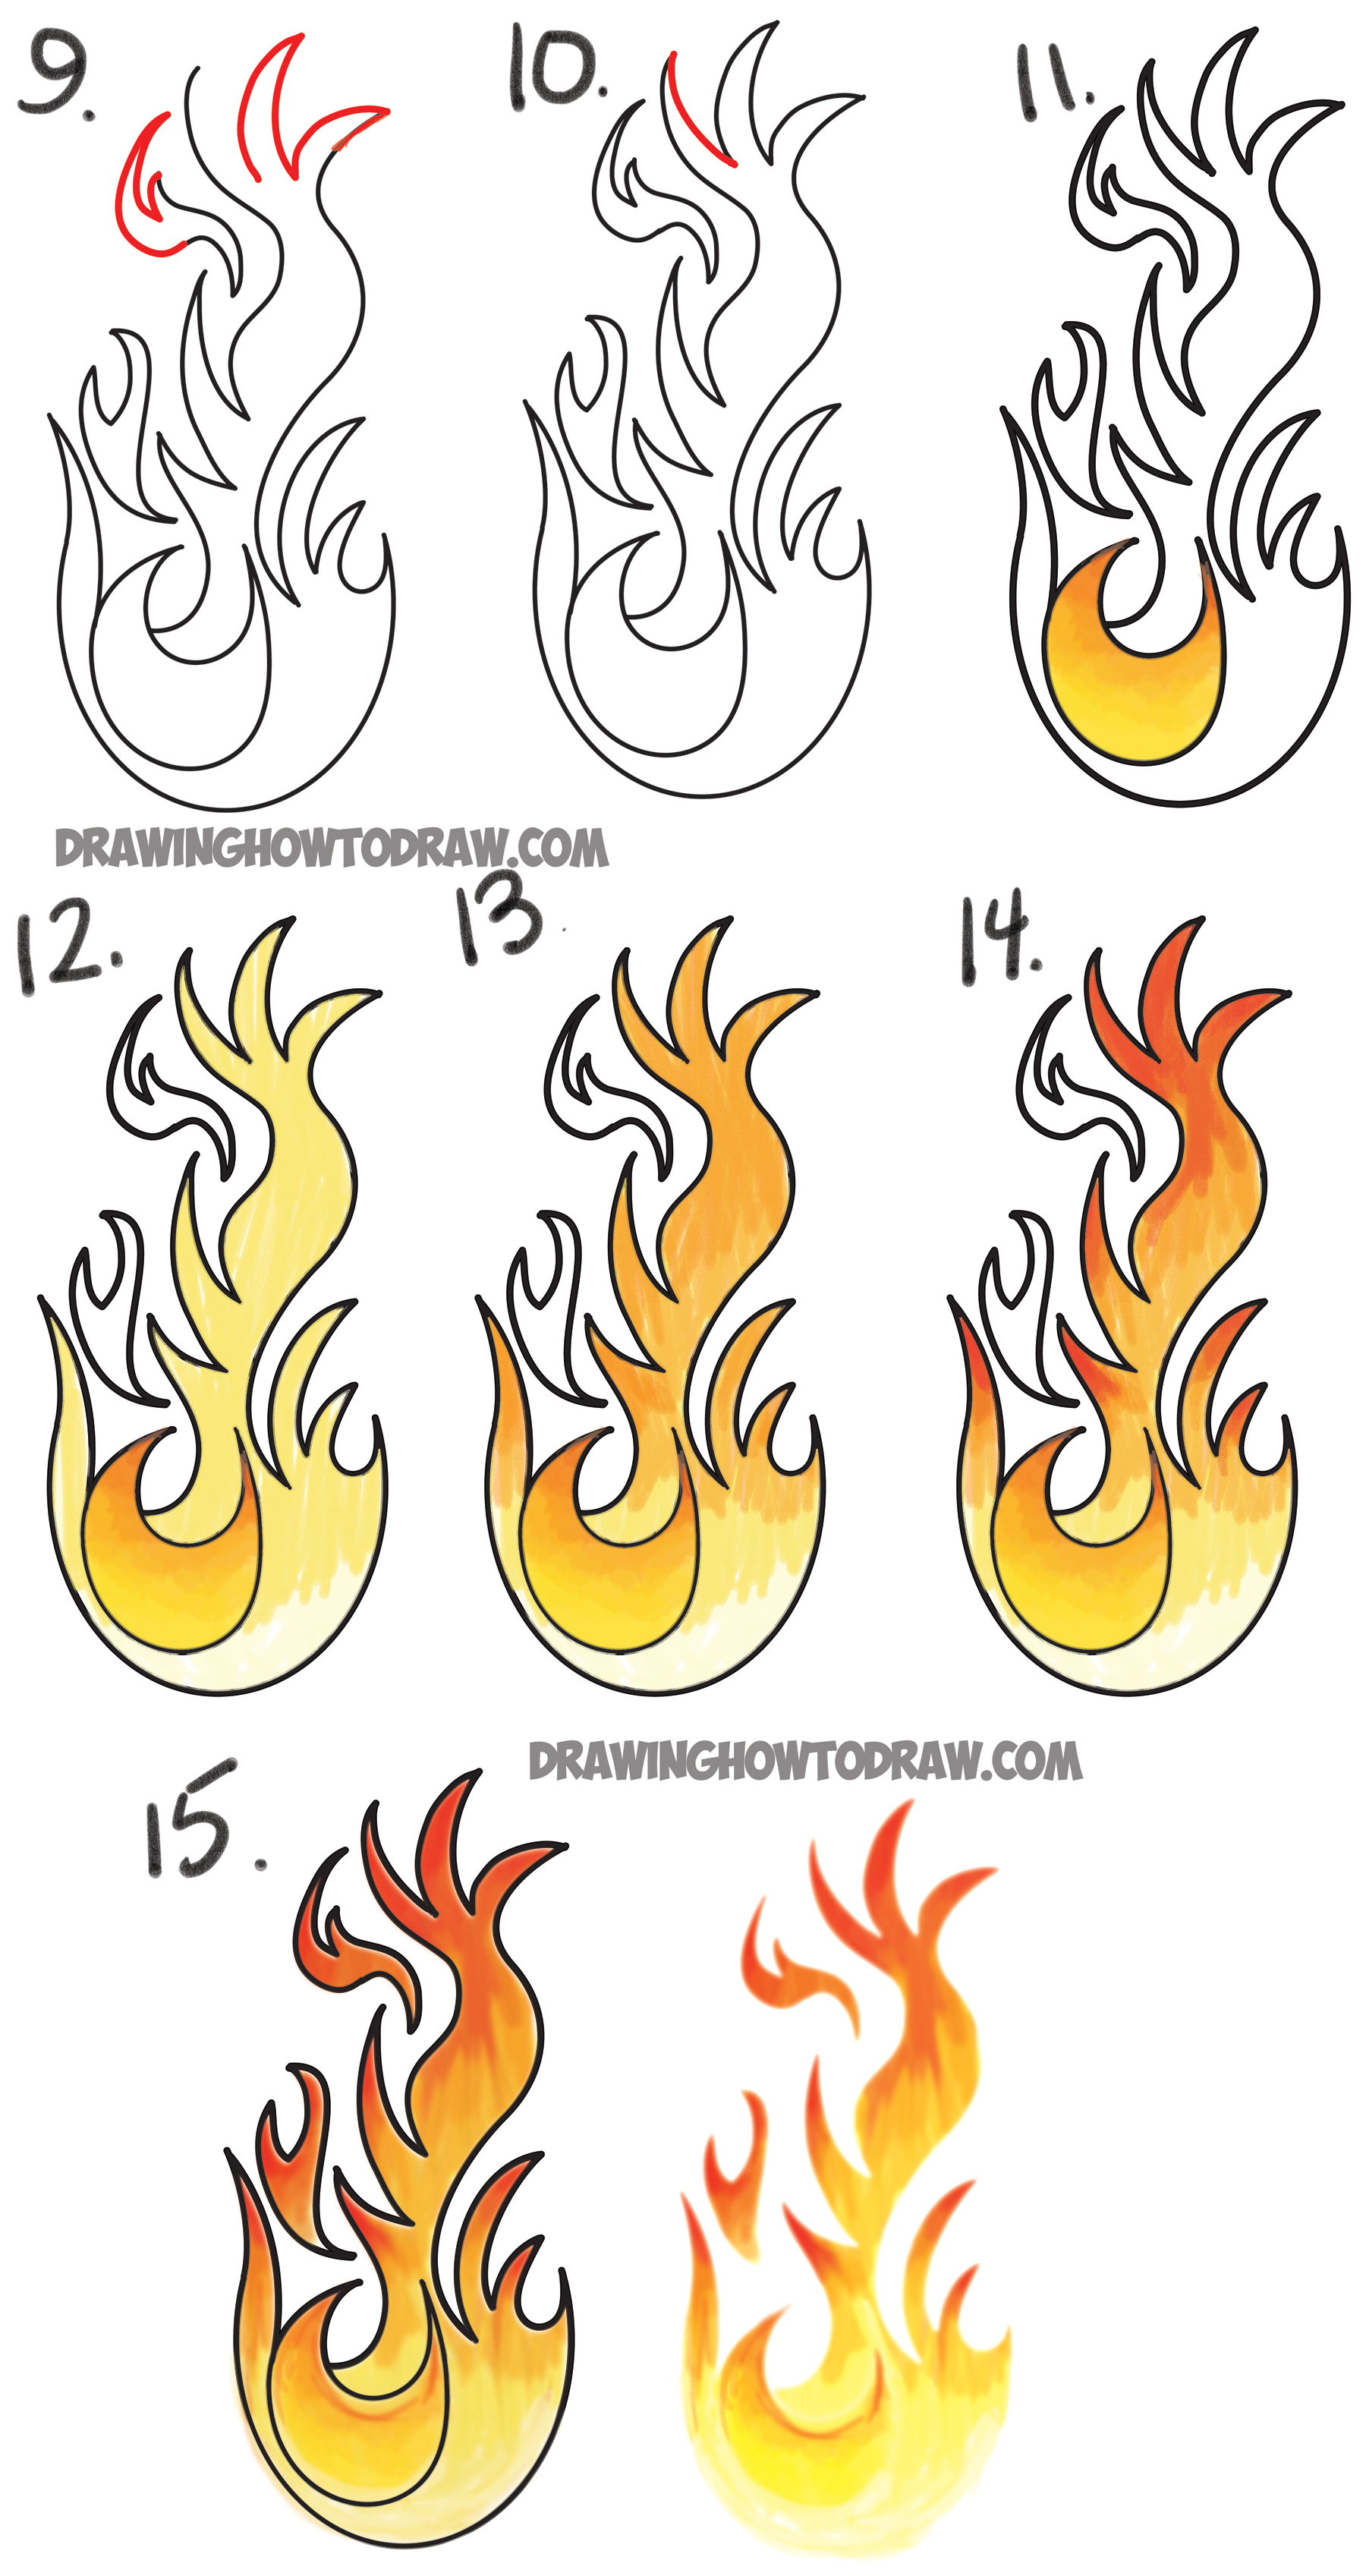
Step 4: Layering Colors for Depth
This is where your fire really comes to life! Fire has vibrant colors, and we'll use them to create depth. Start with the brightest color, like a bright yellow or even white, for the very center and the smallest inner shapes you drew in Step 3, you know. Color these areas gently.
Next, use an orange color to fill in the areas around the yellow, but still within the main flame shapes. As you move outwards, use a red. So, you'll have yellow in the middle, then orange, and then red on the outer edges. This color gradient makes the fire look hot and alive, basically.
You can even add a touch of dark red or brown at the very base, where the flame meets its fuel, to show where it's hottest. Layering colors like this is key to making your fire look dynamic and real, you know. It’s a very visual way to show heat and light, actually.
Step 5: Refining Edges and Movement
With your colors in place, let's refine the edges. Fire isn't perfectly smooth; it flickers and moves. Use your eraser to gently soften some of the hard lines you drew earlier, especially on the outer edges of the red and orange. This makes the flame look less rigid and more ethereal, you know.
You can also add very thin, wispy lines extending upwards from the main flame. These represent tiny flickers or sparks flying off. These small details add a lot to the feeling of movement. Remember, flames are constantly changing, so your drawing should reflect that, actually.
Don't be afraid to make some edges a bit uneven or slightly blurred. This helps capture that dynamic, dancing quality that makes fire so captivating. It’s about making it feel alive on the page, you know.
Step 6: Adding Smoke and Sparkle
To really complete your fire, think about what surrounds it. Smoke often rises from a fire, especially if it's a bit smoky. You can draw soft, swirling grey lines above your flame to represent smoke. Keep these lines light and airy, you know, not too dark or heavy.
For sparkle, you can add tiny dots of yellow or white around the flame, almost like embers floating upwards. These small touches really bring the whole scene together. They add to the atmosphere and make your fire feel like it's part of a bigger picture, actually.
You might also want to add a subtle glow around the fire, perhaps with a very light yellow or orange wash, to show the light it casts. This makes the fire pop even more. So, these final details are pretty important for that finished look, basically.
Digital Fire Drawing: Using Online Tools
If you're into digital art, learning how to draw fire can be even more flexible. There are many fantastic free online drawing applications that let you create digital artwork. You can share these online and export them to popular image formats like JPEG, PNG, SVG, and PDF, which is pretty handy, you know.
One such tool is Sketchpad. It's a free online drawing application for all ages, and it's been updated recently to version 4.1. You can easily draw, edit photos, or design your next business card with it, actually. It’s quite versatile for crafting images for social media posts, digital ads, paper, or even apparel.
You can learn more about Sketchpad and watch videos for tips and tricks on how to use it and get the most out of the app! It's a great way to experiment with different brushes and layering effects for fire, basically, without needing to buy expensive software. For instance, you can use the letter "s" to take a shortcut to the style chooser, or while holding a button, tap the screen with different finger combinations to access tool presets, which is pretty cool.
Tips for Making Your Fire Look Real
Making your drawn fire look really convincing is all about paying attention to a few key things. First, remember that fire is brightest at its source and gets darker as it goes up and outwards. So, keep that yellow/white core intense, you know.
Second, don't make your flames too symmetrical. Real fire is always moving and changing, so give your lines a bit of irregularity. Third, consider the light source. If your fire is the only light, everything around it should be lit by its glow, actually.
Finally, practice observing real flames. Look at how they move, how the colors shift, and how smoke behaves. The more you observe, the better you'll become at capturing that natural look, basically. It’s all about getting that dynamic feel right, you know.
Common Questions About Drawing Fire
People often ask a few things when they are trying to figure out how to draw fire. Here are some common questions and their answers, actually, to help you along.
What colors do you use to draw fire?
Typically, you'll want to use a range of warm colors. Start with bright yellow or even white for the hottest, innermost parts of the flame, you know. Then, move to oranges, and finally, reds for the outer edges. Sometimes, a touch of dark red or even brown at the very base can add depth, basically.
How do you make fire look realistic?
Making fire look realistic involves a few tricks. Focus on irregular, wavy shapes rather than perfect ones. Layer your colors from light (center) to dark (edges) to show heat, you know. Also, add subtle elements like rising smoke, tiny embers, and a soft glow around the fire to enhance its presence, actually. Don't forget the movement!
What are the basic shapes of a flame?
The most basic shape for a flame is a wobbly, elongated tear-drop or a slightly stretched letter 'S' that points upwards. From this main shape, you then add smaller, similar wavy forms inside to create the illusion of multiple flickering parts, you know. It's all about organic, flowing lines, basically.
Your Next Steps in Drawing Flames
You've just learned how to draw fire in a few simple steps, which is pretty great! Remember, drawing a fire can seem like an intimidating task, but it can be an enjoyable and rewarding experience once you get the hang of it. The more you practice, the more confident you'll become in capturing those beautiful, dancing flames, you know.
Keep experimenting with different colors, styles, and even types of fire – from a small candle flame to a roaring bonfire. Each drawing session helps you improve your skills and develop your unique artistic touch. You can find more helpful drawing tips and tutorials on our site to keep your artistic journey going, actually. Learn more about drawing techniques on our site, and link to this page for more art inspiration.
So, don't be afraid to try drawing fire again and again. Each attempt is a step towards creating something truly spectacular. Happy drawing, and keep those creative sparks flying, basically!
- Another Word For And
- Earthy Style Dress To Impress
- Thank You In Spanish
- Inside Out 2 Always On Phone
- La La Land Cafe
How to Draw Flames and Drawing Cartoon Fire Drawing Tutorial – How to

How to Draw Fire - Tutorial on Toyhouse
Fire Flames Sketch
