Mastering How To Draw A Mouth: Simple Steps For Expressive Artwork Today
Learning how to draw a mouth can feel like a real puzzle for many aspiring artists. That, is that, a face without a well-drawn mouth often looks incomplete, or perhaps, a bit lifeless. The mouth, you see, plays a big part in showing feelings, and it helps make a person's face look unique. Getting the shape, the curve, and the small details just right can really make your character drawings come alive. It is a skill that takes some practice, but it is certainly one worth picking up for anyone wanting to create great portraits.
This guide offers a basic look at the shapes and anatomy needed for drawing realistic mouths, which is rather useful. We will walk through the steps together, making it easy to follow along, whether you are picking up a pencil for the first time or just want to get better at facial features. You will discover various lip shapes and learn how to draw them in different styles, too. Our aim is to help you feel more sure of yourself when it comes to sketching this important part of the face, making your art much more dynamic.
Fortunately, once you learn how to draw a basic mouth, either closed or open with teeth showing, you will be able to make adjustments depending on who you are drawing or what. This article on how to draw a mouth step by step for kids and beginners will help you in facial drawing and become expert of it. So, get ready to make some stunning artwork, as we explore simple steps and techniques for realistic and expressive illustrations. This guide will be simple and useful for you, honestly.
- South Carolina Gamecocks Womens Basketball
- Kelsey Chow Movies And Tv Shows
- Missouri Star Quilt Company
- Descargar Video De Instagram
- How To Fake Sick
Table of Contents
- How to Draw a Mouth: Getting Started
- Understanding Mouth Anatomy for Drawing
- Step-by-Step Guide to Drawing a Closed Mouth
- Drawing an Open Mouth with Teeth
- Expressing Emotion Through Mouths
- Shading Techniques for Realistic Mouths
- Tips for Drawing Mouths on Different Faces
- Frequently Asked Questions About Drawing Mouths
- Continuing Your Drawing Journey
How to Draw a Mouth: Getting Started
When you first begin to draw a mouth, it is good to think of it as a set of basic shapes, you know. Forget about all the small details for a moment. Just focus on the overall form. This approach helps you place the mouth correctly on a face and get the proportions right. A simple line can often be your best friend to start with, truly.
You might wonder if you need special tools. Well, not really. A simple pencil and paper are perfectly fine for practice. If you want to draw a mouth with a pen or graphic tablet, the same basic ideas apply. The main thing is to get comfortable with the shapes before adding too much detail. That is a good way to learn, basically.
To start, consider the center line of the mouth. This line, more or less, shows where the upper and lower lips meet. It is often the most expressive part. Getting this line right is a big step towards a mouth that looks real. You will find that this guide makes things simple and useful for you, as a matter of fact.
- 10 Sibling Entire Wayans Brothers Family
- Itscarlyjane Leaks
- Bbq Chicken Urban Dictionary
- Shu Jiao Fu Zhou
- Daisy Edgar Jones Movies And Tv Shows
Understanding Mouth Anatomy for Drawing
To draw mouths that truly look real, it helps a lot to know a little about what is underneath the skin. We are talking about the basic parts of the lips and the muscles that move them. This knowledge helps you understand why lips curve in certain ways and how they change with different feelings, you know. It makes your drawings much more convincing, honestly.
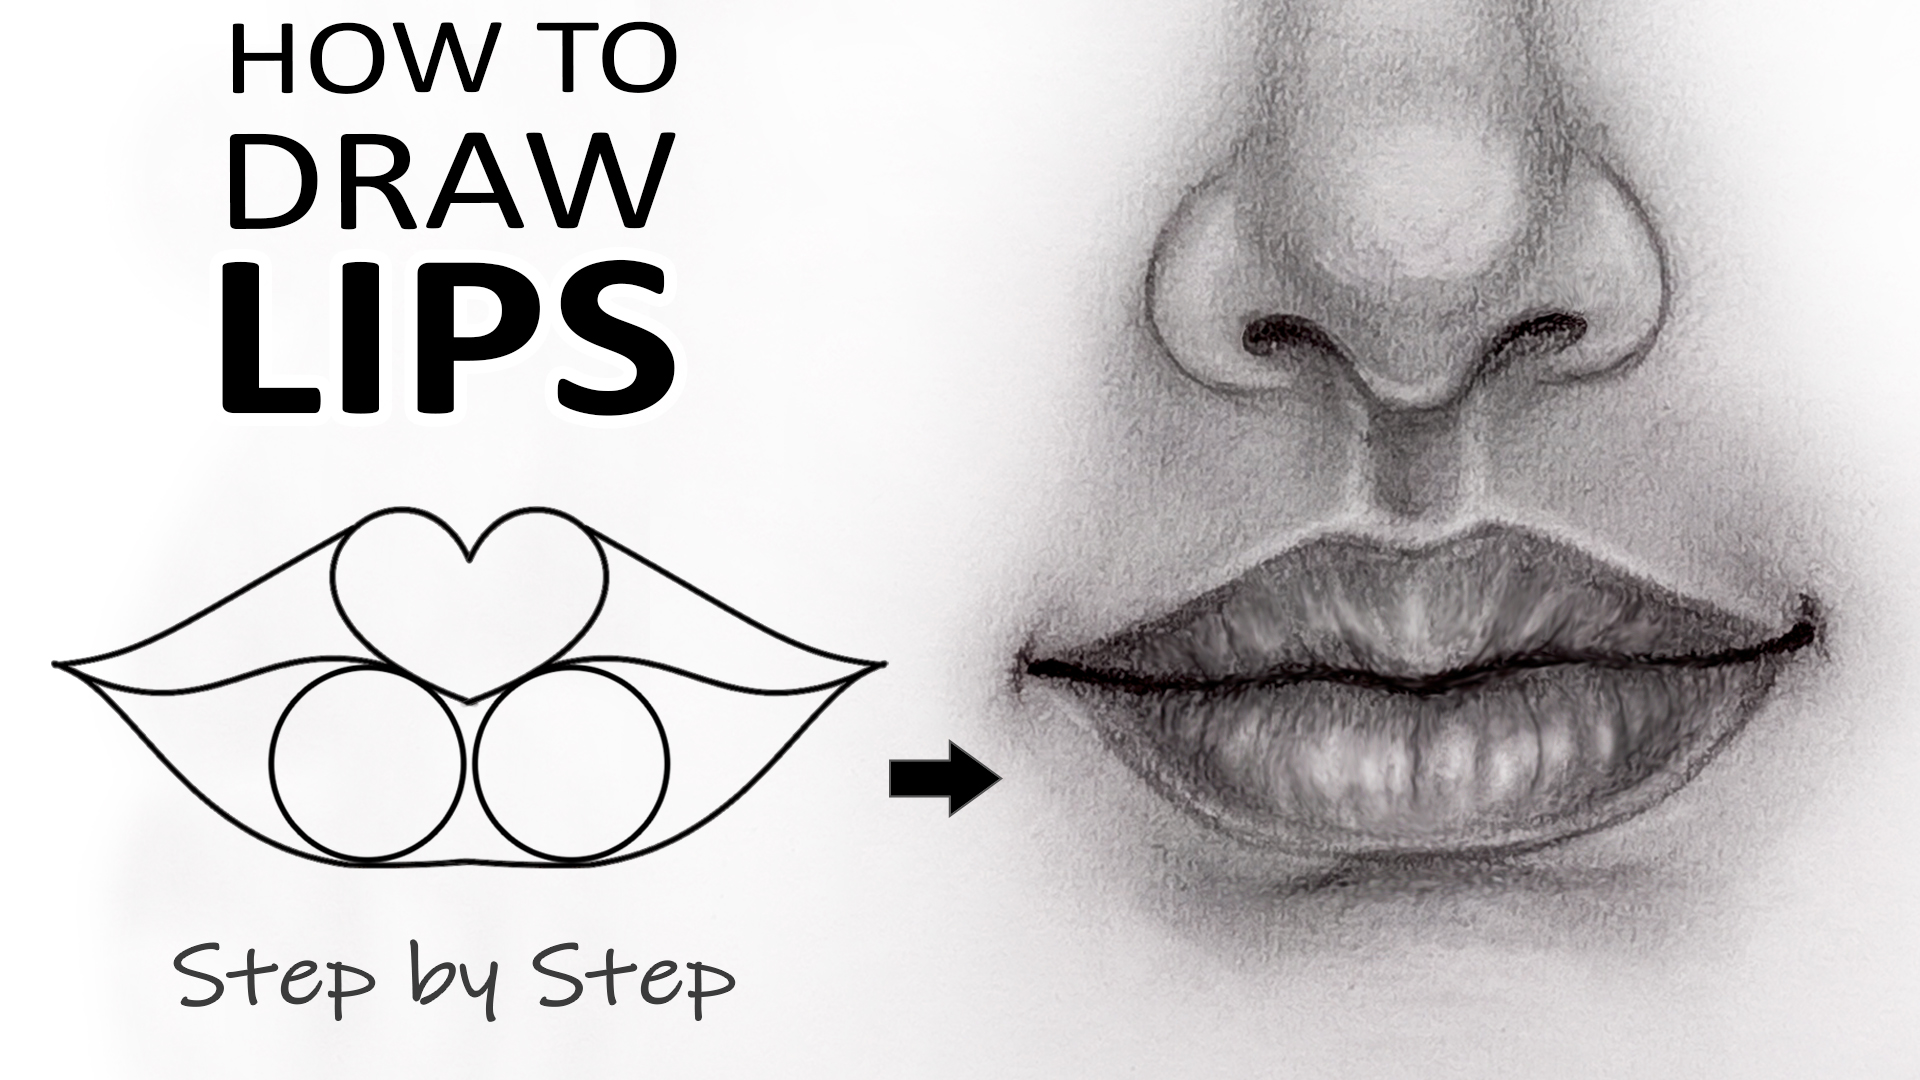
The Basic Shapes of Lips
Think of lips as having a few key parts. The upper lip often has a distinct curve in the middle, which we sometimes call the cupid's bow. This shape is quite unique to each person. Below that, the philtrum is the small groove that runs from your nose down to the upper lip. The lower lip, on the other hand, is usually fuller and has a softer curve. It is often made of two main bumps, or rather, rounded forms.
The corners of the mouth, called commissures, are where the upper and lower lips meet. These points are very important for showing expressions. They can turn up for a smile or down for a frown. Remembering these simple shapes will help you build a mouth that has volume and looks like it belongs on a face. It is like building with blocks, in a way.
Muscles and Form
The mouth is not just a static shape; it moves because of muscles. The main muscle around the mouth is called the orbicularis oris. It acts like a ring, allowing you to pucker your lips, smile, or frown. Knowing this helps you understand why lips push out or pull back when someone talks or makes a face. This muscle, you see, affects the whole form of the mouth.
Other muscles around the cheeks and jaw also connect to the mouth, affecting its overall look. For instance, when you smile, muscles pull the corners of your mouth upwards and outwards. This causes small creases to appear around the mouth. Understanding these muscle actions helps you draw more dynamic and expressive mouths. It is pretty neat, actually.
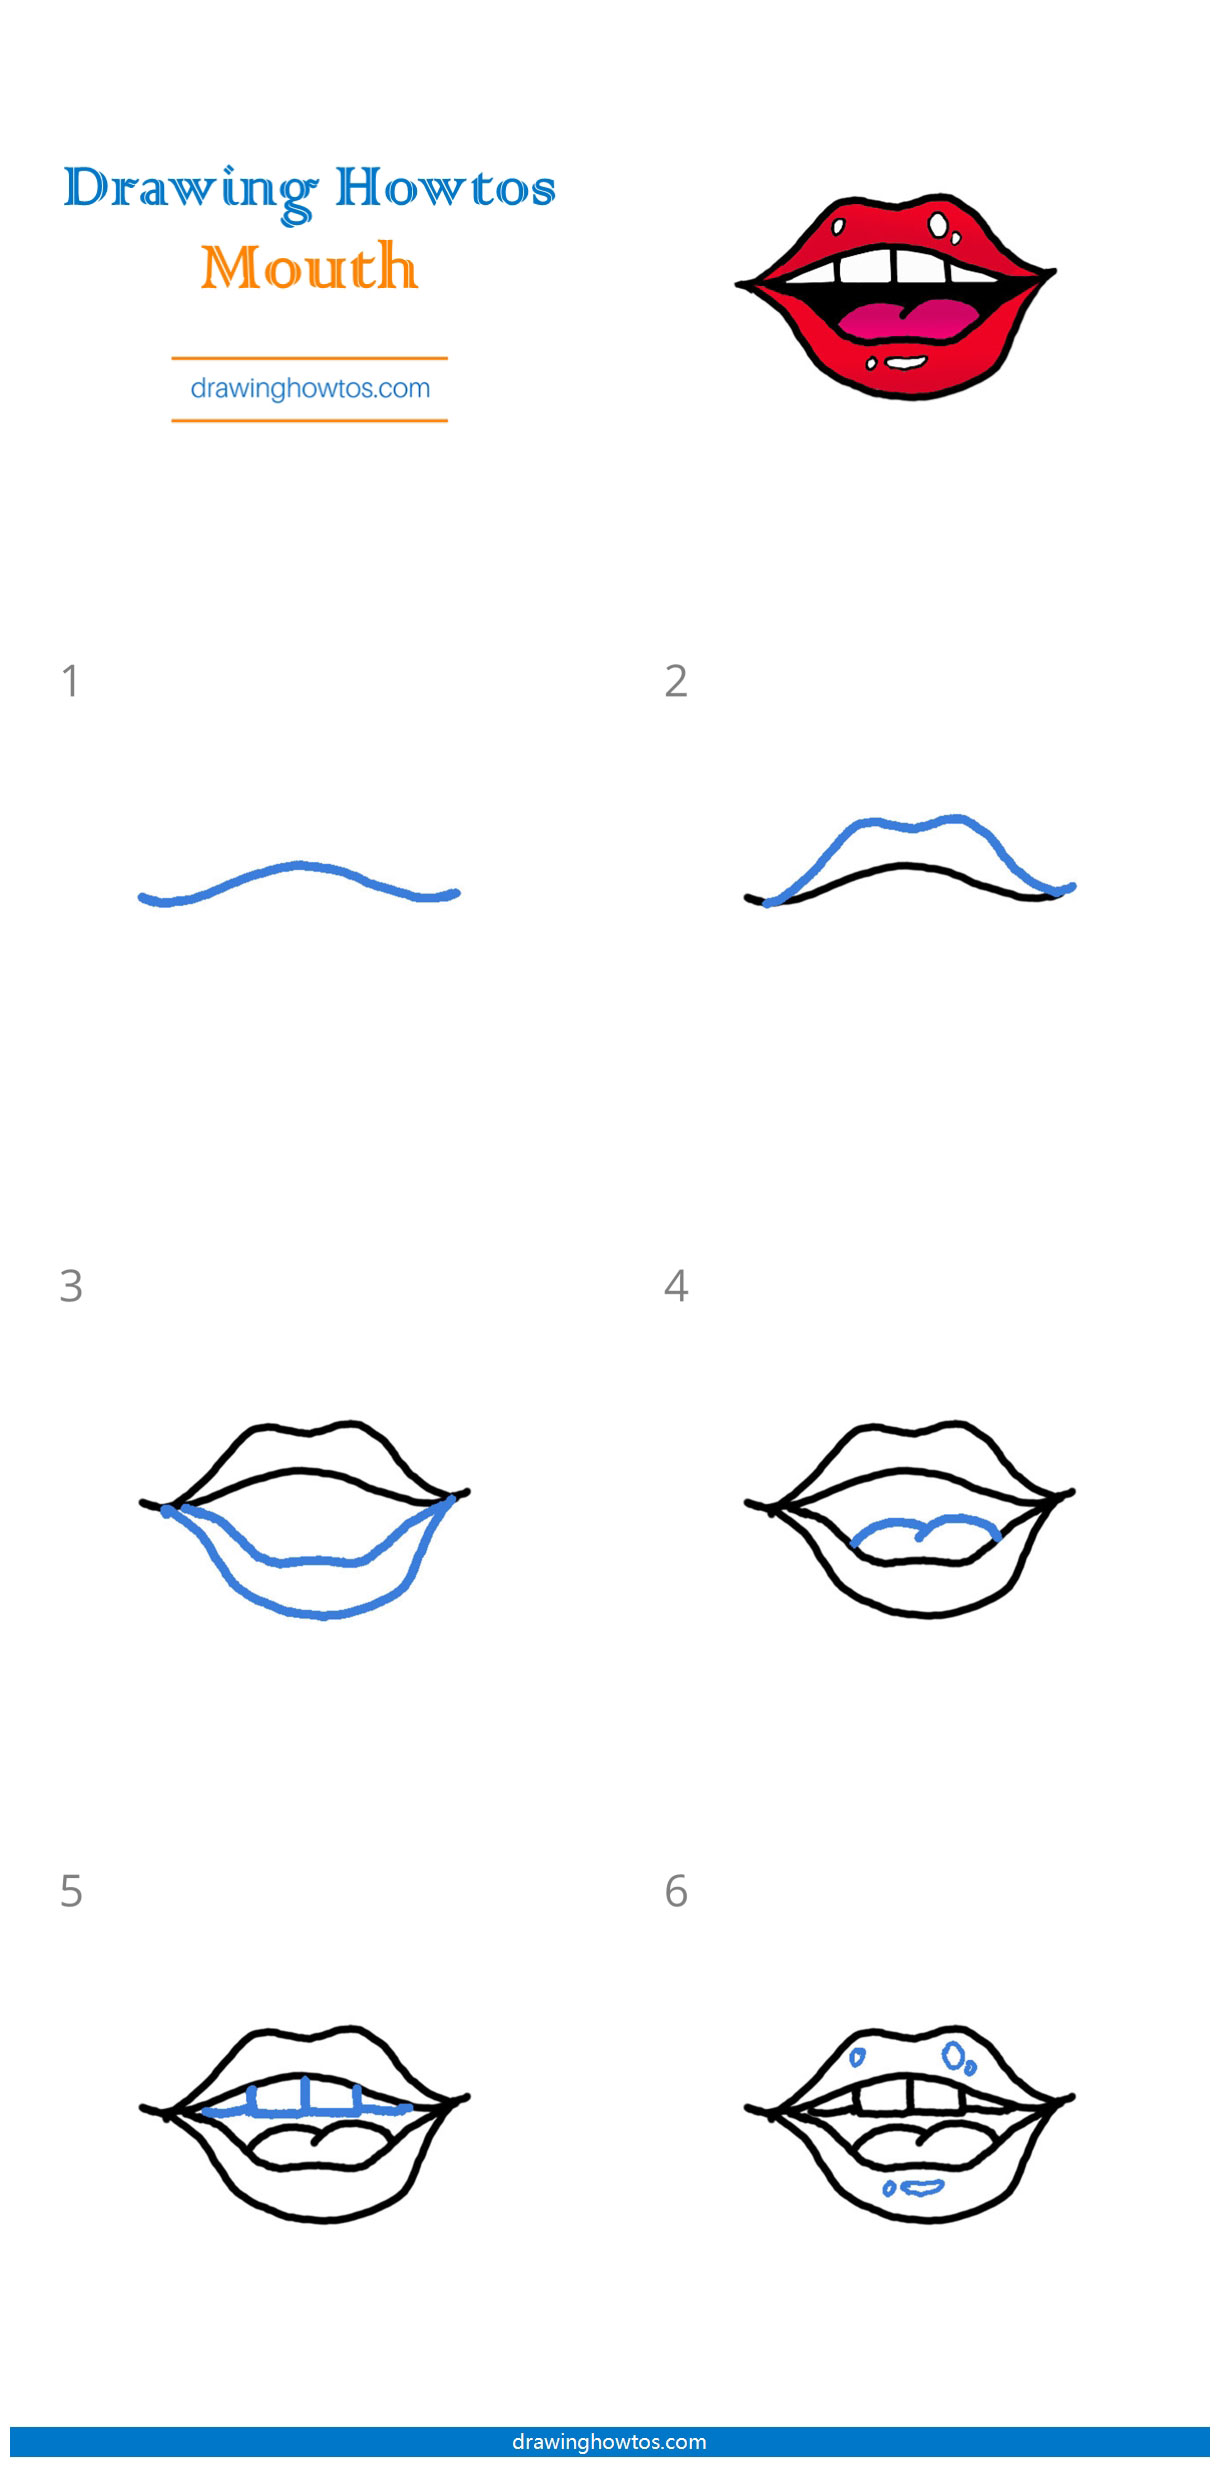
Step-by-Step Guide to Drawing a Closed Mouth
Let us begin with drawing a closed mouth, as it is a good starting point for beginners. This process will show you how to build up the shape from simple lines to something that looks quite real. We will go through it one step at a time, making sure you get a good grasp of the basics. This is a very practical way to learn, honestly.
Starting with Simple Lines
First, draw a light horizontal line. This line will serve as the center line of the mouth, where the lips meet. It helps you get the width and placement right on your drawing. Make sure it is not too dark, as you will erase parts of it later, you know. This line is just a guide, after all.
Next, above this center line, draw a small "M" shape for the cupid's bow of the upper lip. This "M" does not have to be perfect, just a general indication of that curve. Below the center line, draw a gentle, wide "U" shape for the bottom curve of the lower lip. These simple shapes are the foundation, basically.
Then, mark two small vertical lines at each end of your horizontal center line. These will be the corners of the mouth. They help define the overall length of the mouth. You are just sketching out the basic frame here, so keep your lines light and loose. It is pretty straightforward, really.
Adding Volume and Curve
Now, let us give the lips some fullness. Connect the points of your "M" shape to the corners of the mouth, forming the top edge of the upper lip. Remember that the upper lip often has a slight dip or curve in the middle, so make sure your line reflects that. It is not just a straight line, you see.
For the lower lip, connect the ends of your "U" shape to the corners of the mouth. The lower lip is usually fuller than the upper one, so give it a nice, soft curve. You might find it has two gentle bumps rather than one smooth arc. Observe how your own lips curve, or look at a picture, for instance.
At this stage, you should have a basic outline of the lips. It might look a bit flat, and that is perfectly fine. We are just getting the main structure down. You are building up the shape piece by piece, which is a good way to handle things, in a way.
Refining the Lip Lines
Once you have the basic shapes, it is time to make the lines smoother and more natural. Gently erase any harsh or unnecessary guide lines. Start to soften the edges of the lips. Lips are not usually drawn with sharp, hard lines all around. They have a softer feel, you know.
Pay attention to the slight differences in thickness between the upper and lower lips. The upper lip tends to be a bit thinner in many people, while the lower lip is often fuller. Also, consider the slight shadow that forms just under the lower lip, which helps give it a rounded look. This helps a lot, you know.
You can also add a very faint line or two to suggest the vertical creases on the lips, but do not overdo it. Too many lines can make the lips look old or dry. Just a hint of texture is often enough. This step is about making the mouth look more like actual skin, basically.
Drawing an Open Mouth with Teeth
Drawing an open mouth adds a whole new level of expression to your characters. It can show surprise, laughter, or even speech. The key here is to understand how the jaw drops and how the teeth fit into that space. It is a bit different from a closed mouth, as a matter of fact.
Sketching the Jawline and Opening
To start an open mouth, begin with the basic closed mouth shape, but then imagine the jaw dropping. This means the lower lip will move down, creating a gap between the upper and lower lips. Sketch a wider, more open shape for the mouth opening. This opening will be somewhat oval or rounded, depending on how wide the mouth is open, you see.
Think about the overall head shape and how the jaw connects. When the mouth opens, the jaw pivots, and the chin moves down a bit. This affects the shape of the cheeks and the area around the mouth. Make sure the opening looks natural for the face you are drawing. It is a subtle but important detail, really.
Placing the Teeth
With the mouth opening sketched, you can now place the teeth. The upper teeth are usually more visible than the lower ones, especially when smiling. Draw them as a row of slightly curved rectangles or squares, following the curve of the upper lip. Do not draw every single tooth perfectly; just suggest the general shape and placement. Too much detail can make them look like a denture, honestly.
For the lower teeth, they are often seen less clearly and might be in shadow. Draw them as a shorter, less defined row beneath the upper teeth. Again, do not draw every tooth. Just give the impression of teeth being there. Remember that teeth are not perfectly flat; they have a slight curve to them, which is something to consider.
Adding Gums and Tongue
If the mouth is open wide enough, you might see a bit of the gums above the upper teeth or below the lower teeth. These are usually just very small, soft curves. Do not make them too prominent, as they can look odd if overdone. A little hint is often enough, you know.
The tongue is another element that can add a lot to an open mouth. It usually sits at the bottom of the mouth opening, curving upwards. Draw it as a soft, rounded shape. Its position can change with different expressions or sounds, so pay attention to that. For example, a tongue might be flatter when someone is yelling, or slightly curled when speaking certain words. This adds a lot of life to your drawing, as a matter of fact.
Expressing Emotion Through Mouths
The mouth is a powerhouse for showing feelings. A slight change in its shape can completely alter a person's mood in your drawing. Mastering shading, anatomy, and expressions helps you create stunning artwork, truly. Let us look at how to show different feelings, you know.
Happy and Smiling Mouths
When someone is happy or smiling, the corners of their mouth turn upwards. The lips often become a bit wider and sometimes thinner, as they stretch. The upper lip might reveal some upper teeth, and you will see small lines or creases appear at the outer corners of the eyes and mouth. These are called "smile lines" and they add a lot to a happy face. It is a pretty clear sign of joy, really.
The lower lip might also show a gentle curve upwards, reflecting the overall upward movement. Remember that smiles come in many forms, from a soft, closed-lip smile to a wide, open-mouthed laugh. Each one has its own specific shape. You can try drawing different kinds, for instance.
Sad and Frowning Mouths
For sadness or a frown, the corners of the mouth typically turn downwards. The lips might appear to press together more, or the lower lip could push out a bit. Sometimes, the upper lip pulls down in the middle, creating a more downturned shape. This can make the face look quite different, you know.
You might also see a slight pulling down of the skin between the nose and the upper lip, creating a worried look. The overall shape of the mouth becomes more compressed or downturned. These small changes really help convey the feeling of sadness. It is a powerful way to show emotion, basically.
Surprised and Angry Expressions
A surprised mouth is often wide open, forming an "O" shape or a stretched oval. The lips might be relaxed and rounded, showing a lot of teeth or even the tongue. This wide-open look really communicates shock or wonder. It is a very clear expression, really.
For an angry expression, the mouth might be a tight, thin line, with the corners pulled down or even slightly up in a snarl. The lips can be pressed together very firmly, or the upper lip might curl up to show teeth in a more aggressive way. The muscles around the mouth are usually tense, which you can show with sharper lines and shadows. This tension is key to showing anger, you know.
Shading Techniques for Realistic Mouths
Shading is what gives your drawing depth and makes it look three-dimensional. Without proper shading, even the most perfectly outlined mouth can look flat. This is where you really start to make your drawing pop. Do you want to draw a mouth as realistically as possible? Then shading is very important, frankly.
Light and Shadow Basics
To start shading, first decide where your light source is coming from. Is it from above, below, or to the side? This will tell you where the shadows will fall. Lips are rounded forms, so they will have areas of light and shadow. The parts that stick out most will catch the light, while the parts that recede will be darker. It is a simple idea, but it makes a big difference, honestly.
Typically, the upper lip is often in a bit more shadow than the lower lip, because the nose casts a slight shadow over it. The lower lip often catches more light, especially in the middle. There is also a small shadow that usually forms just under the lower lip, which helps lift it off the face. These basic shadows are very important, you know.
Creating Depth and Form
Use soft, gradual changes in tone to show the curves of the lips. Do not draw harsh lines for shadows; instead, build them up slowly with layers of pencil strokes. Think about the form of the lips as if they were cylinders or spheres. The light will wrap around them, creating a smooth transition from light to dark. This makes them look much more rounded, you see.
You can also add highlights, which are the brightest spots where the light hits directly. A small highlight on the cupid's bow or on the fullest part of the lower lip can make them look moist and alive. Be careful not to make highlights too bright or too many. Just a few well-placed ones are often enough. This really helps create depth, actually.
Using Different Drawing Tools
The tools you use can affect your shading. If you are drawing with a pencil, you can use different pressures to create lighter or darker tones. Blending tools, like a paper stump or even your finger, can help smooth out shadows for a softer look. This is a very common technique, basically.
If you are working with a pen, you will need to use techniques like cross-hatching or stippling to create shadows. These involve drawing many small lines or dots to build up tone. For graphic tablets, you have a wide range of brushes and opacity settings to create smooth blends and textures. Each tool has its own way of making shadows, which is quite interesting, you know. By the end of this tutorial, you will have learned various ways to shade effectively.
Tips for Drawing Mouths on Different Faces
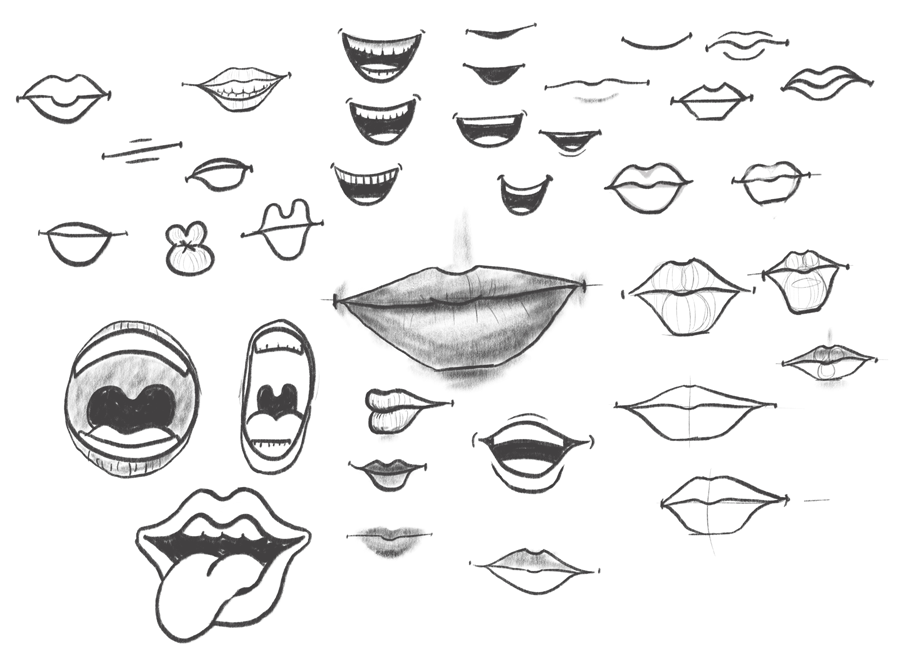
Not every mouth looks the same, which is a good thing! People have all sorts of lip shapes and sizes. Some have full, plump lips, while others have thinner ones. Some mouths are wide, and some are narrow. This variety makes drawing faces so interesting, you know. Discover various lip shapes and how to draw in different styles, too.
When you are drawing a mouth, think about the person's age and gender. Younger people often have fuller lips, while older people might have thinner lips with more lines around them. Men's mouths often appear a bit wider and less defined than women's, though these are general ideas and not strict rules. It is good to observe real people, as a matter of fact.
Also, consider the overall style of your drawing. Are you going for a cartoon look, or something very realistic? This will affect how much detail you add and how you shape the lips. A stylized mouth might be simpler, while a realistic one needs more careful attention to form and shadow. This article will help you become an expert in facial drawing, frankly.
Remember to watch my other tutorials on facial features! You can learn more about drawing eyes on our site, and link to this page to learn about drawing noses. These other guides will help you put all the pieces together for a complete face. It is like building a whole picture, you know.
Frequently Asked Questions About Drawing Mouths
People often have similar questions when they start learning how to draw a mouth. Here are some common ones that might help you, too, as a matter of fact.
How do you draw a mouth for beginners?
For beginners, the best way to draw a mouth is to start with very simple shapes. Begin with a horizontal line for the mouth's center. Then, add a gentle "M" shape for the upper lip's curve and a soft "U" for the lower lip. Connect these to the corners. Focus on getting the basic outline and proportions right before adding any fine details or shading. This step-by-step approach makes it much easier to learn, you know.
What are the basic shapes of a mouth?
The basic shapes of a mouth typically involve a central horizontal line, which is where the lips meet. The upper lip can be thought of as an "M" shape in the middle, curving down to the corners. The lower lip is often a softer, wider "U" shape. Sometimes, people even think of the whole mouth as a sort of stretched oval or a trapezoid shape to get the overall width and height right. These are just starting points, of course.
How do you make a mouth look realistic?
To make a mouth look realistic, you need to pay attention to a few key things. First, get the basic anatomy right, like the cupid's bow and the philtrum. Second, use shading to create depth and volume, showing where light hits and where shadows fall. Third, add subtle details like faint lip lines and a bit of highlight to make them look moist. Finally, consider expressions and how they change the mouth's shape. It is a combination of these elements that makes a mouth truly look real, honestly.
Continuing Your Drawing Journey
You have taken a good look at how to draw a mouth, from the very first lines to adding expressions and shading. This tutorial gives you a basic look at the shapes and anatomy needed for drawing realistic mouths. Remember that practice is what truly helps you improve. The more you draw, the more your hand gets used to the shapes and curves, and the more your eye learns to see the small details. Keep a sketchbook handy and draw mouths whenever you get a chance,
- High Potential Season 2
- Dominican Restaurant Near Me
- Tyson Httpsanonpastecomsharesophie Rain Spiderman Video Fn834nm5f
- What Is The 4th Hole Slang
- What Is A Sapiosexual
How to Draw a Mouth - Step by Step Easy Drawing Guides - Drawing Howtos
How To Draw A Mouth - For this tutorial i will show you how to draw a
How To Draw A Mouth Step By Step Realistic
