How To Separate Names In Excel: Your Quick Guide To Data Cleanup Today
Dealing with a big list of names all crammed into one cell can feel, you know, a bit like trying to untangle a giant knot of yarn. It's actually a common headache for anyone working with data, whether you're managing customer lists, student rosters, or just your personal contacts. You might be looking at a column full of "John Doe" or "Jane A. Smith" and thinking, "There has to be an easier way to get those first and last names into their own spots." Well, as a matter of fact, there really is, and it's much simpler than you might think.
You see, Excel is, in some respects, pretty clever about anticipating what we need. It's almost as if it knows we want to take a full name and just, like, pull it apart so we can sort things better or maybe personalize emails. This kind of data organization is pretty important, actually, for keeping your spreadsheets neat and making sure your information is easy to use. Nobody wants to spend hours manually copying and pasting, right?
So, if you've ever felt stuck with a single column of full names, wondering how to separate names in Excel, you're definitely not alone. This guide is here to walk you through a few straightforward ways to get those first names and last names into their own distinct columns, making your data much more manageable and, honestly, a lot less frustrating to work with. We'll show you how to tackle this common task with ease, giving you back precious time you can spend on other things.
- Why Are People Boycotting Target
- Minecraft Cherry Blossom House
- 10 Sibling Entire Wayans Brothers Family
- Kevin Bacon New Show
- How Old Is North West
Table of Contents
- Why Separate Names in Excel? It's More Useful Than You Think
- Method 1: Text to Columns – The Easiest Way to Separate Names in Excel
- Method 2: Flash Fill – Excel's Clever Shortcut
- Method 3: Formulas – For More Control
- Common Questions About Separating Names in Excel
- Making Your Excel Data Work for You
Why Separate Names in Excel? It's More Useful Than You Think
You might be wondering, "Why go through all this trouble just to split names?" Well, honestly, it opens up a lot of possibilities for your data. For instance, if you want to sort your list alphabetically by last name, you really need that last name in its own column. Or, perhaps you want to create a mailing label that says "Dear [First Name]," which, you know, feels a lot more personal. It's also pretty helpful for filtering data, running reports, or even just making your spreadsheet look a lot tidier.
Having separate columns for first and last names just makes your information much more flexible. It’s a bit like having all your tools organized in a toolbox rather than just thrown into one big pile; you can actually find what you need when you need it. This simple step can actually save you a ton of time down the road, especially if you deal with large datasets often. So, learning how to separate names in Excel is, in a way, a really good skill to have.
Method 1: Text to Columns – The Easiest Way to Separate Names in Excel
This is, arguably, the go-to method for most folks. It's pretty straightforward and, frankly, works wonderfully for most situations. The "Text to Columns" feature in Excel is, you know, basically designed for this kind of task. It takes a single column of text and splits it into multiple columns based on a delimiter, which is just a fancy word for a character that separates your data, like a space or a comma. Luckily, Excel is one step ahead of us, making it easy to split a column full of names into two separate columns with first and last names, which is really handy.
- Slide Rock State Park
- Salvage Hunters Tee
- Cast Of Kpop Demon Hunters
- Voice For Optimus Prime Transformer Movie
- Dairy Queen Grill Chill
Step-by-Step Guide for Text to Columns
Let's say you have a list of full names in column A, starting from A2. Here’s how you can separate them:
- Select Your Data: First, you need to highlight the entire column (or the specific cells) that contain the full names you want to split. So, just click on the column header (like 'A') to select everything in that column, or drag your mouse over the relevant cells.
- Find "Text to Columns": Go to the "Data" tab in Excel's ribbon. You'll typically find a section called "Data Tools." Within that section, look for the "Text to Columns" button. It's usually represented by an icon that looks like text being split into two columns.
- Choose "Delimited": A wizard will pop up. The first step asks you to choose the file type. Select "Delimited" because your names are separated by a character (like a space), not a fixed width. Then, click "Next."
- Select Your Delimiter: This is where you tell Excel what's separating your first and last names.
- If your names are like "John Doe," you'll check the "Space" box. Uncheck any other boxes that might be selected, unless you have other delimiters.
- If your names are like "Doe, John," you'd check "Comma" and "Space" (or just "Comma" if there's no space after the comma).
You'll see a data preview at the bottom, which is pretty helpful, actually, as it shows you how your data will look once split. This way, you can verify your choices before moving on. Then, click "Next."
- Choose Destination and Format:
- Destination: This is super important. Excel will, by default, try to put the split data right next to your original column. If you don't want to overwrite your original data, you need to change the "Destination" cell. Click the little up arrow next to the destination box and select an empty cell where you want your new first names to start (e.g., B2). This way, your original data stays safe.
- Column Data Format: For names, "General" is usually fine. This format handles numbers, text, and dates. If you were splitting something else, you might choose "Text" or "Date."
After you've set your destination, click "Finish." And just like that, you should have your first and last names in separate columns! It's actually pretty neat how quickly it works.
Handling Middle Names and Initials with Text to Columns
What if you have names like "John A. Smith"? If you use "Space" as your delimiter, Excel will, you know, split it into three columns: "John," "A.," and "Smith." This is usually what happens, which is perfectly fine. You can then, basically, just decide what to do with the middle initial column. You might keep it, or you might, you know, just delete it if you don't need it. It's a pretty flexible tool, you see.
If you want to combine the first and middle name, or the middle and last name, that would require a different approach, perhaps using formulas after the initial split, or a more advanced formula from the start. But for a simple split, this method is, you know, generally very effective.
What About Names with Commas?
Sometimes, data comes in as "Doe, John." In this situation, when you get to the delimiter step, you'll want to check "Comma" first. This will split "Doe" into one column and "John" into another. If there's a space after the comma, like "Doe, John," you might need to run "Text to Columns" again on the second column, using "Space" as the delimiter to get rid of that leading space, or use the TRIM function later. It's, you know, all about adjusting to your specific data.
Troubleshooting Text to Columns
If things don't look right, you know, don't worry too much. Here are a few things to check:
- Delimiter Choice: Did you pick the correct delimiter? Sometimes, it's a tab, not a space, or maybe even a semicolon.
- Extra Spaces: If names have multiple spaces between words (e.g., "John Doe"), Text to Columns might create empty columns. You can clean this up later with the TRIM function (we'll talk about that a little later, too).
- Overwriting Data: Did you accidentally overwrite your original data? If so, immediately hit "Ctrl+Z" (Undo) and try again, making sure to select an empty destination column. It's a common mistake, honestly.
Method 2: Flash Fill – Excel's Clever Shortcut
Flash Fill is, quite frankly, a bit of a magic trick in newer versions of Excel (Excel 2013 and later). It's incredibly smart and can often figure out what you're trying to do just by seeing a pattern. If you're looking for a super quick way to separate names in Excel without, you know, messing with wizards or formulas, this might be your best bet.
How Flash Fill Works Its Magic
Here’s how you can use it:
- Set Up Your Columns: Let's say your full names are in column A. In column B, type the first name from your first full name (e.g., if A2 is "John Doe," type "John" into B2).
- Give Excel a Hint: In column C, type the last name from your first full name (e.g., if A2 is "John Doe," type "Doe" into C2).
- Let Flash Fill Do the Rest:
- For the first names: Go to cell B3 (the cell right below "John"). Start typing the first name from A3. As you type, Excel will, you know, often suggest filling in the rest of the first names automatically. If it does, just press "Enter."
- Alternatively, after typing "John" in B2, go to B3, then go to the "Data" tab, and click the "Flash Fill" button (it's in the "Data Tools" group, next to "Text to Columns"). Excel will then, basically, fill down the rest of the first names for you.
- Repeat for Last Names: Do the same for column C. After typing "Doe" in C2, go to C3, and either start typing the next last name to trigger the auto-suggestion or click the "Flash Fill" button.
It's honestly pretty amazing how well it works. Excel just, like, picks up on the pattern and completes the task for you. It's very intuitive, really.
When to Use (and Not Use) Flash Fill
Flash Fill is great for consistent data. If all your names follow the "First Last" pattern, it's usually perfect. However, if your data is a bit messy, with some names having middle initials, some having two last names, or some being "Last, First," Flash Fill might, you know, get confused. It tries to guess the pattern, and if the pattern changes too much, its guesses might be wrong. So, always double-check the results when you use it. It's a bit like a helpful assistant; sometimes it gets it perfectly, and sometimes it needs a little nudge or a different approach entirely.
Method 3: Formulas – For More Control
If you need something a bit more robust, or if your data isn't perfectly consistent, using formulas can give you a lot more control. This method is, you know, a bit more involved, but it's incredibly powerful once you get the hang of it. We'll use a combination of functions like LEFT, FIND, MID, RIGHT, and TRIM to precisely extract the parts of the name you need. This is, arguably, the most flexible way to separate names in Excel.
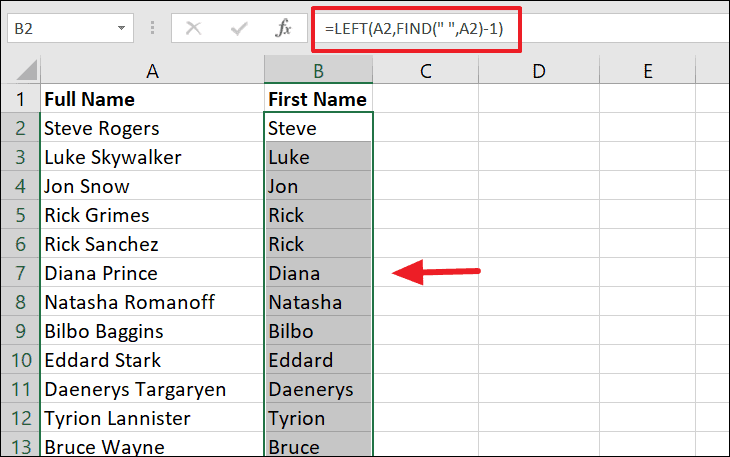
Separating the First Name with Formulas
Let's assume your full name is in cell A2, like "John Doe." To get "John," you want everything to the left of the first space. Here’s the formula:
=LEFT(A2, FIND(" ", A2)-1)
FIND(" ", A2): This part finds the position of the first space in cell A2. For "John Doe," the space is at position 5.-1: We subtract 1 because we don't want to include the space itself. So, 5 - 1 = 4.LEFT(A2, 4): This then takes the first 4 characters from the left of A2, giving you "John."
Just drag this formula down to apply it to your whole column. It's actually pretty clever how it works, you know?
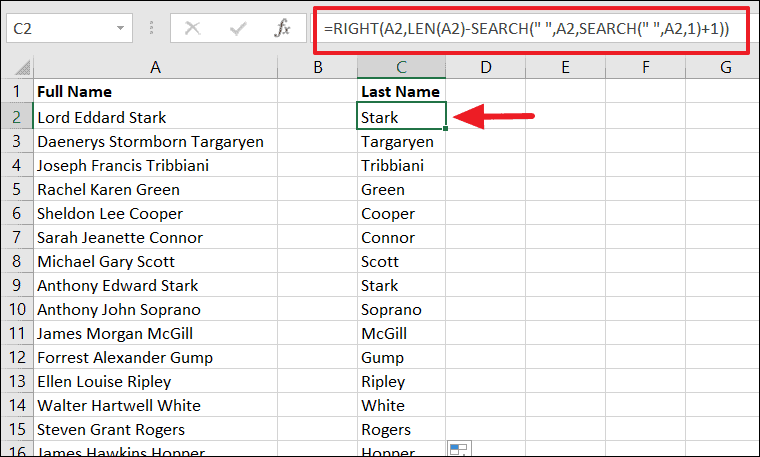
Getting the Last Name with Formulas
Now, to get "Doe" from "John Doe" in A2, you need everything to the right of the first space. This is a bit trickier because you need to figure out how many characters are *after* the space. Here’s the formula:
=RIGHT(A2, LEN(A2)-FIND(" ", A2))
LEN(A2): This counts the total number of characters in A2 ("John Doe" has 8 characters).FIND(" ", A2): Again, this finds the position of the first space (position 5).LEN(A2)-FIND(" ", A2): This calculates how many characters are *after* the first space (8 - 5 = 3).RIGHT(A2, 3): This then takes the last 3 characters from the right of A2, giving you "Doe."
Again, you can just drag this formula down. It's a little more complex than the first name, but, you know, it gets the job done reliably.
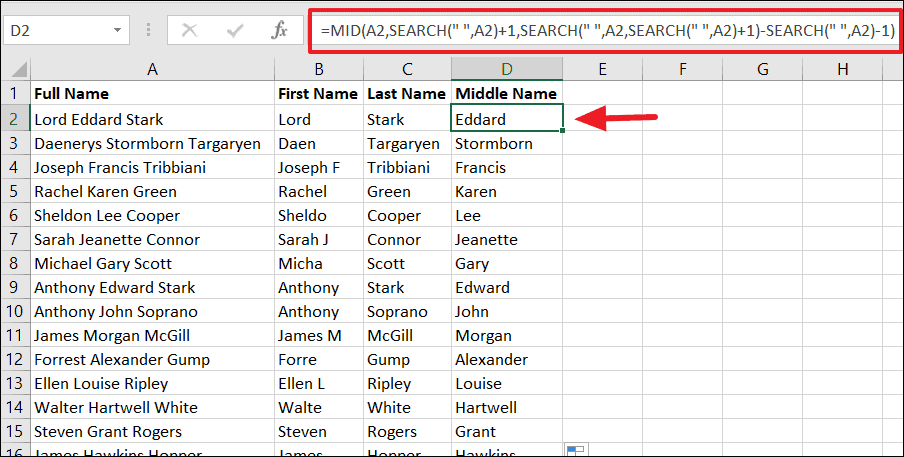
Extracting the Middle Name or Initial with Formulas
This is where things get a bit more advanced, especially if you have names like "John A. Smith" in A2. You need to find the first space, then the second space, and extract what's in between. This formula is, you know, a bit of a mouthful:
=TRIM(MID(A2, FIND(" ", A2, 1)+1, FIND(" ", A2, FIND(" ", A2, 1)+1) - (FIND(" ", A2, 1)+1)))
Let's break it down:
FIND(" ", A2, 1): Finds the first space.FIND(" ", A2, FIND(" ", A2, 1)+1): Finds the *second* space, starting the search *after* the first space.MID(A2, start_num, num_chars): Extracts text from the middle.start_num: The position right after the first space.num_chars: The number of characters between the first and second space.
TRIM(...): This is, you know, added to clean up any extra spaces that might accidentally be pulled in.
This formula is, arguably, quite powerful for those specific scenarios. It's a bit of a puzzle to put together, but once it's done, it's very consistent. You can learn more about Excel text functions on our site, which is pretty helpful, too.
Cleaning Up Extra Spaces with TRIM
Sometimes, names might have extra spaces, like "John Doe" (with two spaces). This can mess up your formulas or your Text to Columns results. The TRIM function is, you know, basically designed to fix this. It removes all spaces from text except for single spaces between words.
To clean up a name in A2, you would use:
=TRIM(A2)
You can apply this to your original column first, then run your other methods, or apply it to the results of your Text to Columns. It's a pretty handy little function, honestly, for keeping things neat.
Common Questions About Separating Names in Excel
People often have similar questions when trying to split names in Excel. Here are a few, you know, pretty common ones:
How do I split first and last names in Excel without a formula?
The easiest way to do this without writing a formula is by using Excel's "Text to Columns" feature. You simply select your column of names, go to the "Data" tab, choose "Text to Columns," and then pick "Space" as your delimiter. It's, you know, a very quick and straightforward process that many people find incredibly helpful. Flash Fill is another great option, too, if you have a newer version of Excel and consistent data.
How do I separate names in Excel with a space?
If your names are separated by a space, like "Jane Smith," the "Text to Columns" tool is, frankly, your best friend. You'll follow the steps we outlined earlier, making sure to select "Space" as the character that tells Excel where to make the split. It's designed specifically for these kinds of common separators, making the task, you know, virtually effortless.
Can I separate names in Excel if they have middle initials?
Yes, you absolutely can! When using "Text to Columns" with "Space" as the delimiter, names like "Alice B. Johnson" will typically be split into three separate columns: "Alice," "B.," and "Johnson." You can then, basically, decide to keep all three, or just combine the first and middle initial if you need to, or, you know, simply discard the middle initial column if it's not relevant to your task. Formulas also offer precise control for extracting middle names, which is very useful.
Making Your Excel Data Work for You
Learning how to separate names in Excel is, you know, a pretty fundamental skill for anyone who deals with data regularly. Whether you choose the simple "Text to Columns" tool, the clever "Flash Fill," or the more powerful formulas, having your names properly organized just makes everything so much easier. It means less manual work for you, cleaner data, and, honestly, more flexibility for all your other tasks.
So, the next time you face a column of combined names, you'll know exactly what to do. You can, you know, apply these techniques to make your spreadsheets work smarter for you, saving time and reducing potential errors. For more helpful tips and tricks on managing your data, consider checking out this useful resource on Microsoft's Excel support page. And, if you're looking to broaden your Excel skills even further, we have more guides like this one, so link to this page for additional help.
- Where Did Steve Horstmeyer Go To High School
- Valentino Born In Roma
- Haley Joel Osment Movies
- Audrey Le Strat Age
- What Is The 4th Hole Slang
How to Separate Names in Excel
How to Separate Names in Excel
How to Separate Names in Excel
