How To Draw A Basketball: Your Simple Guide To Awesome Sports Art
Austin and I are learning how to draw a basketball, and we really hope you're going to follow along with us. This lesson, you know, it's super easy and actually meant for younger artists, but all ages will love it. We are here again with how to draw a basketball tutorial, complete with beautiful pictures for all the game lovers, kids, and novice artists out there. It’s a simple basketball sketch tutorial for beginners, too, so everyone can join in the fun.
Learning how to draw a basketball, you know, can feel like a big challenge at first. Yet, it is actually very simple when you can break it down into construction, detail, and coloring steps. This guide will tell you how to draw a basketball, making it a very approachable task for anyone who wants to try. We will go through each step, so you can make your drawing look super realistic with all the cool details, too.
Want to learn how to draw a basketball easy? You can watch this entire video as we show you step by step basketball drawing. This lesson is perfect for training work with basic shapes and lines, which is really helpful for anyone starting out. It’s a fun way to get better at art, you know, and create something you can be proud of, especially if you like sports.
Table of Contents
- Getting Ready: Your Drawing Tools
- Starting Your Basketball: The Basic Shape
- Adding the Basketball's Unique Lines
- Bringing Your Basketball to Life: With Color and Shading
- Common Questions About Drawing Basketballs
- Keep Practicing Your Basketball Art
Getting Ready: Your Drawing Tools
Before you even start, it's pretty good to have all your drawing stuff ready. You will need a pencil, you know, probably one that is not too dark at first. An eraser is also very important, just in case you want to fix something. Paper, of course, is a must. You might also want some coloring tools, like crayons or colored pencils, to give your basketball some life. Having these things close by makes the whole process a lot smoother, you know, and less interrupted.
For beginners, especially kids, a simple pencil and paper are perfectly fine, actually. You don't need fancy art supplies to make a great drawing. The goal here is to have fun and learn, you know. As you get better, you might want to try different types of pencils or paper, but for now, just the basics will do. It’s all about getting started, really, and enjoying the process.
You might, you know, even consider having a ruler handy for some initial light guidelines, though a basketball is mostly freehand. It can help you make sure your first shape is pretty centered on the page. Remember, these are just tools to help you, not strict rules. So, feel free to use what you have and what feels good for you, too.
- Haley Joel Osment Movies
- Dominican Restaurant Near Me
- Taco Bell Steakhouse Burrito
- Voice For Optimus Prime Transformer Movie
- Creme De La Creme
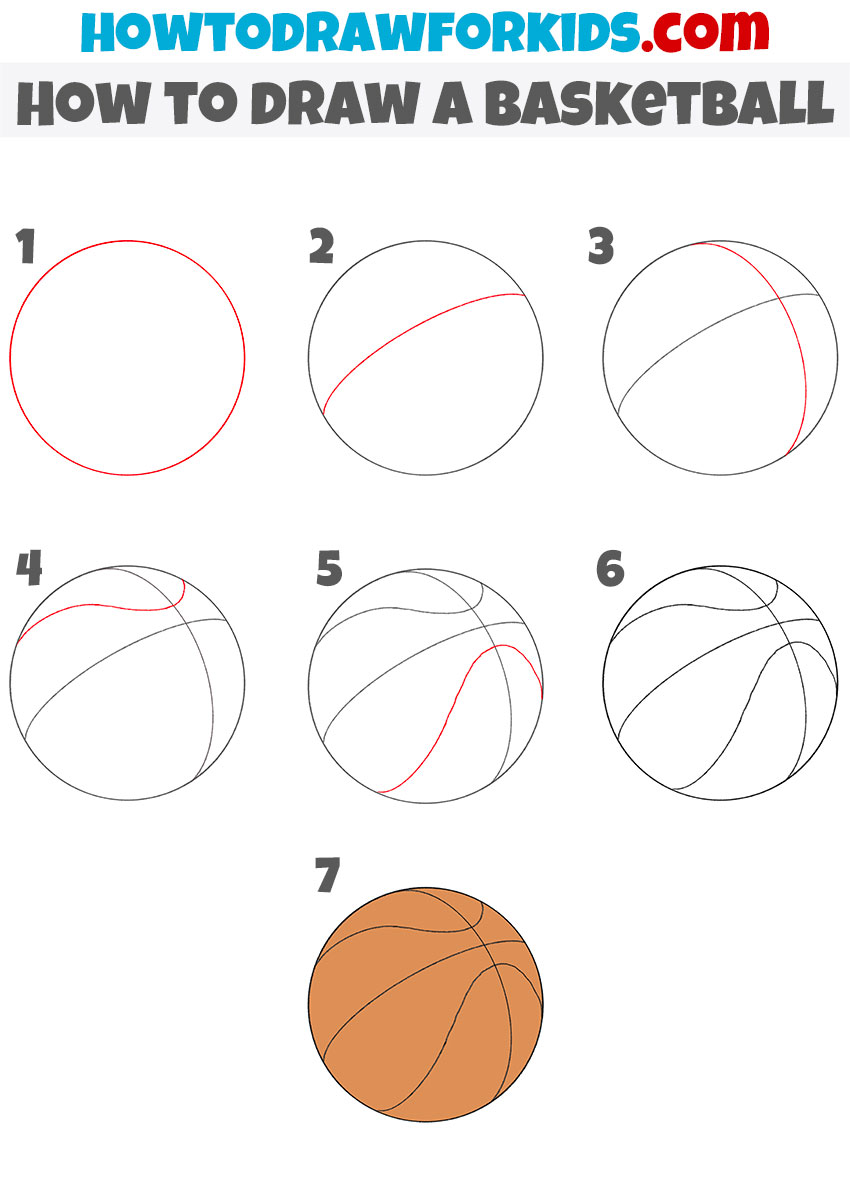
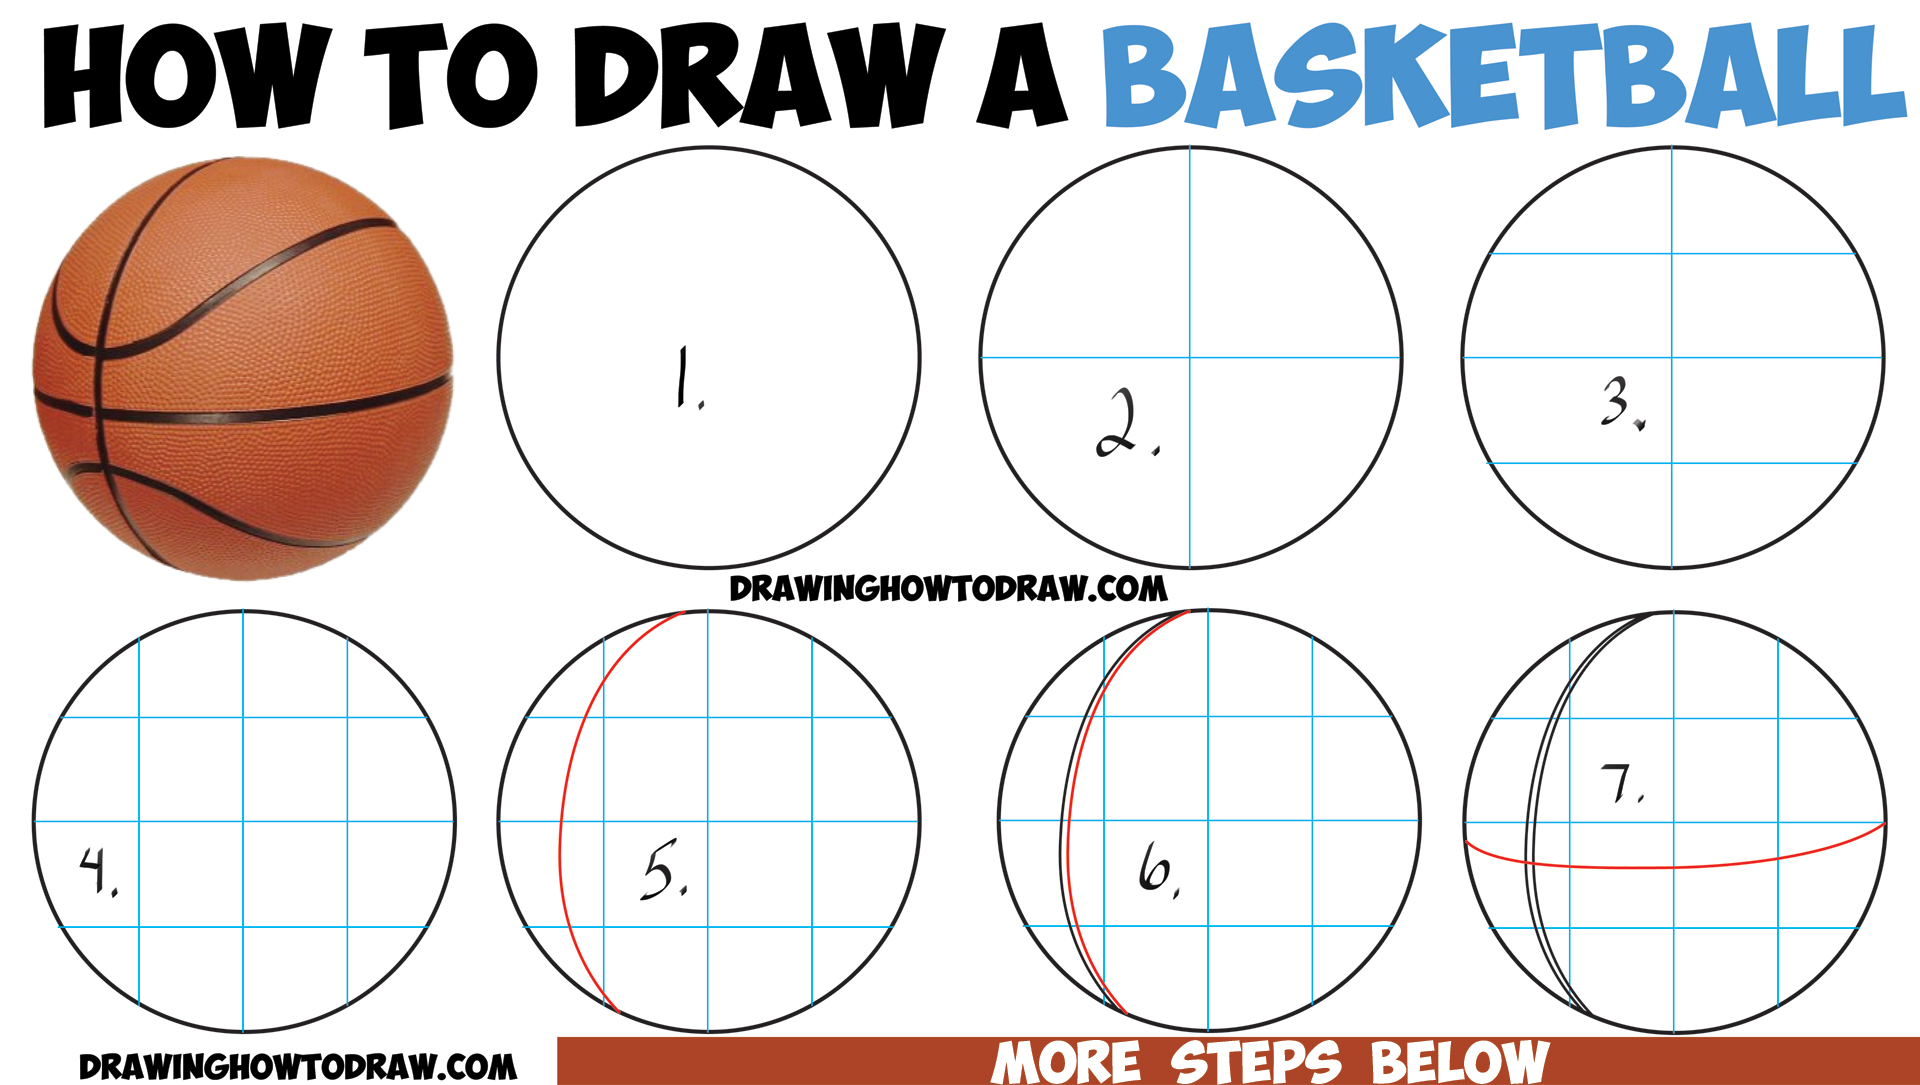
Starting Your Basketball: The Basic Shape
Every drawing, you know, begins with a basic shape, and for a basketball, that shape is a circle. This might seem simple, but getting a good circle is actually pretty important for the whole drawing. We want to draw a simple basketball icon design, and a more realistic basketball, so a good circle is key for both, you know. It’s the foundation, really, for everything else.
You will learn how to draw a basketball with easy step-by-step instructions. The first step, as a matter of fact, is always to get that round shape down. Don't press too hard with your pencil at this stage, just a light touch is good. This way, you can easily erase any lines you don't want later on. It’s just like, you know, making a rough sketch before the final drawing.
Think of it like this: the circle is the whole ball, you know. If the ball isn't round, then the drawing might look a bit off. So, take your time with this first step. Practice drawing a few circles if you need to, just to get a feel for it. It’s a very common starting point for many objects, so it’s a good skill to practice, too.
Making That Perfect Circle
Drawing a circle freehand can be a little tricky, you know. A good way to start is to draw a very light square first. Then, try to draw a circle inside that square, touching the middle of each side. This can help guide your hand and make the circle more even. It's just a little trick, you know, to get a rounder shape without using a compass.
Another method, actually, is to draw several small, light arcs that connect to form a circle. Don't worry if it's not perfect right away; you can clean it up later. This technique, you know, helps you build the shape gradually. It’s often easier than trying to draw one continuous, perfect circle in one go, too. Many artists use this kind of approach.
Remember, this initial circle should be very light. It's like a guide, you know, not the final outline. You will go over it later with darker lines once you are happy with the shape. So, don't be afraid to make a few light lines and then choose the best one. It’s really about finding what works for you, you know, to get that basic form right.
Refining Your Circle a Little Bit
Once you have a light circle on your paper, take a moment to look at it. Does it look round enough, you know? Are there any parts that seem a bit flat or pointy? This is your chance to make small adjustments. You can gently erase parts and redraw them until you are happy with the overall roundness. It’s a bit like sculpting, you know, but with a pencil.
You can, you know, even hold your paper at arm's length to get a better perspective. Sometimes, seeing your drawing from a little distance helps you spot things you might not notice up close. This step is pretty important for making sure your basketball has a good, solid base. It’s all about getting that right shape before moving on to the details, you know.
When you feel good about your circle, you can then, you know, lightly darken the parts of the line that you want to keep. This helps define the basketball's outer edge. Remember, we want a realistic basketball with smooth lines, so making that outer edge clear is a good idea. This is, in a way, the first real step in bringing your basketball to life.
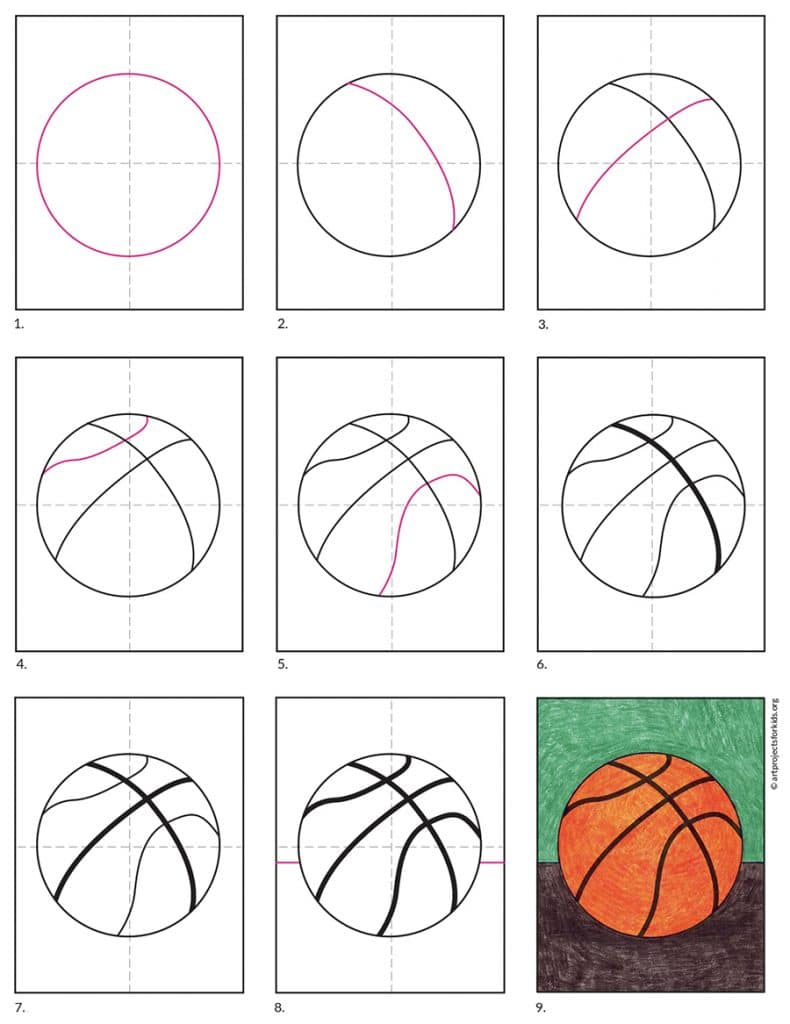
Adding the Basketball's Unique Lines
Now that you have your basic circle, it's time to add those famous lines that make a basketball, you know, look like a basketball. These lines are pretty important for giving the ball its character and structure. They are, in fact, what makes it instantly recognizable. Learn how to draw a basketball with easy step by step instructions to drawing the tricky line pattern, too.
There are, you know, usually two main curved lines that go around the ball and then a few smaller lines that connect them. It might seem intimidating, but it is actually very simple when you can break it down. We will go through each of these lines, so you can place them just right on your drawing. It’s all about getting the right curves, you know.
This part of the drawing, you know, really starts to make your circle look like a three-dimensional object. The lines help show the roundness of the ball, even before you add any shading. So, pay close attention to how these lines curve and where they meet. It’s a very key step, you know, for making your basketball look authentic.
The Main Curved Lines
Start by drawing two long, curved lines that go across the ball. These lines, you know, should look like they are wrapping around the sphere. Imagine an equator on a globe, but then two lines that cross it, too. One line will curve from the top-left to the bottom-right, and the other will curve from the top-right to the bottom-left. They should cross near the center of your circle, you know.
These lines, you know, should not be straight at all. They need to have a gentle curve to show the roundness of the basketball. Think about how a string would lie on a ball; it would curve, right? That's the kind of curve you are aiming for. Draw them lightly first, just like you did with the initial circle, you know, so you can adjust them easily.
It's pretty important, you know, that these lines don't just look like an 'X' on a flat surface. They need to suggest that they are on a curved surface. This is where the "tricky line pattern" comes in. The curves should get a little bit more pronounced as they move towards the edges of the ball. This helps create the illusion of depth, you know, which is really cool.
The Smaller Connecting Lines
After you have those two main curved lines, you will add two shorter, curved lines. These lines, you know, will connect the main lines at the top and bottom of the ball. Imagine them as small arcs that complete the pattern. They create those distinct segments that you see on a real basketball, too. This step, you know, really finishes the pattern.
One of these smaller lines will connect the top points where the main lines meet the edge of the circle. The other will do the same at the bottom. Again, remember to keep these lines curved, following the shape of the ball. They are, you know, not straight lines at all. This maintains the roundness of your drawing, which is very important.
These lines, you know, are what really make it clear that you are drawing a basketball and not just a patterned sphere. They define the panels of the ball. Take your time to get the curves right, and make sure they connect smoothly with the main lines. It’s just about getting those details right, you know, to make your drawing pop.
Making the Lines Smooth and Clear
Once all your lines are in place and you are happy with their position and curve, you can then, you know, go over them more firmly with your pencil. This will make them stand out and look more defined. You want these lines to be smooth, you know, so try to draw them in a steady motion. This is where the smooth lines part of the lesson comes in, too.
You might, you know, even use a slightly darker pencil or press a little harder to make these lines distinct. If you made any light guide lines that you don't need anymore, this is a good time to gently erase them. You want your basketball to look clean and crisp, you know, with clear, strong lines. It’s pretty satisfying to see it come together.
This step, you know, is really about solidifying your drawing. It’s moving from the sketch phase to the finished line art. Take pride in your lines, you know. They are the backbone of your basketball. Learn more about drawing guides on our site for other helpful tips on line work, too.
Bringing Your Basketball to Life: With Color and Shading
A basketball isn't just lines; it has color and, you know, it has depth. Adding color and shading is what really brings your drawing to life. This is where you can make your basketball look like it's actually round and sitting there on the page. We are here again with how to draw basketball tutorial with the beautiful pictures for all the game lovers, too.
You will learn how to draw a realistic basketball with smooth lines and, you know, proper shading. Shading is what creates the illusion of light and shadow, making a flat drawing look three-dimensional. It’s a very important part of making your art look real. So, get ready to add some color and dimension to your ball, too.
This part, you know, is where your creativity can really shine. There are many ways to color and shade, and you can experiment with what you like best. It’s not just about filling in the lines; it's about adding texture and form. So, let's get into making your basketball look truly awesome, you know, with all the cool details.
Choosing Your Colors
A typical basketball, you know, is usually a shade of orange or a reddish-brown. You can pick your favorite orange crayon or colored pencil for the main color of the ball. For the lines, you know, black is the standard. If you want a more unique basketball, you could even choose different colors, too, which is fun.
When you apply your color, try to do it evenly. You can, you know, color in small circles to avoid harsh lines and streaks. This helps create a smooth, consistent base color for your basketball. Remember, this is the first layer of color, so you don't need to press too hard yet. It’s just about getting that main hue down, you know.
Think about the overall look you want, you know. Do you want a bright, new basketball, or one that looks a bit worn from many games? Your color choices can help tell that story. This step is pretty straightforward, but it sets the stage for the shading that comes next. So, choose your colors wisely, you know, and have fun with it.
The Art of Shading for Depth
Shading is where your basketball really starts to look round. Imagine where the light source is coming from, you know. If the light is coming from the top-left, then the bottom-right of the ball will be in shadow. You will use a darker shade of your orange or brown, or even a light brown, to add these shadows, too.
Apply the darker color gently to the areas that would be in shadow. Blend it smoothly into the lighter base color. You can, you know, use your finger or a blending tool if you have one to soften the edges of your shadows. This creates a gradual transition from light to dark, which makes the ball look truly round. It’s all about smooth blending, you know.
Don't forget the lines themselves, you know. The black lines also need to have some depth. You can make them a bit thicker or darker on the side that is in shadow. This small detail, you know, really adds to the realistic look. Learn how to draw a basketball step by step with this easy tutorial for beginners, including how to shade the basketball.
Highlights and Finishing Touches
To make your basketball truly pop, you need to add highlights. Highlights are the brightest spots on the ball where the light hits directly. You can use a white crayon, a white colored pencil, or even just leave a small area uncolored in the brightest spot. This makes the ball look shiny and, you know, very real.
A small, curved highlight near the top-left, for example, can make a big difference. This little touch, you know, adds that final bit of dimension. You might also add a very subtle shadow underneath the basketball to make it look like it's resting on a surface, rather than floating in the air. This ground shadow, you know, is a small but important detail.
Finally, take a step back and look at your drawing. Are there any small areas you want to refine, you know? Maybe a line needs to be a bit darker, or a shadow needs to be softer. Follow simple instructions to create a realistic basketball with smooth lines and details. This is your chance to perfect your artwork, you know. For more inspiration, check out other fun art projects on our site, too.
Common Questions About Drawing Basketballs
People often have questions when they are learning something new, and drawing a basketball is no different, you know. Here are a few common things people ask.
What's the easiest way to start a basketball drawing?
The easiest way to start, you know, is with a very light circle. Don't press hard, just sketch it out. This initial circle acts as your guide for the entire ball. It's really the most basic foundation, you know, for getting the shape right.
How do you make the lines on the basketball look curved and not flat?
To make the lines look curved, you know, imagine they are wrapping around a real ball. Don't draw them as straight lines. Let them arc and bend, especially as they get closer to the edges of your circle. This helps create the illusion of roundness, too, which is very important.
What's the best way to add shading for a realistic look?
For realistic shading, you know, think about where your light source is. The side of the ball opposite the light source will be darker. Use a darker shade of your main color and blend it smoothly. Adding a highlight where the light hits directly also makes a big difference, you know, to the overall effect. You can find more tips on shading techniques at your favorite art supply store, too.
Keep Practicing Your Basketball Art
Drawing, you know, is a skill that gets better with practice. Austin and I had a lot of fun learning how to draw a basketball, and we hope you did too. This lesson, as a matter of fact, is super easy and meant for younger artists, but all ages will love it. Don't worry if your first try isn't perfect; every artist starts somewhere, you know.
You can try drawing a basketball from different angles, you know, or even try drawing a basketball player, a basketball court, and a basketball with simple steps and illustrations. This tutorial is for kids and beginners who love basketball and want to, you know, make their own art. The more you draw, the more confident you will become with your pencil and paper, too.
Remember, it's all about having fun and expressing yourself through art. So, keep practicing, keep experimenting with colors and shading, and you will see your skills grow. You will be drawing awesome basketballs in no time, you know, and maybe even other sports equipment too. Just keep at it, and enjoy the process.
- Kevin Bacon New Show
- How Many 0 For Billion
- Jason Luv Eva Elfie
- Translate The Correct Sentences From Exercise 2 Into Your Language
- Wildrileyoutdoors Nude
Easy How to Draw a Basketball Tutorial · Art Projects for Kids
How to Draw a Basketball - Easy Drawing Tutorial For Kids
How to Draw a Basketball in Easy Step by Step Drawing Tutorial - How to
