How To Draw Spongebob: A Fun, Easy Guide For Everyone Today
Have you ever watched Spongebob Squarepants and wished you could bring that happy-go-lucky character to life on your own paper? Well, you're certainly not alone! Learning how to draw Spongebob is a really fun project for anyone, whether you're a young artist just starting out or an adult looking for a cheerful creative break. It's actually a wonderful way to connect with a beloved cartoon friend, and you might find it quite relaxing, too, in some respects.
This beginner's guide is here to help you every step of the way. We've got simple drawing instructions that have even been reviewed by artist Jeanine Hattas Wilson, ensuring you get a good start. You will learn to sketch a fun and accurate cartoon Spongebob Squarepants from his head right down to his little shoes. It’s a bit like following a recipe, really, just for art!
So, get ready for an exciting and funny drawing lesson. By following our easy steps, you can easily draw a perfect Spongebob Squarepants. It's a drawing adventure that promises smiles, and you know, that's what art is all about, right? Let's get our pencils ready and begin this wonderful creative journey.
- Green Tea Shot Recipe
- What Does Oc Mean
- Jackerman Mothers Warmth
- Passion Fruit In Spanish
- Brooke Monk Leaked Nudes
Table of Contents
- Getting Ready: Your Drawing Tools
- The Joy of Drawing Spongebob
- How to Draw Spongebob Step-by-Step
- Bringing Spongebob to Life with Color
- Tips for a Great Spongebob Drawing
- Frequently Asked Questions About Drawing Spongebob
- Your Spongebob Drawing Adventure Continues
Getting Ready: Your Drawing Tools
Before we start our drawing fun, it's a good idea to gather what you'll need. You really don't require anything fancy, just some basic art supplies that you probably already have around your home or classroom. We're talking about simple things, you know, nothing too complicated.
Here is a list of the supplies we typically use, but please feel free to use whatever makes you comfortable. A pencil is, like, your main tool for sketching. An eraser is also very helpful for those little adjustments. Paper, of course, is where your art will appear.
For coloring, you might like crayons, colored pencils, or even markers. Each one gives a slightly different look, which is actually quite interesting. If you want more information about the supplies we use, you can always visit our art supply page for some extra details. It’s all about making art accessible, you see.
- Aime Leon Dore Hat
- 10 Sibling Entire Wayans Brothers Family
- How Did Coach Wall Die
- Hawaiian Bros Island Grill
- Good Morning In Italian
The Joy of Drawing Spongebob
Drawing Spongebob is more than just putting lines on paper; it's about capturing a bit of joy. He's a character known for his boundless energy and happy outlook, and that spirit, you know, is something we can all enjoy. When you draw him, you're bringing a piece of that cheerfulness into your own day.
For kids, drawing Spongebob is a wonderful way to practice fine motor skills and follow instructions. It's a creative outlet that also builds confidence, which is really important. There's a real sense of accomplishment when you see your favorite character taking shape, almost like magic.
And for adults, it's a chance to relax, unwind, and tap into that inner child. It's a break from the everyday, a little moment of peace with a pencil and paper. Plus, sharing your Spongebob creations with others can be a very rewarding experience, too. It’s about connection, after all.
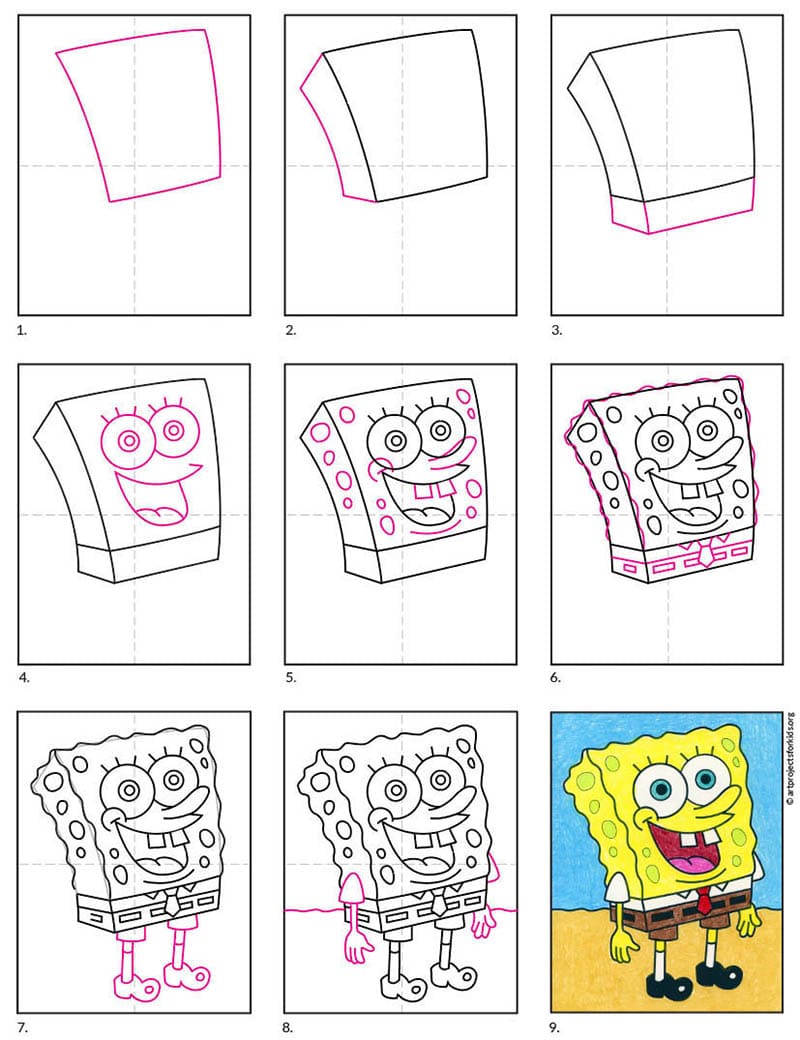
How to Draw Spongebob Step-by-Step
Alright, let's get into the fun part! We're going to demonstrate how you can easily draw Spongebob through six easy steps. Remember, the video above offers detailed instructions if you want to see everything in action. It's like having a personal art teacher, you know, right there with you.
Don't worry if your first lines aren't perfect; drawing is all about practice and having a good time. Every artist starts somewhere, and every drawing is a step in your learning journey. So, let's take it easy and enjoy this process, shall we?
Step 1: The Basic Body Shape
First things first, we need to create the main shape for Spongebob's body. He is, after all, "Squarepants," so a square or a slightly wobbly rectangle is where we begin. It's not a perfectly geometric shape, more like a friendly, organic sponge, you know, with soft edges.
Draw a vertical rectangle in the middle of your paper. Make sure it's tall enough to give him plenty of room for his eyes and smile. This will be the foundation for everything else, so make it a good size, not too small. You might want to sketch it lightly first, as we will refine it later, too.
Think of it as the main block of cheese, if you will, that we're going to carve. It's a bit like building a house; you start with the main structure. This shape will guide all the other parts of his body, so, it's pretty important, actually.
Step 2: Adding the Facial Guides
Now that we have his body shape, let's add some guides for his face. These lines will help us place his eyes, nose, and mouth in the right spots. It's like drawing a map on his face, you know, to make sure everything lands where it should.
Draw a horizontal line across the upper third of the rectangle. This line will be for the bottom of his eyes. Then, draw a vertical line down the center of the rectangle. This helps us keep his face symmetrical, which is quite useful.
These lines are just guides, so draw them very lightly. You'll erase them later, more or less. They are there to assist you in getting the proportions right, which is actually a big part of drawing any character. It's all about planning ahead, you see.
Step 3: Drawing His Big, Friendly Eyes
Spongebob's eyes are a big part of his expressive personality. They are large and round, full of wonder and happiness. So, let's give him those iconic peepers, shall we? This is where he starts to truly come to life, it seems.
On the horizontal guide line you drew, draw two large circles for his eyes. Make them touch the center vertical line, but don't let them overlap too much. Inside each large circle, draw a smaller circle for the iris, and then an even smaller dot for the pupil. Give him a little sparkle in each eye with a tiny white circle, too.
Above each eye, add a short, curved line for his eyelashes. He usually has three on each eye, sort of like little spiky hairs. This gives his eyes that distinctive Spongebob look, which is actually quite charming. You're doing great, by the way!
Step 4: Creating That Iconic Smile and Nose
What would Spongebob be without his cheerful, wide smile and his unique nose? These features really capture his optimistic spirit. This step is about giving him that unmistakable happy expression, you know, the one we all recognize.
For his nose, draw a slightly elongated, somewhat rounded shape right below the center of his eyes, on the vertical guide line. It sticks out a bit, like a friendly little bump. It’s not a perfect circle, more like an oval that’s been stretched a little, in a way.
Then, for his smile, draw a wide, upward-curving line below his nose. Make it reach almost from one side of his face to the other. At the ends of the smile, add two small, square-ish teeth. He's always ready to laugh, it seems! And don't forget those little dimples at the ends of his smile, too.
Step 5: Sketching His Arms and Legs
Now let's give Spongebob some limbs so he can wave hello and run around Bikini Bottom. His arms and legs are quite thin and bendy, adding to his cartoonish charm. It’s almost like they’re made of rubber bands, you know, very flexible.
From the sides of his body, draw two thin, slightly curved lines for his arms. They should extend downwards. At the end of each arm, draw a simple, four-fingered hand. His hands are usually a bit rounded, not too detailed, which is actually quite easy to draw.
For his legs, draw two more thin, slightly curved lines extending downwards from the bottom of his body. At the end of each leg, add a simple shoe shape. His shoes are usually black and quite round, like little boat shoes. They are pretty straightforward, too.
Step 6: The Finishing Touches: Clothing and Details
Spongebob's outfit is as iconic as he is! It's time to add his shirt, tie, and, of course, his square pants. These details really make him recognizable and complete his look. It's like putting the final pieces of a puzzle together, more or less.
Draw a collar around his neck, just below his head. Then, add a small, red tie in the center of the collar. Below that, draw a white shirt with short sleeves, showing just a bit of his arms. Then, draw his brown square pants, which cover the lower half of his body. Don't forget his belt with a buckle, too.
Finally, add the little sponge holes all over his body. These are just small, irregular circles and ovals. You can put them randomly, which is actually quite fun. Erase any guide lines that are still visible, and your Spongebob is nearly ready for color!
Bringing Spongebob to Life with Color
Once you've finished sketching, it's time for the most exciting part for many: adding color! This is where your Spongebob truly pops off the page and becomes vibrant. It's like giving him a voice, you know, through shades and hues.
You'll need a few key colors: bright yellow for his body, light blue for his eyes, red for his tie, white for his shirt, brown for his pants, and black for his shoes and pupils. A little bit of pink for his cheeks can add some extra charm, too.
Take your time coloring, staying within the lines if you like, or experimenting with different shading techniques. This is your creation, after all! You can also visit the official Spongebob Squarepants website here: Spongebob Official Site for some color inspiration or just to enjoy his world. Learn more about drawing fun on our site, and check out this page for more character guides.
Tips for a Great Spongebob Drawing
Drawing is a skill that grows with practice, so don't be shy about trying again and again. Every time you draw, you learn something new, which is actually pretty cool. Here are a few extra tips to help you on your way, you know, to make your drawings even better.
- **Start Lightly:** Always begin your sketches with very light lines. This makes it much easier to erase mistakes or adjust shapes without leaving marks on your paper. It’s a good habit to pick up, really.
- **Observe Closely:** Take a good look at Spongebob's pictures or watch the show. Notice the small details, his expressions, and how his body moves. The more you observe, the better you'll capture his essence, too.
- **Don't Be Afraid to Erase:** Erasers are an artist's best friend! They are there to help you refine your work. It's not a sign of failure to erase; it's a sign of making things better, in some respects.
- **Experiment with Expressions:** Spongebob has so many funny faces! Once you're comfortable with his basic look, try drawing him with different expressions. This adds a lot of personality to your art, too.
- **Have Fun:** This is probably the most important tip. Drawing should be an enjoyable activity. If you're having fun, it will show in your artwork, and that's what truly matters, you know.
Frequently Asked Questions About Drawing Spongebob
People often have questions when they're learning to draw Spongebob. Here are some common ones that might help you, too. It's good to get answers, you know, when you're trying something new.
Is Spongebob easy to draw for beginners?
Yes, absolutely! Spongebob is actually a fantastic character for beginners because his shapes are mostly simple, like squares and circles. His design is very forgiving, which means small imperfections often add to his charm. With our step-by-step guide, you can certainly draw him quite easily.
What colors do I need to color Spongebob accurately?
To color Spongebob accurately, you'll mainly need yellow for his body, light blue for his eyes, red for his tie, white for his shirt, and brown for his square pants. Don't forget black for his shoes and pupils. A little pink for his cheeks can also be a nice touch, too.
How can I make my Spongebob drawing look more like the cartoon?
To make your Spongebob drawing look more like the cartoon, pay close attention to his proportions, especially the size of his eyes and his wide smile. Adding his signature sponge holes and the specific details of his outfit, like his belt and tie, really helps. Also, remember to give him that happy, energetic expression, which is actually quite key.
Your Spongebob Drawing Adventure Continues
We are so glad to offer you this exciting and funny drawing lesson. Learning how to draw Spongebob is a rewarding experience, and we hope you've enjoyed every moment of it. Remember, every line you draw, every color you add, is a step in your artistic journey. It's a continuous process, you know, of learning and creating.
Keep practicing, keep exploring, and most importantly, keep having fun with your art. There are so many wonderful characters and things to draw in the world, and Spongebob is just the beginning. Your creative possibilities are, like, truly endless. So, grab your pencils and keep making amazing art!
- How To Bake A Sweet Potato
- How To Draw A Bear
- Nicki Minaj Net Worth
- Anti Social Social Club
- How To Remove Gel Polish

How To Draw SpongeBob SquarePants - Art For Kids Hub
Draw SpongeBob SquarePants Tutorial and SpongeBob Coloring Page

How to Draw SpongeBob SquarePants: Step-By-Step Tutorial
