Your Simple Guide: How To Read A Measuring Tape Easily Today
Have you ever picked up a measuring tape and felt a little lost looking at all those tiny lines? You are not alone, as a matter of fact. Learning how to read a tape measure is an important skill to learn, whether you're doing home projects, planning an apartment layout, or just trying to hang a picture. Many people find those small markings confusing, and it is easy to mix up inches and centimeters, you know?
This guide is made for beginners who want to measure things correctly without the confusion. We regularly get asked the question “how do you read a tape measure,” so we put together this easy-to-follow explanation. It is almost like learning a new language, but a very practical one, that.
We will walk you through the basics of reading a tape measure, including the hook, the markings, and the units of measurement. By the end, you will understand how to interpret today's tape measures and feel much more confident with your measuring tasks, you see. This article is for you if you have felt frustrated by those tiny markings or mixed up units, so.
- Red Hair Big Boobs
- La Vie Est Belle
- 1 0 6 And Park
- Whistle Express Car Wash
- Pete Davidson Tattoo Removal
Table of Contents
- Understanding Your Measuring Tape
- Breaking Down Imperial Measurements: Feet and Inches
- Making Your Measurements Accurate
- Practical Tips for Real-World Projects
- Frequently Asked Questions About Reading a Tape Measure
- Final Thoughts on Measuring
Understanding Your Measuring Tape
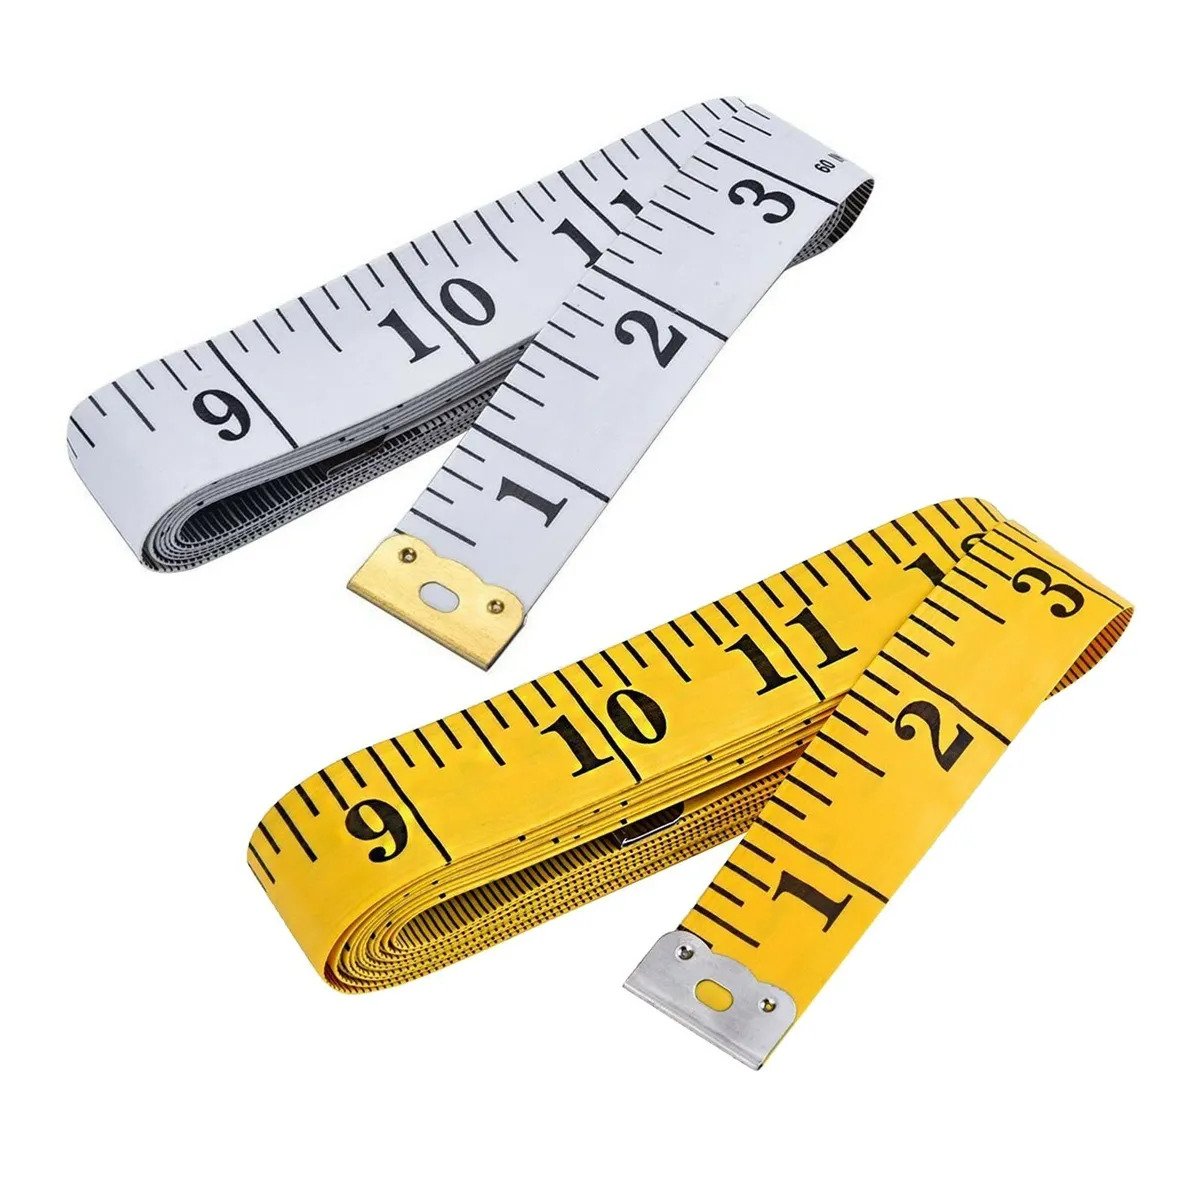
Before you even start measuring, it helps to know the parts of your tape. A tape measure, you know, is a flexible ruler for measuring lengths. It has a few key features that make it work, so.
The Metal Hook and the Zero Mark
Every tape measure has a little metal piece at the very beginning, that. This is called the hook or tang. It is designed to catch onto the edge of whatever you are measuring, which is really quite clever.
When you start a measurement, you generally want to place this metal end flush against the edge of the item. To accurately read tape measures, always make certain the zero mark lines up. This ensures your measurement begins at the true starting point, of course.
- Sid The Sloth Ice Age
- Susan Mikula Photography
- Itscarlyjane Leaks
- Wildrileyoutdoors Nude
- Kanye West And Bianca Censori
Sometimes, you might notice the hook has a little bit of play, it moves slightly. This is actually on purpose! It accounts for whether you are measuring from an outside edge or an inside edge, which is pretty neat.
Imperial vs. Metric Systems
Tape measures often show two different systems of measurement. You will find imperial (feet and inches) and metric (centimeters and millimeters) markings, more or less. Knowing which one you need is a big first step, that.
Imperial measurements are common in places like the United States. Metric is used in most other countries, and it is based on tens, which can be easier for some. Many tapes have both, so you can compare imperial and metric tape measures and switch between them if needed.
For this guide, we will primarily focus on how to read a tape measure in feet and inches. This is the system that tends to give people a bit more trouble, you know.
Breaking Down Imperial Measurements: Feet and Inches
Reading a tape measure requires just a bit of background in basic fractions. It is not as scary as it sounds, honestly. We will take it one step at a time, so.
The Inch Markings
The biggest numbers on your tape measure represent whole inches. These are usually marked with the longest lines, that. Every 12 inches, you will see a foot mark, often in a different color or with a foot symbol (like a single prime mark, ').
So, you might see "1F" or "12" for one foot, then "1F1" or "13" for one foot and one inch, and so on. Understanding how to read measuring tape and convert measurements between inches and feet is really useful.
These main inch lines are your anchor points, you know. All the smaller marks between them break down that inch into smaller parts, that.
Halves, Quarters, and Eighths of an Inch
Between each whole inch mark, you will find a series of shorter lines. The longest line between two inch marks is the half-inch mark, typically. This line divides the inch exactly in half, so.
Then, between the whole inch and the half-inch mark, you will find a slightly shorter line. This is the quarter-inch mark. There are four of these in every inch, obviously.
Even shorter lines represent eighths of an inch. There are eight of these in a full inch. It is like slicing a pie into smaller and smaller pieces, you know.
Learning how to use fractions, hook, and blade to measure flat surfaces is a key part of this. Just remember that each shorter line represents a smaller fraction, that.
Sixteenths and Smaller Fractions
Most tape measures also show sixteenths of an inch. These are the smallest lines you will typically see, and there are sixteen of them in one inch. They are pretty tiny, so it can be a bit of a challenge to see them clearly sometimes.
Some specialty tapes might go down to thirty-seconds or even sixty-fourths of an inch. For most home projects, sixteenths are usually precise enough, as a matter of fact. The key is to find the line and then count how many of those smallest segments you have past the last whole inch, you know.
Just count the number of small lines from the last full inch mark. If you land on the fifth small line after the 3-inch mark, that is 3 and 5/16 inches, for example.
How to Read Feet and Inches
To read a measurement in feet and inches, you first look for the foot mark. For instance, if your tape goes past the "1F" mark, you know you have at least one foot. Then, you count the whole inches after that foot mark. Let's say it is 5 inches past the 1-foot mark, that.
After that, you look at the fractions of an inch. Find the longest line your measurement reaches after the last whole inch. If it is the half-inch mark, you add 1/2. If it is a quarter, you add 1/4, and so on. So, you might have 1 foot, 5 and 3/8 inches, for instance.
This is the best and the easiest way to read a tape measure in feet and inches with practice. It just takes a little bit of getting used to, you know.
Making Your Measurements Accurate
Accuracy is pretty important, especially when cutting wood or building a house. A small mistake can cause big problems, you know. So, let's talk about getting it right every time, that.
Starting Your Measurement Right
The very first step is crucial. Start by placing the metal end of the tape measure flush against the edge of whatever you're measuring. Make sure it is snug and not angled, you know.
If you are measuring an inside corner, like inside a window frame, the hook will push in slightly. If you are measuring from an outside edge, it will pull out a little. This small movement is part of its design for accuracy, so.
Always double-check that your zero mark lines up perfectly. This is a common spot for small errors to creep in, as a matter of fact.
Holding the Tape Correctly
Once you have the hook in place, pull the tape measure out until you've reached the other end of what you are measuring. Try to keep the tape as straight and flat as possible. A sagging or twisted tape can give you a wrong reading, you see.
If you are measuring a long distance, it helps to have someone hold the other end. If you are alone, you can use a clamp or a heavy object to keep the hook in place, which is quite handy.
Keeping the tape level and taut is really important for getting a precise length, that.
Reading the Measurement Spot
When you have the tape extended to the desired point, look straight down at the mark. If you look at it from an angle, you might misread the line, a phenomenon called parallax error. It is a bit like looking at a speedometer in a car, you know.
Identify the whole inch first, then count the fractions. Is it past the half-inch? Is it at a quarter? An eighth? A sixteenth? Take your time to really see the smallest line your measurement reaches, that.
Many people find it useful to mark the spot with a pencil before retracting the tape. This gives you a clear point of reference, of course.
Practical Tips for Real-World Projects
Learning how to read a tape measure with detailed explanations of tape measure parts makes a big difference. This skill is truly useful in many situations, you know.
For DIY and Home Planning
Mastering the art of reading a tape measure is crucial for DIY projects and apartment planning. Whether you are buying new furniture, hanging shelves, or figuring out how much paint you need, accurate measurements save you time and money, you see.
For example, when you are planning to build a small shelf, you will need to measure the wood pieces very carefully. A wrong cut means wasted material, and nobody wants that, so. Practicing on different objects around your home can really help you get comfortable, that.
Remember, understanding how to read measuring tape and convert measurements between different units can also be a lifesaver when following instructions from different regions, you know.
In Construction Settings
In construction, a tape measure is an everyday tool. Reading tape measure for construction means precision is paramount. Builders, carpenters, and other tradespeople rely on their ability to measure quickly and accurately, you know.
When cutting wood or building a house, it’s important to read a tape measure accurately. Even a tiny error can throw off an entire structure, leading to bigger problems down the line, as a matter of fact. This is why pros spend so much time making sure their measurements are spot on, that.
For construction work, it is also common to mark measurements directly onto materials with a pencil or chalk. Sometimes, you will see little black diamonds on the tape at 19.2-inch intervals; these are for spacing studs in building walls, which is pretty interesting.
Frequently Asked Questions About Reading a Tape Measure
Here are some common questions people ask when they are learning how to read a measuring tape, you know.
What do the different lines on a tape measure mean?
The lines represent different units of length. The longest lines usually show whole inches or centimeters. Shorter lines break these down into fractions like halves, quarters, eighths, and sixteenths of an inch, or millimeters, that. Each progressively shorter line generally means a smaller division of the main unit, so.
How do you read a tape measure for beginners?
For beginners, start by finding the whole inch marks. Then, look for the longest line between those inches, which is the half-inch mark. Next, find the quarter-inch marks, and then the eighths and sixteenths. Count from the last whole inch to your measurement point, adding the fractions as you go. It is a bit like learning to count in a new way, you know.
Is a tape measure hard to read?
It can seem a little confusing at first, especially with all the small lines and fractions. But with a little practice and understanding of how the marks work, it becomes much easier. This guide aims to make it simple and clear, so you can measure confidently, you see. It really just takes a bit of time to get the hang of it, that.
Final Thoughts on Measuring
Learning how to read a tape measure easily is a skill that will serve you well in many parts of life. From simple home fixes to bigger construction projects, accurate measurements are your best friend, you know. This guide is made for beginners who want to measure things correctly without the confusion, and we hope it has helped clear things up for you.
Keep practicing, and soon you will be measuring like a pro. Remember, the key is to understand the fractions and how the markings relate to each other, that. You can always refer back to this guide if you need a quick refresh, and you know, there's always more to learn about tools and techniques, so. Learn more about measuring tools on our site, and for more detailed guides, link to this page how to measure with a tape.
- Who Do You Think You Are I Am
- Lia Engel Leaks
- David Bromstad Married
- Translate The Correct Sentences From Exercise 2 Into Your Language
- Taco Bell Steakhouse Burrito

Measuring Tape – Scheham

How to Read a Measuring Tape (with Pictures) - wikiHow
MEASURING TAPE | Storables
