Your Easy Guide: How To Tie A Bow Tie Perfectly Every Time
Learning how to tie a bow tie might seem a bit tricky at first, a skill reserved for the most dapper among us, you know? But honestly, it’s a lot simpler than you probably think. Getting this just right can really make your whole look feel polished and complete, whether you're heading to a big event or just want to add a special touch to your everyday clothes. A hand-tied bow tie shows a certain kind of care and attention to detail, which, frankly, looks pretty cool and makes a statement.
Many people, it seems, just go for the pre-tied options, and that’s okay for some occasions. However, there’s something truly satisfying about tying your own, a bit like a secret handshake for style enthusiasts. It’s a classic move, actually, that adds a touch of genuine luxury to any outfit, making you feel, well, rather secure in your formal attire. Today, [Current Month Day, Year], we’re going to walk you through exactly how to tie a bow tie, making sure you feel totally confident with this timeless accessory.
Here at our men's suit shop, Pursuit, we teach guys how to tie bow ties every single day, and we've really perfected the technique over thousands of lessons, you see. Our menswear experts have broken down the whole process into seven easy steps, so you don't have to guess. We’ll guide you through each part, and once you finish reading, your tie will look neat, no doubt. So, let’s get started on learning this real bow tie skill.
- Inside Out 2 Always On Phone
- Cast Of Kpop Demon Hunters
- Sophie Rain Spiderman Video Tutorial
- 10 Sibling Entire Wayans Brothers Family
- French Pole Vaulter Video
Table of Contents
- Introduction
- Why a Hand-Tied Bow Tie is Special
- Getting Ready: What You Need
- The Seven Steps to a Perfect Bow Tie
- Common Questions About Tying a Bow Tie
- Practice Makes It Just Right
- Ready to Show Off Your Style
Why a Hand-Tied Bow Tie is Special
A hand-tied bow tie has a certain charm, a kind of relaxed imperfection that a pre-tied one just can't quite capture, you know? It looks more natural, a little less stiff, and it tells a story of personal effort. This skill is perfect for bow tie enthusiasts, groomsmen, and anyone wearing a tuxedo, really. It will truly elevate your style at weddings, galas, and other special occasions.
Learning how to tie a real bow tie is a skill that stays with you. It’s a bit like learning to ride a bike; once you get it, you pretty much have it for life. Plus, it allows for little adjustments, so you can make it fit your personality and the specific look you're going for, which is a nice touch, actually. You can make it slightly asymmetrical or perfectly neat, just as you like.
Getting Ready: What You Need
Before we jump into the steps, you just need a few things to get started. Obviously, you'll need a bow tie, one that isn't already tied. Make sure it's one that can be adjusted to your neck size, too. A mirror is also really helpful, so you can see what you’re doing from all angles. And, well, a little bit of patience, because it does take a little practice to get the hang of it, as a matter of fact.
- Jw Marriott Desert Ridge
- Dominican Restaurant Near Me
- Atlanta Mother Maria Bonilla Ice Detention
- Henry Günther Ademola Dashtu Samuel
- Taco Bell Steakhouse Burrito
Our bow tie tutorial aims to make the entire process a breeze, so you won't feel lost at any point. If you're more of a visual learner, which many people are, you might find a helpful video tutorial useful alongside these written steps. We often suggest trying to tie a bow tie with our helpful video tutorial if you prefer seeing it in action.
The Seven Steps to a Perfect Bow Tie
Whether you’re wearing a bow tie for the first time or just need a refresher on tying one, we’ll walk you through each step of the way, so don't worry. These seven exact steps will help you tie a bow tie to perfection. Just follow this advice, and you’ll be a pro yourself in no time, honestly.
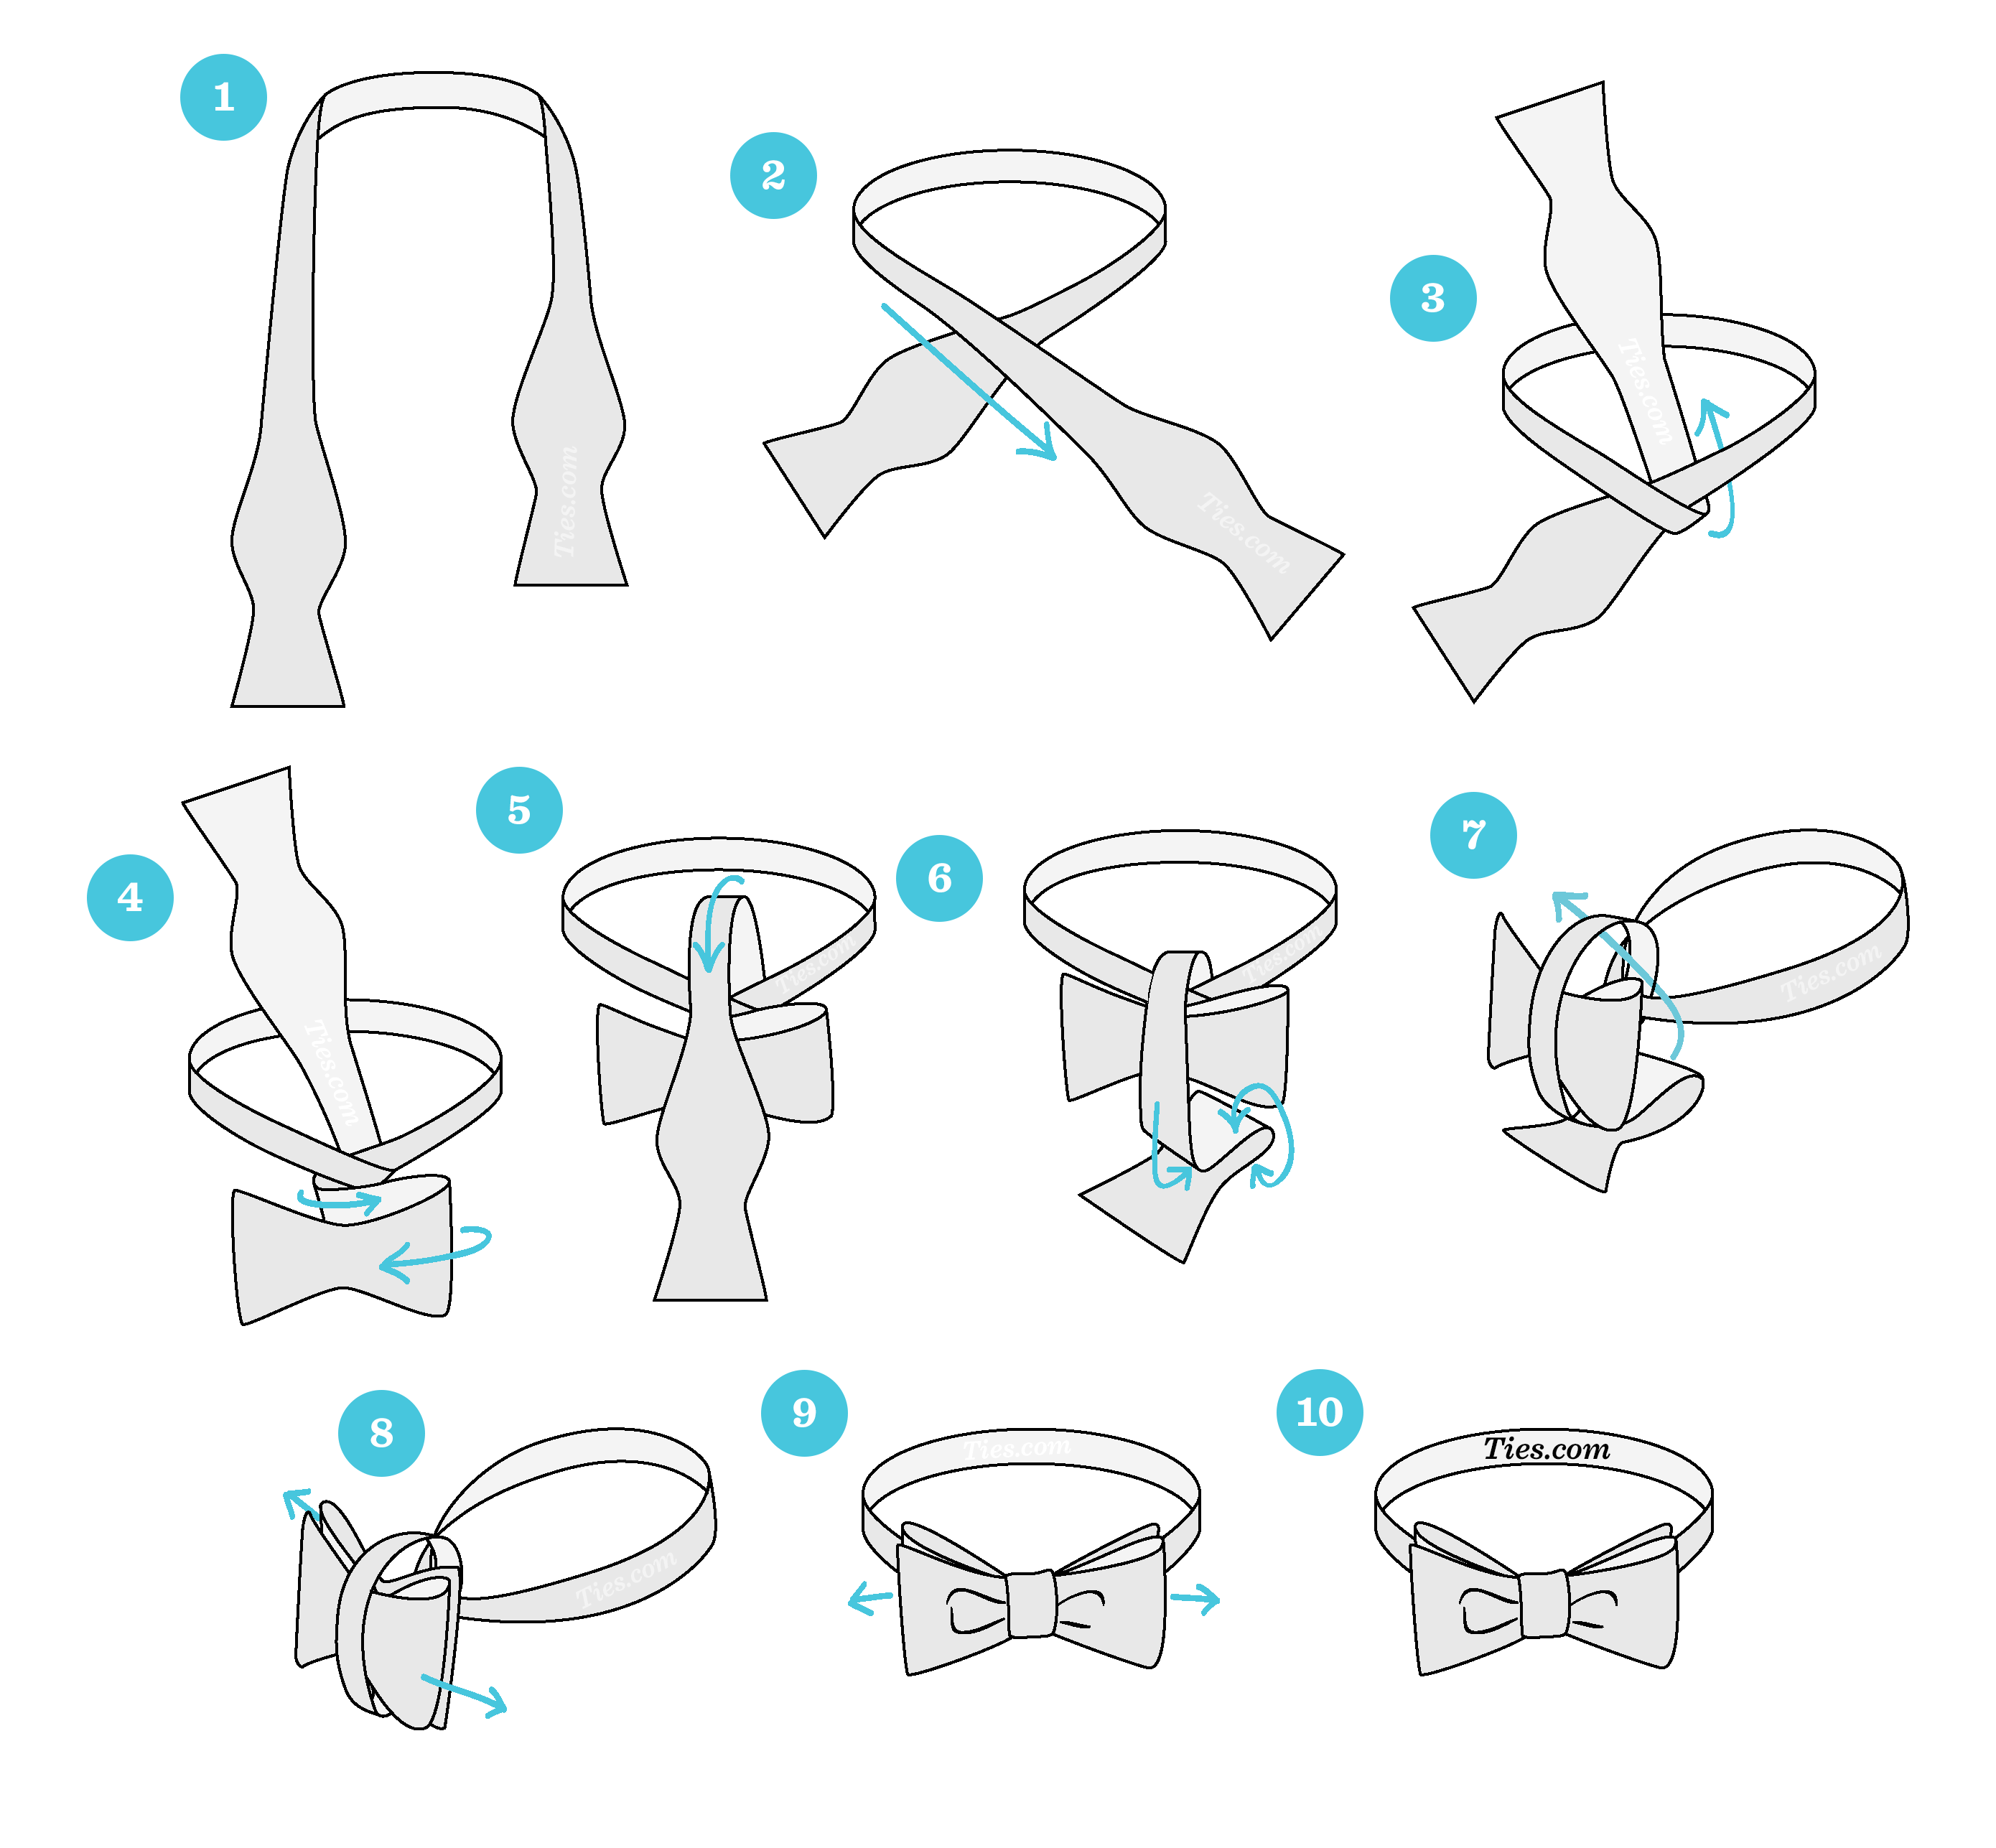
Step 1: Draping and Initial Adjustment
You start by draping the bow tie around your neck. Make sure the seams are facing down, so the smooth side is showing. It's usually best to start with the bow tie lying face up, which means the pattern or main color is visible. Now, here’s a pretty important part: adjust the bow tie so the right side is shorter than the left. You want the left end to be noticeably longer, like, say, by about three to four inches, you know?
Step 2: The Crossover
Next, you take the longer left end of the bow tie and bring it over the shorter right end. You want to cross them over each other right at the center of your neck, making an "x" shape. This creates the basic foundation for your knot, so make sure it feels comfortable and fairly snug, but not too tight, obviously.
Step 3: The First Loop
Now, take that longer left end, which is currently draped over the right, and bring it up through the loop you’ve created around your neck. Pull it up and through, so it comes out from underneath the knot. This forms the first part of your actual tie. Gently pull it tight enough so it feels secure, but don't yank it, you know? It should just sit nicely.
Step 4: Forming the Bow
With the shorter right end, you're going to create the first loop of the bow. Fold it horizontally across your neck, forming a loop shape that will be one side of your bow. Make sure this loop is roughly the size you want your finished bow to be, because it sets the scale, more or less. Hold it in place with one hand, like your thumb, maybe.
Step 5: The Second Loop
Now, take the longer end that you pulled up in Step 3 and bring it straight down over the front of the loop you just made. Then, you'll thread it through the small hole behind the first loop. This can be a bit fiddly, so just take your time, you know? Push it through the back, creating the second loop of your bow tie. This is where it really starts to look like a bow.
Step 6: Tightening and Shaping
Once you have both loops, you’ll see two folded ends hanging down. Gently pull on these folded ends, one at a time, to tighten the knot. You want to pull them evenly so the bow becomes symmetrical. This part is really about feel, so don't be afraid to adjust it a bit. You’re aiming for a firm, neat knot, but not so tight that it feels uncomfortable, obviously.
Step 7: Final Adjustments
With the knot somewhat tightened, you can now fine-tune the shape of your bow. Tug on the loops and the ends to adjust their length and fullness. You might pull one loop a little more, or adjust an end to make it even. The goal is to make both sides of the bow look pretty balanced, you know, but a little bit of natural asymmetry is actually part of the charm of a hand-tied bow. Feel secure in your formal attire by learning these 7 exact steps on how to tie a bow tie to perfection.
Common Questions About Tying a Bow Tie
People often have questions when they're learning something new, and tying a bow tie is no exception. Here are a few things people often ask, you know, to help you out.
Is tying a bow tie really that hard?
Honestly, it might look a little complicated, but it's more about getting the sequence right. Like anything new, it just takes a little practice, you know? Our easy guide breaks it down into simple steps, so it's really quite manageable. Many people find that after a few tries, it starts to click.
How do I make my bow tie look neat and even?
The trick to a neat bow tie is mostly in the final adjustments. Pulling on the loops and the ends gently and evenly in Step 7 makes a huge difference. Don't be afraid to keep adjusting until it looks just right to you. Sometimes, a mirror helps a lot, you know, to get the angles just so.
What if one side of my bow tie is longer than the other?
That's a very common thing, actually! It usually means you didn't start with one end long enough or short enough in Step 1. Or, perhaps you pulled one side a bit more during tightening. Just loosen the knot a little and adjust the lengths of the loops and ends until they look more balanced. It's all part of the practice, you know?
Practice Makes It Just Right
While it does take a little practice to master the art of the perfect bow tie knot, our bow tie tutorial will guide you with step by step instructions that will make the entire process a breeze. Don't get discouraged if your first few attempts aren't absolutely perfect. That’s totally normal, you know. Think of it as building a new skill, a bit like learning to play an instrument, almost.
Try tying a bow tie a few times before the big event, like a wedding or a gala. This way, you’ll feel much more comfortable and confident when it really counts. You could even practice in front of a mirror, just to get a good visual sense of what you're doing. Many people find this helps a lot, you know, to really see the progress. You will be a pro yourself in no time, honestly.
You can even practice while wearing a regular shirt, not necessarily your formal one. This helps you get the motion down without worrying about messing up your nice clothes. Once you’re feeling good about the steps, then you can try it with your actual outfit. It’s a pretty simple way to build confidence, actually.
Ready to Show Off Your Style
Learning how to tie a bow tie is a fantastic skill that really adds a touch of class and personal flair to your look. It creates a sharp appearance in minutes and adds a touch of luxury to your outfit. With these seven steps, you're well on your way to tying a real bow tie like a pro. Remember, our menswear experts, like those at Ties.com, often share similar advice, so you're getting solid guidance here.
Once you’ve got it down, you’ll find yourself reaching for that bow tie more often, perhaps. It’s a small detail that makes a big impression, showing that you pay attention to your style. So, go ahead, give it a try, and get ready to look incredibly dapper. You can learn more about formal wear options on our site, and find more style tips by visiting our style guide page.
- Bengali Viral Mms
- Wasmosomali
- Hannah Einbinder Partner
- Cronología De Inter Milan Contra Fc Barcelona
- Sid From Toy Story

How to Tie a Bow Tie | Bow Tie Knot Tutorial | Step by Step Bow Tie
Easy Way To Tie A Bow Tie

How To Tie A Bow Tie Pictures, Photos, and Images for Facebook, Tumblr
