How To Draw A Flower: Easy Steps For Beginners Today
Learning how to draw a flower can feel like a big project, but it is actually quite simple. Many people want to bring the beauty of nature onto paper, and a flower drawing is a wonderful way to start. You might feel a little unsure where to begin, or perhaps you think drawing is just not for you. Well, you know, that is not true at all, and we are here to show you how easy it can be to create something truly lovely.
This easy guide will teach you how to draw a flower step by step. We believe everyone can learn how to draw a flower, no matter their skill level. Our fun tutorials make it simple to learn how to draw beautiful flowers, and you will find yourself creating pretty pictures in no time at all, so.
This tutorial shows how to draw a flower with a stem and a pair of leaves using examples done in a simple style. Flower drawings provide a wonderful opportunity for beginners to explore the beauty and intricacy of nature through art, and you might just surprise yourself with what you can make, actually.
- French Pole Vaulter Video
- John Tee Artist
- Jw Marriott Desert Ridge
- Wildrileyoutdoors Nude
- Moose For Step Up
Table of Contents
- Getting Started with Flower Drawing
- Basic Shapes for Any Flower
- Drawing Leaves and Details
- Drawing Different Flower Types
- Frequently Asked Questions About Flower Drawing
Getting Started with Flower Drawing
Learning how to draw a flower easy and step by step is really about taking things one small piece at a time. You do not need any special art tools to get started, just a pencil, some paper, and a willingness to try. This approach makes it very welcoming for anyone wanting to learn a new skill, you know.
Many people feel a bit overwhelmed when they think about drawing something like a flower. They see all the delicate parts and colors, and it seems too hard. But, by using some basic shapes and putting in a little bit of practice, you can draw any kind of flower in nature in just a few steps, honestly.
Our goal here is to make easy flower drawings for beginners made simple. We break down the process into small, manageable actions. This helps you build your drawing confidence piece by piece. You will see how each step adds to the picture, making it come alive, in a way.
Find ideas in this tutorial for beginners. We are going to walk you through the process, making sure each instruction is clear and easy to follow. You will be so proud of your drawing once you finish it, that is for sure.
Basic Shapes for Any Flower
The secret to drawing a flower, any flower really, is to begin with simple shapes. Think of circles, ovals, and lines. These are your building blocks. Using these basic forms helps you get the overall shape right before you add the smaller parts, more or less.
This method works for almost any flower you want to draw. Whether it is a daisy or a lily, starting with a basic shape sets up your drawing for success. It takes away some of the guessing and makes the whole process feel much clearer, you know.
You can learn how to draw simple flowers with these step by step guides made for beginners. We focus on these foundational shapes because they are the easiest way to start. Once you get good at this, you will find drawing more complex flowers becomes much easier, too.
Remember, practice is a big part of learning any new skill. Do not worry about making things perfect right away. Just enjoy the process of putting pencil to paper and watching your flower take shape, anyway.
The Center and Stem
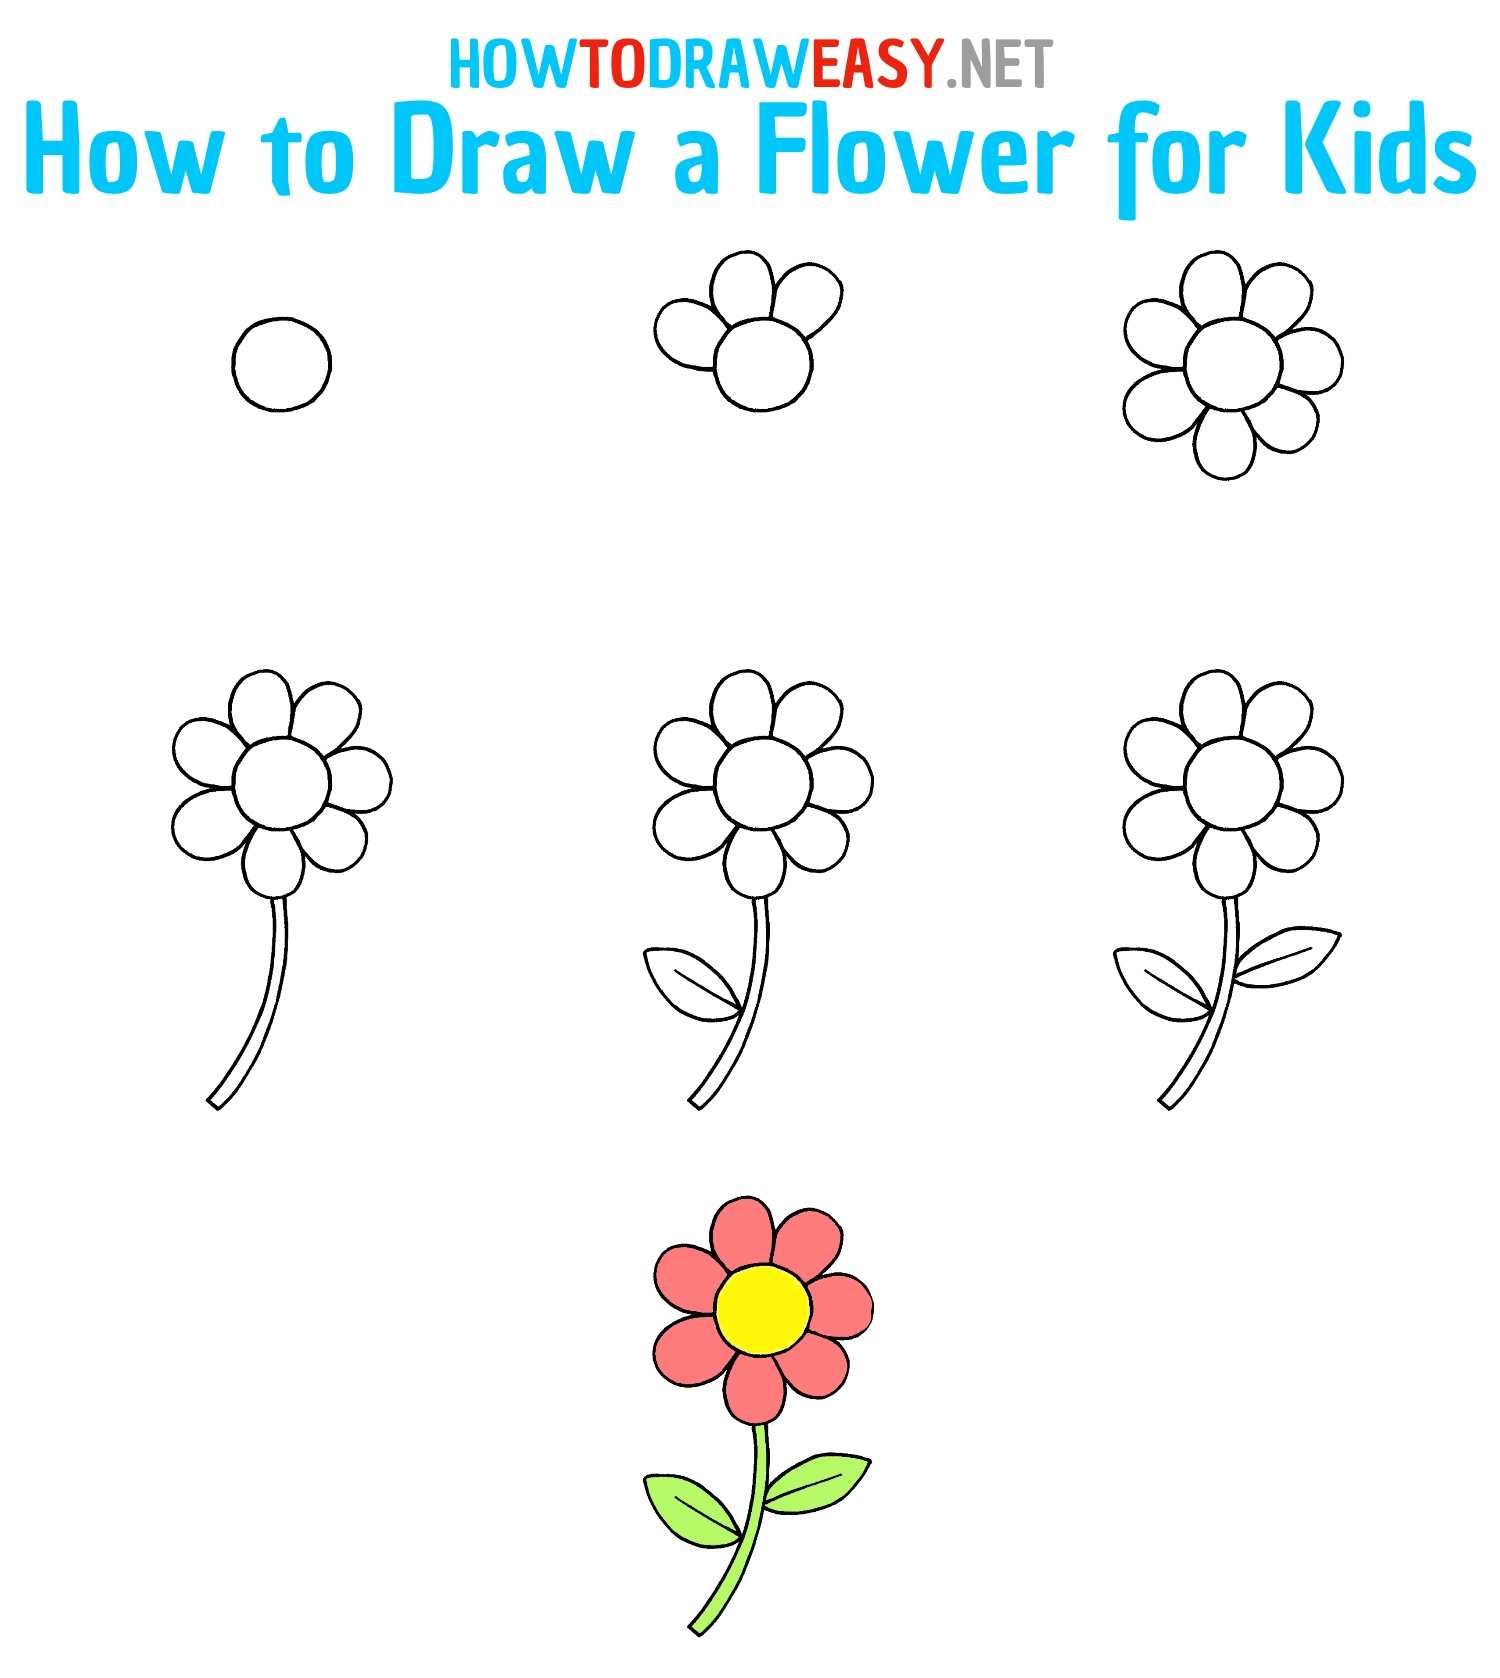
To begin your flower drawing, you will want to draw a small circle in the middle of your paper. This circle will be the very heart of your flower. It does not have to be a perfect circle, just a general guide for where your petals will meet, you know.
Below this circle, draw two parallel lines going downwards. These lines will form the stem of your flower. Keep them fairly close together, but leave enough room for the stem to look natural. This is the main support for your flower, so give it a good length, more or less.
You can make the stem as long or as short as you like, depending on how you picture your flower. Just make sure it connects nicely to the bottom of your center circle. This initial setup is very important for the overall look of your flower, pretty much.
This simple beginning helps you establish the basic structure. It gives you a clear starting point for adding all the other parts of your flower. Just remember to keep your lines light at this stage, so you can easily erase them later if needed, actually.
Adding the First Petals
Now that you have your center and stem, it is time to add the first layer of petals. Start by drawing shapes that look like teardrops or gentle curves around the center circle. These petals should overlap the circle slightly, connecting to its edge, so.
Try to space these first petals somewhat evenly around the circle. You might draw four or five of them to begin with, depending on the type of flower you are picturing. Each petal should have a rounded outer edge and narrow a bit as it reaches the center, you know.
Do not make them all exactly the same size or shape. Flowers in nature are not perfectly uniform, and a little variation makes your drawing look more natural and interesting. This is where your flower really starts to come to life, as a matter of fact.
These initial petals form the front-facing part of your flower. They give it its main character and shape. Take your time with this step, focusing on the curve and placement of each one, anyway.
Building More Petals
Once you have your first layer of petals, it is time to add more depth to your flower. Draw another layer of petals behind the first ones. These new petals should appear in the gaps between the front petals, giving a fuller look to your flower, you know.
These back petals will often be partly hidden by the front ones, so you will only draw the parts that show. This layering technique helps create the feeling of a real flower with many petals. It adds a lot of visual interest and makes your flower look more complete, too.
You can add a third layer if you want your flower to look even more full and lush. Just keep adding petals in the spaces, making sure they seem to be coming from behind the existing ones. This process is quite satisfying as you watch your flower grow on the page, more or less.
Experiment with different sizes and shapes for these back petals. Some might be wider, some a little narrower. This variety makes your flower feel more organic and less like a cookie-cutter design. It is all part of making your drawing unique, pretty much.
Drawing Leaves and Details
After you have drawn the main flower head, adding leaves and other small details really brings your drawing together. These elements give your flower a setting and make it feel like it is part of a bigger plant. They add context and a touch of realism, you know.
Leaves are a big part of a flower's appearance. They provide balance to the bloom and make the stem look less bare. Thinking about where the leaves would naturally grow on a stem helps you place them well, so.
Details like veins on leaves or a textured center for the flower can make a big difference. These small additions turn a simple drawing into something more captivating. It is these little touches that often make a drawing stand out, anyway.
This section will guide you through adding these important elements. You will see how much they enhance the overall picture. Remember, you can always adjust things as you go, that is the beauty of drawing, honestly.
Creating the Leaves
To draw the leaves, pick a spot along the stem where you want them to grow. You can draw one leaf or a pair of leaves, as this tutorial shows how to draw a flower with a stem and a pair of leaves. Start by drawing a curved line extending from the stem, you know.
Then, draw another curved line that meets the first one at a point, forming the leaf shape. Most leaves have a slightly pointed end and a wider middle. You can make your leaves rounder or more elongated, depending on the kind of flower you are drawing, pretty much.
Inside each leaf, draw a central line running from the stem to the tip. This is the main vein. From this central line, you can add smaller, diagonal lines branching out. These are the smaller veins, and they give the leaf a more realistic texture, so.
Think about the direction the leaves would naturally face. Some might point upwards, others might droop a little. Adding this kind of natural movement makes your drawing feel more alive. It is a small detail that makes a big visual impact, in a way.
Final Touches and Shading
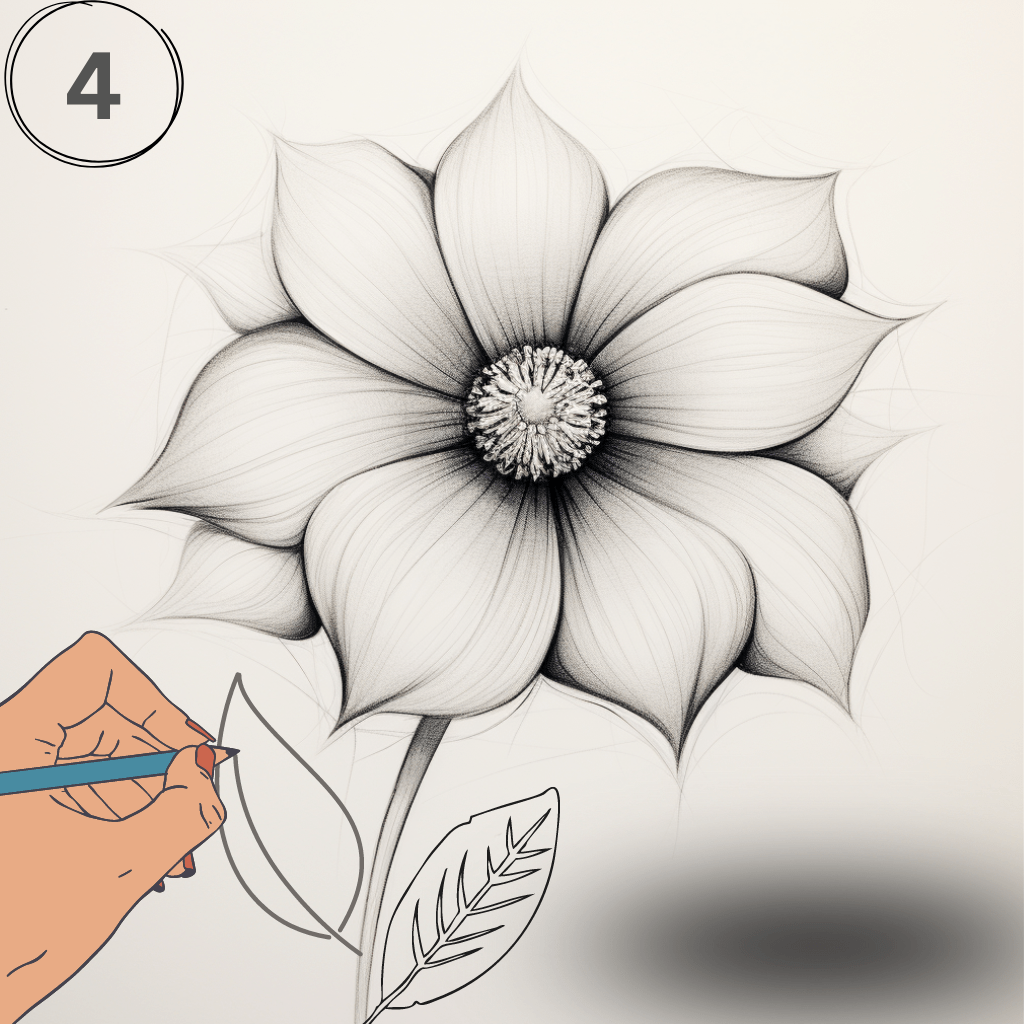
With the leaves in place, it is time for the final touches. Look at your drawing and gently erase any pencil lines that are no longer needed, like the initial center circle that might be peeking through. This cleans up your work, you know.
Now, you can add some shading to give your flower more form. Think about where a light source might be coming from. Areas that are further from the light or are overlapped by other petals would be a bit darker. Use light, gentle strokes with your pencil to add these darker areas, more or less.
For the center of the flower, you can add small dots or a swirling pattern to give it texture. This makes the middle part look more interesting and less flat. Similarly, add some light shading along the stem and under the leaves to give them a rounded appearance, too.
These illustrated tutorials are easy to follow and will help you draw beautiful roses, lilies and more! Remember, shading does not have to be perfect. Even a little bit of shading can make a drawing pop and give it a three-dimensional feel, you know, and it's almost a magical transformation.
Drawing Different Flower Types
Once you have a good handle on the basic flower shape, you can start to draw a rose, tulip, dandelion, and more. The principles you have learned about centers, petals, and stems apply to many different kinds of flowers. It is all about adjusting those basic shapes, you see.
Each flower has its own unique character, but the underlying structure is often quite similar. By understanding how to build a flower from simple components, you gain the ability to tackle a wide range of blooms. It is a very empowering skill to have, honestly.
Do not be afraid to look at pictures of real flowers for inspiration. Notice how their petals are arranged, the shape of their leaves, and how their stems curve. Observing nature is one of the best ways to improve your drawing, pretty much.
These step by step guides made for beginners make it simple to explore various flower types. You will find that with a little observation and practice, you can capture the essence of many different flowers on your paper, too.
How to Draw a Rose
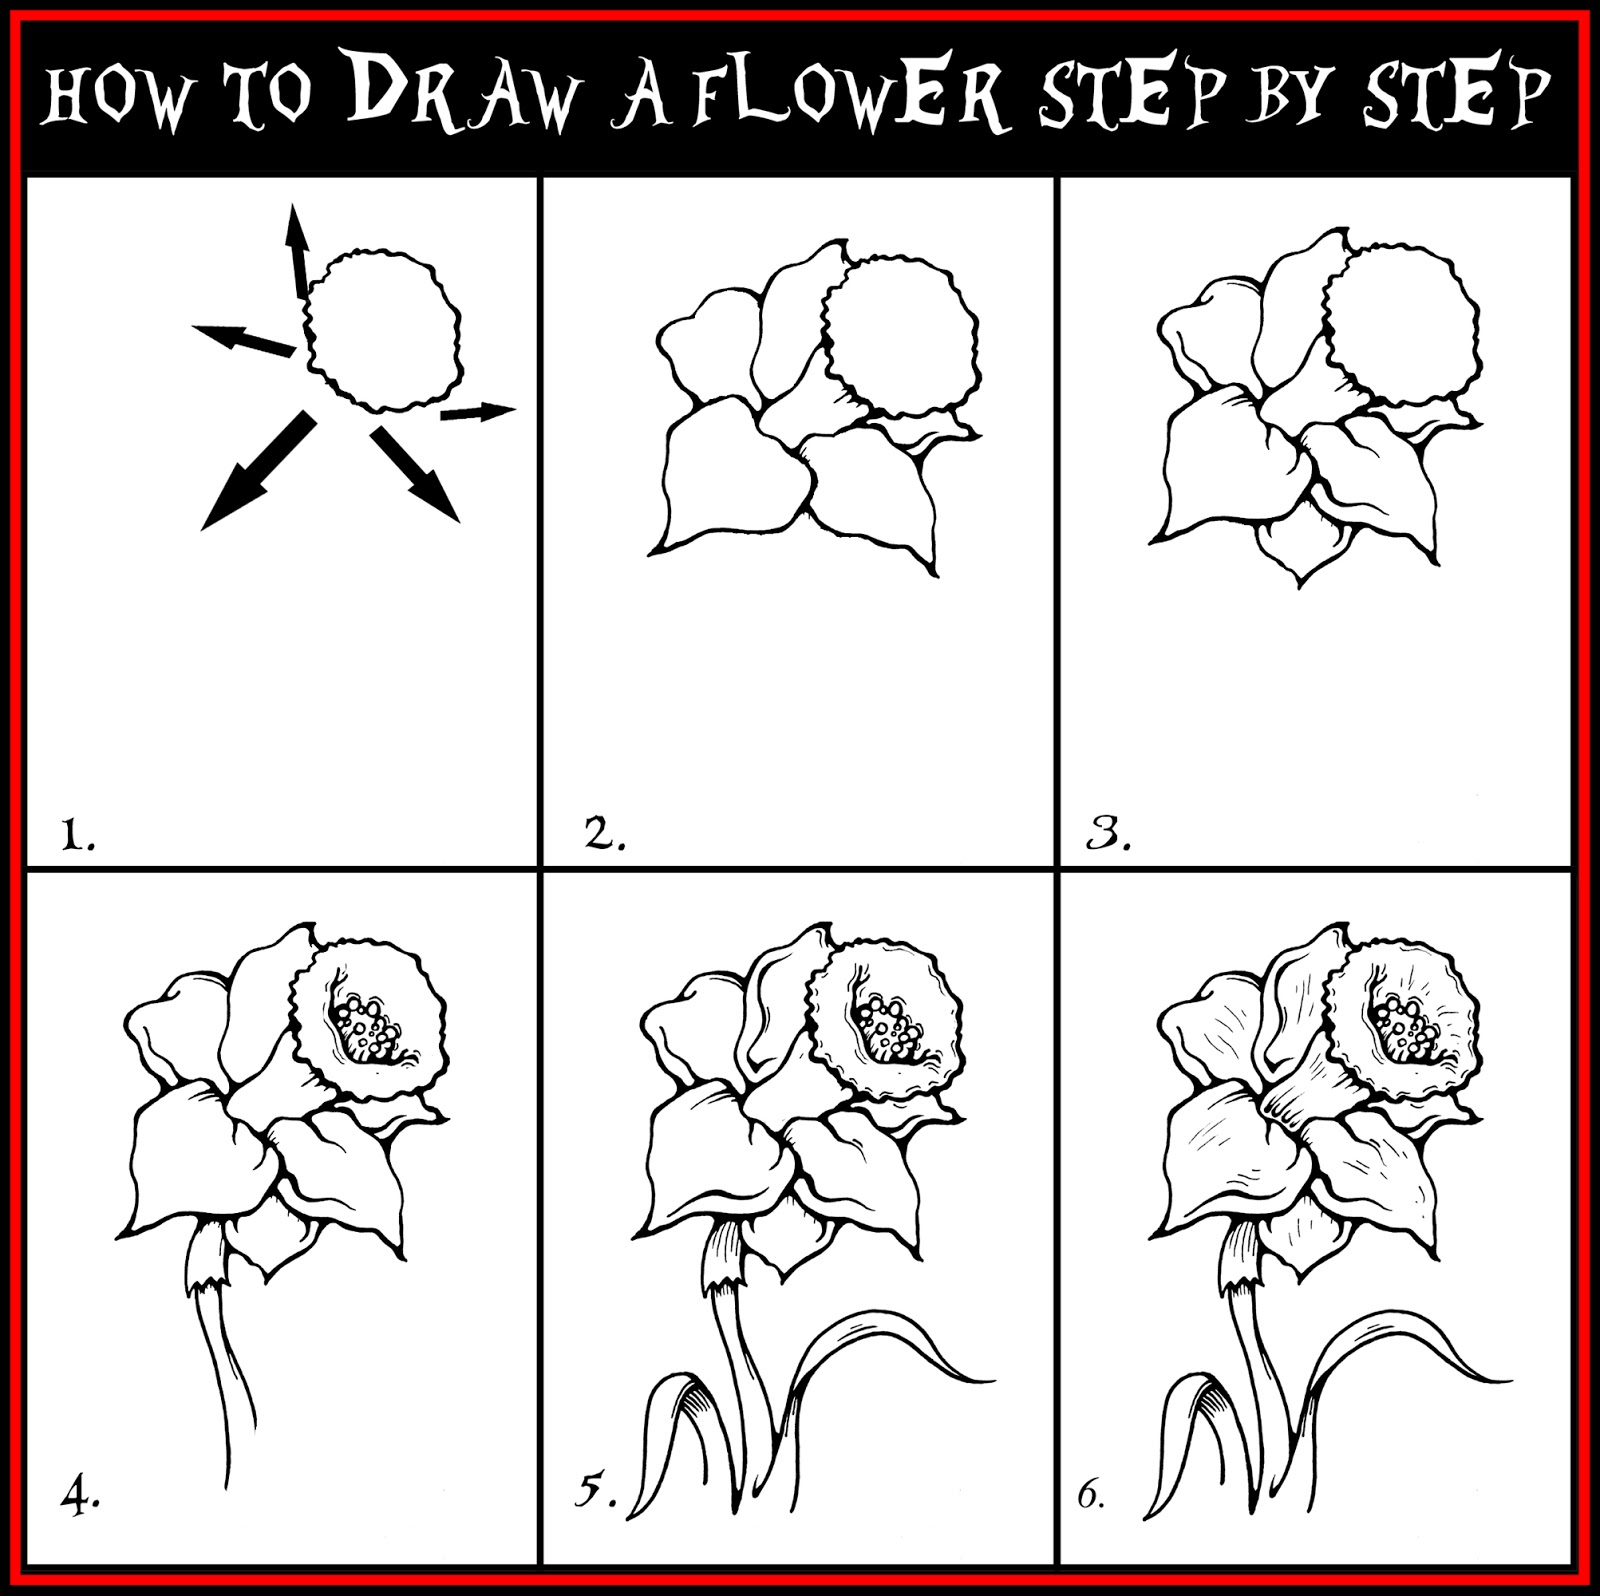
Drawing a rose can seem complicated because of all its petals, but it is easier than you might think. Start with a small spiral or a tight curl in the center. This will be the very heart of your rose, you know.
Around this central spiral, draw small, overlapping C-shaped curves. These curves will form the first layer of petals. Make them slightly irregular, as real rose petals are not perfectly symmetrical. This helps create that natural, soft look, so.
Continue adding more layers of these C-shaped petals, making them larger as you move outwards from the center. Each new petal should overlap the previous ones, giving the rose its characteristic full appearance. Remember to vary their size and angle a little, anyway.
Once you have enough petals, you can add the stem and some thorns if you like. Roses often have a few small, jagged leaves too. This easy guide will teach you how to draw a flower step by step, including more detailed ones like roses. You will be so proud of your drawing, you know.
Drawing a Simple Tulip
Tulips are known for their elegant, cup-like shape, and they are quite straightforward to draw. Begin by drawing an oval shape for the main body of the flower. This oval will be the general outline of your tulip bloom, more or less.
Inside this oval, draw three main petals. Two petals will curve upwards from the bottom of the oval, meeting near the top. The third petal will be in the background, showing just a little bit between the first two. This gives the tulip its signature closed look, pretty much.
Below the oval, draw a straight, sturdy stem. Tulips typically have thick, strong stems. You can add one or two long, broad leaves that wrap around the stem near the bottom. These leaves are a very distinct feature of tulips, you know.
These illustrated tutorials are easy to follow and will help you draw beautiful roses, lilies and more! A simple tulip drawing is a great way to practice smooth, flowing lines and basic petal arrangement. It is a very rewarding flower to draw, actually.
Making a Dandelion Drawing
Dandelions are a joy to draw because of their unique, fluffy appearance. Start by drawing a circle for the main head of the dandelion. This circle will be the base for all those little feathery seeds, you know.
From the center of this circle, draw many small, straight lines radiating outwards. At the end of each line, draw a tiny, fluffy shape, like a very small puff or a star. These represent the dandelion's seeds with their little parachutes. Make them quite dense, so.
Below the circle, draw a long, thin stem. Dandelion stems are usually quite slender. You can add a few jagged, lobed leaves at the base of the stem. These leaves are very distinctive and help identify the plant, more or less.
Our fun tutorials make it simple to learn how to draw beautiful flowers, even something as whimsical as a dandelion. The key is to capture that light, airy feel of the seeds. You will be so proud of your drawing, especially when you see all those tiny details come together, you know.
Learn more about flower art on our site, and link to this page drawing tips for more inspiration.
Frequently Asked Questions About Flower Drawing
People often have questions when they are just starting to draw flowers. Here are some common ones that might help you on your drawing path, anyway.
What is the easiest flower to draw for a beginner?
For a beginner, a daisy or a simple five-petal flower is often the easiest to draw. They have a clear center and petals that are usually uniform in shape and size. This makes them a great starting point for practicing your basic shapes and petal placement, you know, and it's almost like a perfect first project.
How do you start drawing a flower?
You start drawing a flower by sketching a light circle for the center and then adding a line for the stem. From there, you build outwards with basic petal shapes. This foundational approach helps you get the overall structure right before adding details, so.
Can I draw different kinds of flowers with basic shapes?
Yes, absolutely! Thankfully, by using some basic shapes and putting in a little bit of practice, you can draw any kind of flower in nature in just a few steps. All flowers, no matter how complex they look, can be broken down into simpler forms like circles, ovals, and curves, pretty much.
- Red Hot Chili Anthony Kiedis
- What Does Oc Mean
- Cách Tạo Tài Khoản Flow
- Black People With Blue Eyes
- Eso Si Que Es
How to Draw a Flower for Kids - How to Draw Easy
DARYL HOBSON ARTWORK: How To Draw A Flower Step By Step Drawing Guide
How to Draw a Flower: A Beginner's Guide - Full Bloom Club
