Discover How To Make A Paper Snowflake: Easy Steps For Beautiful Winter Decor
Learning how to make a paper snowflake can truly brighten up your winter days, you know. It's a simple, pretty much timeless craft that brings a little bit of magic right into your home, actually. Anyone can do it, regardless of their crafting experience, and the results are often quite lovely.
There's something really satisfying about taking a plain piece of paper and transforming it into something delicate and unique, in a way. This activity, you see, taps into a kind of creative spirit, letting you bring forth something wonderful with just your hands and a few basic tools. It's about the joy of making, which is a feeling many people really appreciate.
Today, we're going to walk through all the steps, from choosing your paper to making those first cuts, so you can create your own stunning paper snowflakes. We'll cover everything you need to know to get started and even offer some ideas for making your designs truly special, just like you might find in a maker's workshop.
- The Big Comfy Couch
- Four Seasons Orlando Baby
- Itscarlyjane Leaks
- What Is The Healthiest Energy Drink
- Sid From Toy Story
Table of Contents
- Why Make Paper Snowflakes?
- What You'll Need: Gathering Your Supplies
- The Core Steps: How to Make a Paper Snowflake
- Beyond the Basics: Advanced Snowflake Ideas
- Common Questions About Paper Snowflakes
- Displaying Your Paper Art
- The "Make" Philosophy: More Than Just a Craft
- Conclusion
Why Make Paper Snowflakes?
Making paper snowflakes is a rather simple activity, yet it offers so much more than just a decoration, you know. It's a chance to slow down, to engage your hands, and to see a creation come to life from humble beginnings. This craft, quite frankly, connects us to a long tradition of people making beautiful things for their homes and for celebrations.
The Simple Joy of Creation
There's a real satisfaction that comes from bringing something into being, isn't there? Just like the meaning of "make" involves bringing something into being by forming, shaping, or altering material, crafting a paper snowflake is a perfect example of this. You start with a flat sheet, and through a series of folds and cuts, you produce a delicate, intricate design, actually. It's a quiet victory, a small act of creation that can brighten your day.
This hands-on process, too, offers a wonderful way to relax and focus your thoughts, in a way. It's a mindful activity that allows you to step away from screens and engage with something tangible. Many people find this kind of creative outlet very calming, almost meditative, you could say, especially during busy times of the year.
- Bulgarian Split Squat Form
- John Tee Artist
- Green Tea Shot Recipe
- Dr Pepper Creamy Coconut
- How Many 0 For Billion
A Touch of Winter Magic
Paper snowflakes, you see, are pretty much synonymous with winter and the festive season. They instantly evoke feelings of coziness and wonder, transforming any space into a charming winter wonderland. Hanging them up, or just having them around, really does add a special, handmade touch to your home, making it feel more personal and warm.
They're also a fantastic way to involve everyone in some creative fun, you know. Kids and adults alike can enjoy the process, and each person's snowflake will be truly unique, just like real ones. It's a lovely shared experience that can create lasting memories, and it’s a very low-cost way to get creative together.
What You'll Need: Gathering Your Supplies
One of the best things about learning how to make a paper snowflake is that you really don't need much, which is great. The supplies are simple, readily available, and probably already in your house, actually. This makes it an accessible craft for nearly anyone, at any time.
Choosing the Right Paper
The type of paper you pick can make a bit of a difference in your final snowflake, so keep that in mind. Standard printer paper, the kind you use every day, works perfectly well for beginners, of course. It's easy to fold and cut, and it's usually on hand.
If you're feeling a little more adventurous, or just want a different look, consider other options, you know. Thin construction paper or even pretty wrapping paper can add color and texture. Just remember, thicker paper can be harder to fold precisely and cut through multiple layers, so perhaps start with something lighter, especially if you’re just beginning.
For a truly delicate look, some people like to use tissue paper, but that can be quite challenging to cut without tearing, so it's probably best for someone with a bit more practice. Anyway, the key is to choose something you're comfortable working with, something that feels good in your hands.
Essential Tools for Cutting
When it comes to cutting, you basically only need one main tool: scissors. Good, sharp scissors are pretty important here, actually. They allow for clean cuts and help you create those intricate patterns without fraying the paper, which can be frustrating.
Small craft scissors or even nail scissors can be really helpful for making tiny, detailed cuts, you know. This is especially true as you get more comfortable and want to try more complex designs. Just make sure whatever scissors you use are comfortable in your hand and sharp enough for the job.
A pencil might also be handy, just for lightly sketching out your designs before you cut, if you want. This can give you a bit more confidence and help prevent any accidental snips that you didn't mean to make. And a flat surface, like a table, is pretty much essential for folding and cutting neatly, of course.
The Core Steps: How to Make a Paper Snowflake
Now, let's get to the heart of it: the actual process of making these lovely decorations. The magic truly happens in the folding and cutting, you know. Once you get the hang of the basic folds, the possibilities for design are nearly endless, which is rather exciting.
Folding Your Paper: The Foundation
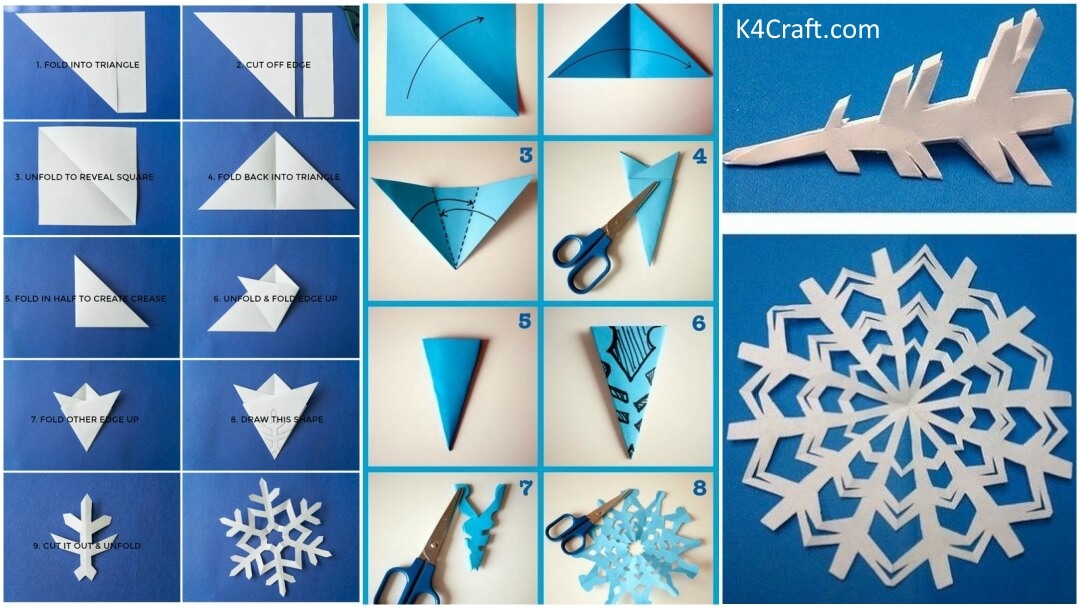
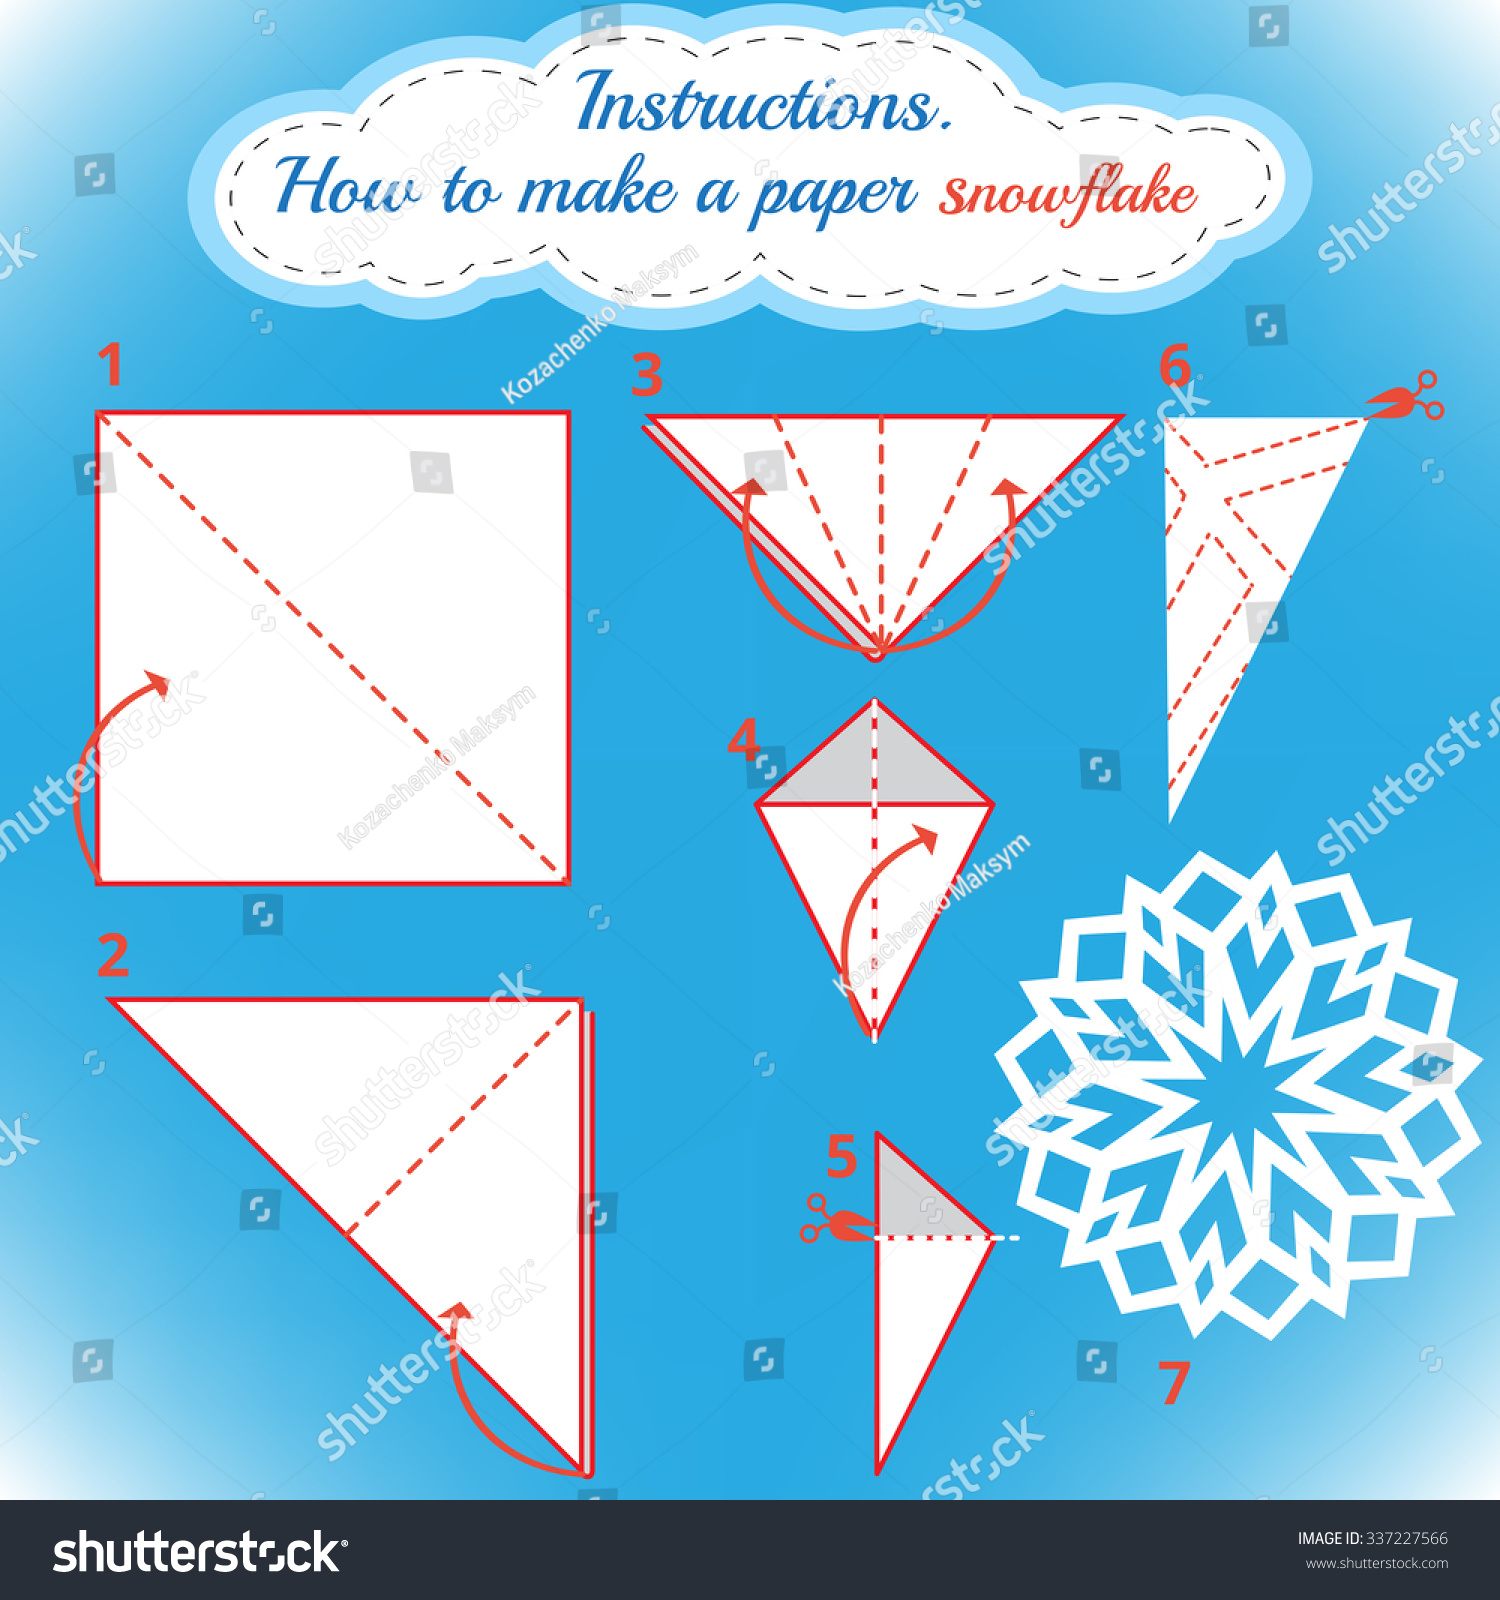
The way you fold your paper is pretty much the most important part of getting that classic snowflake shape. A good, symmetrical fold is what allows your cuts to create a balanced design, so pay attention here. We're aiming for a six-sided snowflake, which is the traditional and most recognized form, actually.
Step 1: Start with a Square
First off, you need a perfect square piece of paper, you know. If you're starting with a standard rectangular sheet, like printer paper, you'll need to make it square. To do this, simply take one corner and fold it diagonally across to the opposite edge, lining up the sides perfectly. You'll create a triangle with a rectangular strip left over. Cut off that rectangular strip, and you're left with a perfect square. This is a pretty common first step in many paper crafts, actually.
Step 2: Fold into a Triangle
Once you have your square, fold it in half diagonally to form a large triangle, so. Make sure the edges meet up neatly, and press down firmly to create a crisp crease. This fold is pretty important for setting up the symmetry of your snowflake, you see.
Step 3: Fold Again for Symmetry
Now, take that large triangle and fold it in half one more time, making a smaller triangle. Again, ensure your edges are perfectly aligned, and really press that fold down. The more precise your folds are, the more symmetrical and pleasing your final snowflake will turn out, which is something you'll definitely notice.
Step 4: The Final Fold
This is arguably the trickiest part for some, but it's really not that bad. You need to divide your triangle into three equal sections, more or less. Imagine cutting a pizza into three slices. Take one point of your small triangle and fold it over towards the opposite side, aiming for a third of the way across. Then, take the other point and fold it over to meet the first fold, forming a kind of cone shape. You should have three layers of paper stacked together. This specific fold is what gives you the six points of a traditional snowflake, so it’s pretty crucial.
It might take a little practice to get this fold just right, and that's totally okay, you know. Don't get discouraged if your first few attempts aren't perfect; it's all part of the learning process. The goal is to have a narrow, somewhat pointed shape with all the paper layers neatly stacked for cutting.
Making Your Cuts: Designing Your Snowflake
With your paper folded, the real fun begins: cutting out your design! This is where your creativity truly gets to shine, actually. There's no single "right" way to cut, so feel free to experiment and make it your own, you know.
Experimenting with Shapes
Think about the edges of your folded paper. You can cut small triangles, curves, or even tiny squares from these edges. Remember that whatever you cut from the folded edges will repeat around the entire snowflake when you unfold it, so that's pretty cool. Try making cuts along the long, open edge, and also along the shorter, folded edges. You can even snip off the very tip of your folded paper to create a hole in the center of your snowflake, which is a nice touch.
Don't be afraid to try different things, you know. A little snip here, a longer curve there – each cut contributes to the overall pattern. The beauty of paper snowflakes is that every single one is unique, a direct result of your personal choices and how you decided to cut. It's a bit like an artistic discovery with each piece.
Tips for Unique Designs
For truly unique designs, consider varying the size and shape of your cuts, you know. Mix small, sharp points with gentle, flowing curves. Don't cut too much from any one area, or your snowflake might become too fragile and tear easily, which would be a bit of a shame after all that effort. Leave enough paper to hold the design together, so that's something to keep in mind.
You can also try making cuts that don't go all the way through the paper, leaving small "bridges" that connect different parts of your design. This can create some really interesting negative space and add complexity. Just be careful when unfolding, as these delicate connections can be a little fragile, you know. A good idea is to look at real snowflakes for inspiration; their natural patterns are incredibly varied and intricate, offering endless ideas for your own paper versions.
Beyond the Basics: Advanced Snowflake Ideas
Once you've mastered the basic technique, you might want to try some more involved projects, which is pretty natural. There are many ways to take your paper snowflakes to the next level, making them even more impressive and decorative, you know. These ideas can really add a touch of flair to your winter crafting.
Layered Snowflakes for Depth
To create a snowflake with more depth and visual interest, you could try layering. This involves making two or three snowflakes of slightly different sizes and perhaps even different colors, actually. Then, you carefully stack them on top of each other, securing them in the center with a tiny bit of glue or tape. This technique really gives your snowflake a three-dimensional quality, making it stand out.
You can experiment with how the patterns align, you know. Maybe offset them slightly to show off the different designs, or line them up perfectly for a more unified look. Using different shades of white or even light blues can also add a subtle, sophisticated touch to your layered creations, so that's something to consider.
Adding Glitter and Embellishments
For a truly sparkling snowflake, a little bit of glitter can go a long way, you know. After you've unfolded your paper snowflake, carefully apply a thin layer of craft glue to certain areas or edges, then sprinkle fine glitter over it. Shake off the excess, and you'll have a snowflake that shimmers and catches the light, which is pretty magical.
Other embellishments could include small sequins, tiny beads, or even a light spray of iridescent paint. Just be mindful not to weigh down your delicate paper creation too much, you know. The goal is to enhance its beauty, not to overwhelm it. These little touches can really make your snowflakes pop, especially when hung near a light source.
Theme-Based Snowflakes
Who says snowflakes have to be just traditional patterns? You can actually create theme-based snowflakes by incorporating specific shapes into your cuts, you know. For instance, you could try cutting out tiny hearts, stars, or even little animal silhouettes into your folded paper. This takes a bit more planning and precision, but the results can be truly delightful.
Imagine a snowflake with tiny reindeer, or perhaps little Christmas trees, integrated into its design. This is a wonderful way to personalize your decorations and make them truly unique to your taste or a specific event, so that's a fun idea. It shows a bit more thought and creativity, which people often appreciate.
Common Questions About Paper Snowflakes
People often have a few questions when they first start making paper snowflakes, and that's completely normal, you know. Here are some common things folks wonder about, along with some helpful answers.
How do you make a paper snowflake stay flat?
- Birthday Gift For Mom
- Kelsey Chow Movies And Tv Shows
- 1 0 6 And Park
- How Did Coach Wall Die
- American Actor Ray Liotta
How to Make Easy Paper Snowflakes - Step by Step Tutorials - Kids Art
Instructions How To Make Paper Snowflake. Tutorial Christmas Snowflake
:max_bytes(150000):strip_icc()/origami-snowflake-04-599ab3d3845b34001115da71.png)
How to Make an Origami Snowflake
